

AI Thumbnail Feedback: Workflow Automation
If I want better thumbnail results, I need a repeatable loop - not guesses. The core process is simple: I make 5–8 thumbnail versions, screen them with a short checklist, test up to 3 in YouTube, wait for at least 1,000 impressions per version over 48–72 hours, then use CTR, watch time per impression, and 30-second retention to decide what to change.
A few numbers make the case fast:
- Custom thumbnails average 8% CTR vs. 3% for auto-generated frames
- Face expression changes can lead to an 88% relative CTR difference
- A file should be 1,280×720 px and under 2 MB
- A thumbnail should be reviewed again around 14 days after upload
- A common trigger is CTR 10% below baseline or under 4.0%
Here’s the workflow in plain English:
- I map my current steps and log where time gets lost
- I standardize inputs like title, brand colors, subject, and emotion
- I generate several thumbnail options in ThumbnailCreator
- I cut weak drafts with a pass-fail review
- I run YouTube Test & Compare
- I log results in a spreadsheet
- I send weak performers back for another round
- I turn winning patterns into new prompts and saved templates
One thing matters most: YouTube does not judge thumbnails on CTR alone. It looks at watch time per impression too. So the best thumbnail is not just the one that gets the click - it’s the one that leads to better viewing.
Below, I’ll break this into a simple workflow I can run every week without second-guessing each upload.
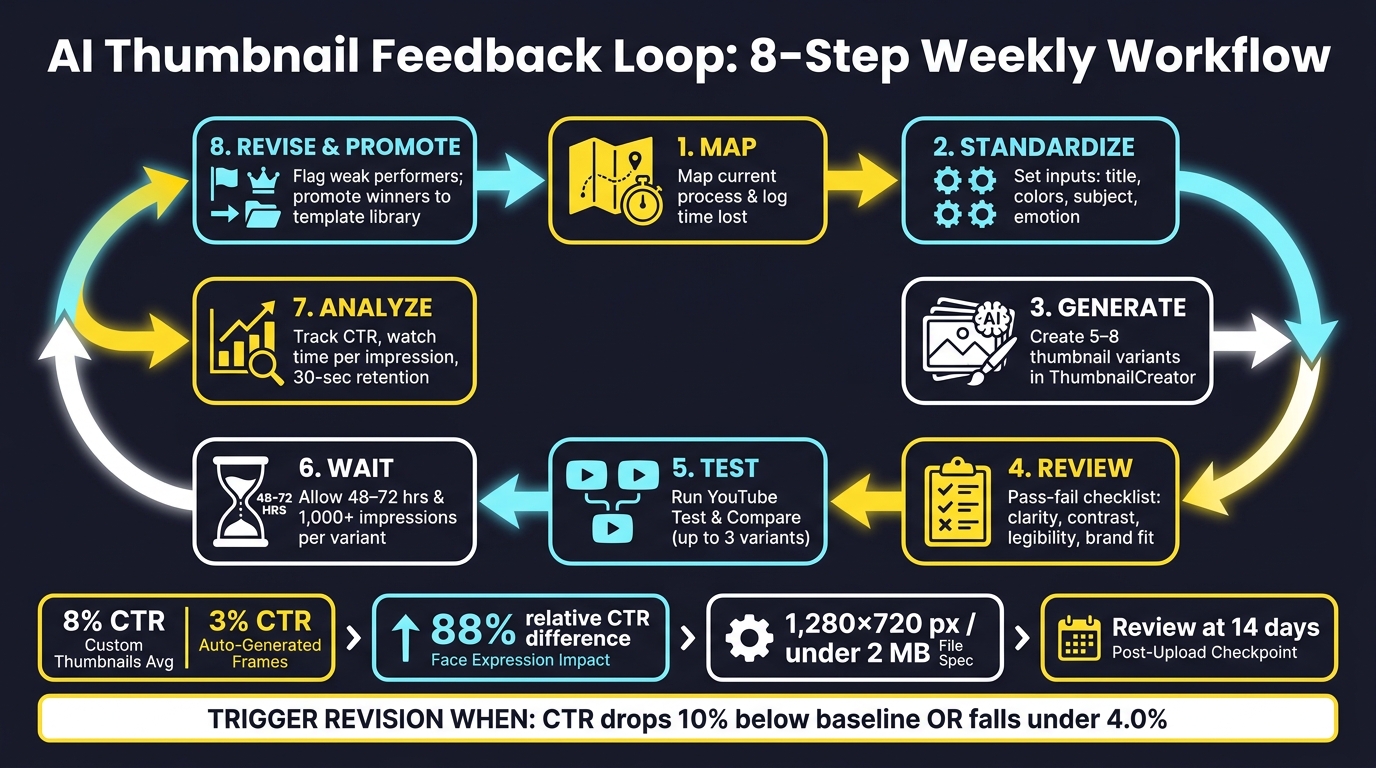
AI Thumbnail Feedback Loop: 8-Step Weekly Workflow
My Secret AI Workflow for Viral YouTube Thumbnails
sbb-itb-b59debf
Map Your Current Manual Thumbnail Revision Process
Before you automate thumbnail feedback, map the manual process you're replacing. Most teams follow a similar path: research, thumbnail ideas, design, upload, performance check, and revision. Design usually takes the most time because that's where the image gets built, text gets added, and everything has to stay readable on a phone screen.
Export is its own step too. That usually means saving a JPG or PNG at 1,280×720 pixels and under 2 MB.
Put each step into a simple spreadsheet with columns for task, owner, tool, and time. Then track how long each step takes. This makes bottlenecks hard to miss. Once the process is on paper, the slow parts tend to stand out fast.
Find the Slow and Inconsistent Steps
After you map the workflow, look for two things:
- Steps that take the most time or have the biggest swings in timing
- Steps where quality changes from one video to the next
A common bottleneck is slow designer feedback. If a designer works in batches, your revision may sit for days before they even start it. Then vague notes in Slack or email can trigger another round of back-and-forth before anything gets changed. While that drags on, the video is already live and losing impressions.
The other issue is inconsistency. When each thumbnail starts from zero, fonts, color palettes, and logo placement can drift from video to video. That makes your brand less recognizable in the recommendations feed. It also makes performance harder to compare across videos because the inputs keep changing.
Any step that repeats, stalls, or changes based on who handles it is a good fit for AI support.
A step needs attention when low CTR leads to guesswork instead of a rule. Set a clear trigger so revision calls happen the same way each time. That process map helps you see which parts can be standardized before AI handles the repetitive work.
Build an AI-Assisted Thumbnail Workflow You Can Repeat
Set up a thumbnail workflow that works the same way every time. The goal is simple: remove guesswork. Before you generate anything, start with a one-page brief.
Standardize Your Inputs Before AI Generation
Most bad AI thumbnails don’t come from the tool itself. They come from fuzzy prompts.
Use a short thumbnail brief with the same fields every time. At a minimum, include:
- Final video title
- One sentence on what the viewer wants
- Brand colors vs. optimized colors
- Preferred font style
- Logo placement rules
- The main subject - the creator’s face, a product, or a metric like $10,000/month
- The emotional goal - curiosity, urgency, relief, or surprise
Attach that brief to the video task so nothing gets missed.
When your inputs stay consistent, your outputs are easier to compare. That makes it much easier to judge performance without changing too many variables at once.
Use ThumbnailCreator to Generate and Revise Variants Faster
Once you have a solid brief, ThumbnailCreator can turn it into several usable thumbnail ideas in minutes. Create 5–8 variants, each built around a different hook angle. For example, make one that leans on a metric, one centered on the creator’s face, and one focused on the problem the video solves.
Use text editing, face swapping, object swapping, and templates to test the hook, emotion, and layout without starting from zero each time. Face swapping matters in particular because extreme versus neutral expressions produce an 88% relative CTR difference.
Review Each Draft with a Simple Pass-Fail Rubric
After generation, score each draft against the same checklist before testing anything.
- Subject clarity - One clear subject, with no competing elements
- Mobile legibility - All words should be readable at thumbnail preview size
- Contrast - Clear separation between foreground and background
- Emotional cue - The expression should match the video’s promise
- Brand fit - Colors, fonts, and logo placement should match your channel style
If a draft fails two or more checks, revise it in ThumbnailCreator or cut it. Only test thumbnails that clear your baseline. That way, your data stays easier to compare.
Once you have your finalists, test them in YouTube and only make changes when the numbers give you a reason to do it.
Automate Testing, Performance Tracking, and Revision Decisions
Run Structured Thumbnail Tests in YouTube
Once you’ve picked your finalists, shift from scoring to live testing. In YouTube Studio, use Test & Compare to test up to three finalists at the same time. YouTube splits impressions evenly across each version.
Here’s the part that trips people up: YouTube doesn’t pick a winner based on CTR alone. It uses watch time per impression. So a thumbnail might pull more clicks, but if people drop off early, that version may still lose.
Let each test run for 48–72 hours. And don’t call it too early. Wait until each variant has at least 1,000 impressions before making a decision.
Track CTR, Impressions, and Early Watch Signals
Pull your numbers from the Reach and Engagement tabs in YouTube Analytics. Then log every test in a spreadsheet. At a minimum, track the video title, thumbnail variant, start date, impressions, CTR, and 30-second retention. Use U.S. date and number formatting.
Add one calculated column that compares each thumbnail’s CTR against your 28-day channel average. Then set up conditional formatting so the sheet automatically highlights any thumbnail that beats that average by 20% or more. After a few rounds, patterns start to show up. You’ll see which styles keep winning instead of relying on gut instinct.
Those numbers should guide the next edit. If a test underperforms, change the hook, the layout, or the text based on what the data points to.
Set Rules That Trigger a New Revision Cycle
Set a few simple rules so you can review thumbnails on a weekly schedule without overthinking it. A good starting point looks like this:
- CTR threshold rule: If a video’s CTR drops 10% below your channel baseline or falls under 4.0%, send it to a revision queue.
- Time-based review: Check every thumbnail again 14 days after upload, when impressions are stable enough for a fair read.
- Layout promotion rule: If one template delivers CTR that is at least 20% above your channel average across three or more videos, move it into your preferred template library in ThumbnailCreator for future use.
When a video gets flagged, open ThumbnailCreator, make 3–5 new variants based on patterns from past winners, and run another structured test. The process is simple: flag, generate, test, log, promote. It runs on a schedule, not on hunches.
Those flags then feed the next revision round.
Improve the System Over Time
Review Past Winners to Refine Future Prompts and Templates
Use your logged CTR, impressions, and retention data to spot patterns. After you’ve run enough tests, go back and study your top thumbnails. The goal is simple: find rules you can use again, not one-off wins.
Pay attention to patterns that keep showing up in your best performers, like face placement, text length, and background contrast. If the same choices appear across multiple winners, that’s not luck anymore. That’s a rule you can work with.
Then turn those rules into your next set of prompts. Skip vague directions like “make it eye-catching.” Be specific instead: “close-up face, bold yellow text, dark background, no more than four words.” Put those constraints into ThumbnailCreator when you generate new versions. Over time, each new thumbnail starts from what has already worked.
Choose the Right Level of Automation for Your Channel
Match the level of automation to your channel size and how much review you want. Not every channel needs the same setup. The right choice depends on your output, team size, and how much hands-on control you want to keep.
| Workflow type | Speed | Creative control | Setup time | Best fit |
|---|---|---|---|---|
| Semi-automated | Moderate to fast | Higher | Lower | Solo creators and small teams |
| Fully automated | Faster at scale | Lower | Higher | High-volume channels and agencies |
If you run a solo channel or work with a small team, start with a semi-automated setup: AI drafts, humans approve. Go fully automated only when you have enough past data to trust rules-based decisions.
Conclusion: The Core Steps That Make the Workflow Work
Once the workflow is up and running, feed the results back into the next brief. Think of it as a loop. ThumbnailCreator handles the generation and revision steps, so the bottleneck moves from production to decision-making. Map, standardize, generate, test, revise, and repeat.
FAQs
How do I set a good CTR baseline for my channel?
Use your own channel’s past data instead of leaning only on broad benchmarks. Each month, look at your top 20 videos and see what keeps pulling people in. That’s where you’ll spot the patterns that fit your audience, not just YouTube in general.
For steadier readouts, try to get at least 1,000 impressions per variant. And while 4% to 10% CTR is often a strong range, don’t stop there. Check watch time too. A high CTR paired with a fast drop-off can mean the thumbnail got the click, but the video didn’t match what viewers expected.
What should I change first if a thumbnail gets clicks but low retention?
First, adjust the thumbnail so it lines up with the video more closely.
When a video gets clicks but people leave fast, the thumbnail and title are often promising more than the video delivers. That gap creates a mismatch right away.
Once viewers notice that the video doesn't match the first promise, they bounce. So the first thing to fix is the thumbnail.
A more honest thumbnail is usually the best first step if you want better long-term engagement.
When should I automate more of my thumbnail workflow?
Automate more of your thumbnail workflow when you need to scale output, keep branding consistent, or cut manual design time. It’s especially handy for high-volume upload schedules, where batch generation can turn out and test multiple options in under 60 seconds.
For most creators, a hybrid approach works best. Use ThumbnailCreator for AI-powered batch generation and base layouts, then spend 3 to 5 minutes checking brand fit, emotional tone, and accuracy before export.