
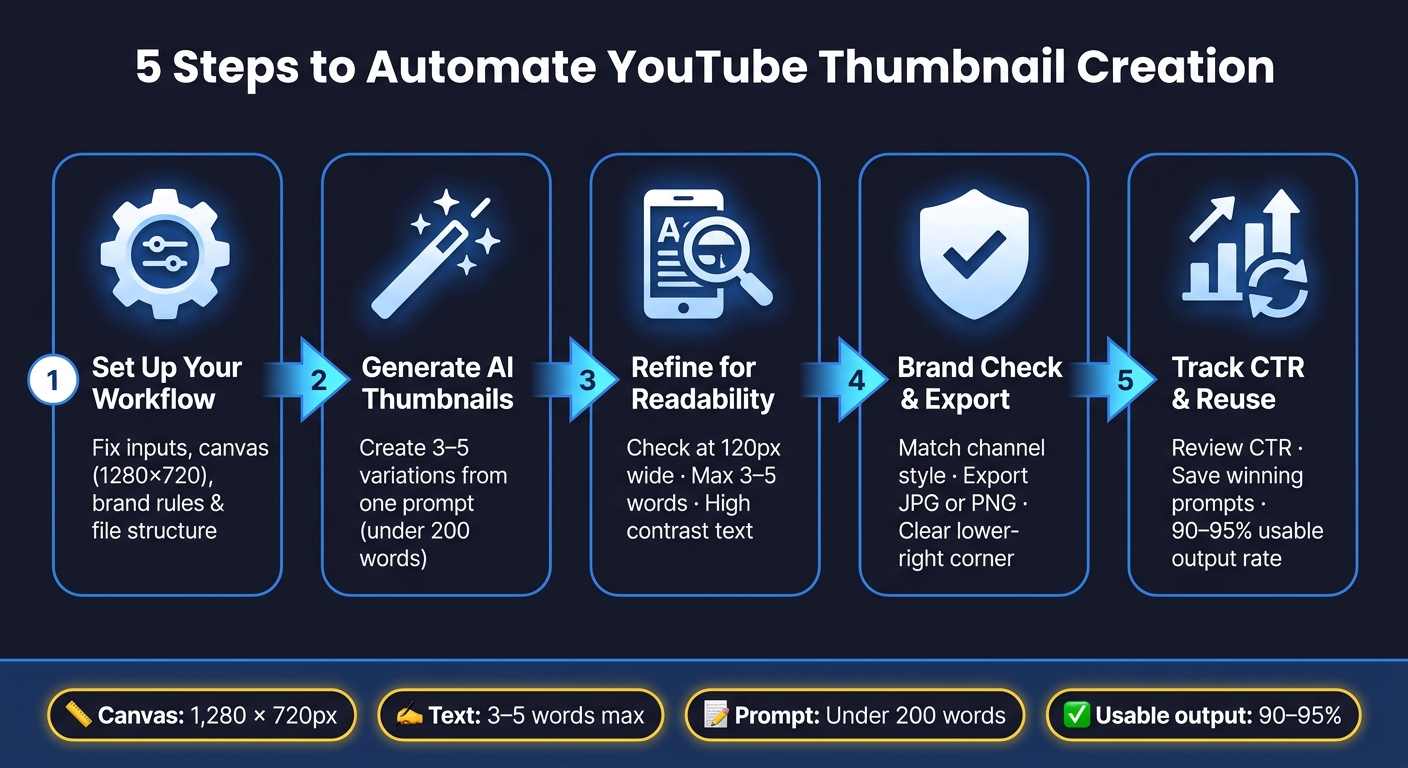
5 Steps to Automate Thumbnail Creation
If thumbnail work keeps slowing down your YouTube uploads, I’d fix it with a 5-step system: set rules, generate 3–5 options, clean up one draft for mobile, check brand fit, then track CTR and reuse what worked.
That’s the whole idea in plain English. Instead of spending 30–40 minutes staring at a blank canvas, I’d build a repeatable setup that uses the same inputs each time: title, transcript, emotion, brand colors, face photos, and a 1280×720 export size. The goal is simple: less last-minute work, steadier visuals, and thumbnails that stay readable at small sizes.
Here’s the short version:
- I start with a fixed workflow for every upload
- I generate 3–5 thumbnail versions from one prompt
- I keep text to 3–5 words
- I check readability at about 120 px wide
- I keep the lower-right corner clear for the YouTube timestamp
- I export in JPG or PNG
- I review CTR first, then save winning prompts and layouts as templates
A few numbers stand out right away:
- YouTube thumbnail size: 1,280 × 720
- Best text length: 3–5 words
- Prompt length: under 200 words
- Usable output rate once the system is set: about 90%–95%
What I like about this process is that it turns thumbnail design into a repeatable part of publishing, not a rushed task right before posting.
| Step | What I focus on | Main outcome |
|---|---|---|
| 1 | Inputs, file setup, brand rules | Less guesswork |
| 2 | Batch generation | More options, faster |
| 3 | Readability and focus | Better mobile viewing |
| 4 | Brand check and export | Ready to upload |
| 5 | CTR review and templates | Better results over time |
If I were setting up thumbnail automation today, this is the exact flow I’d use.
5-Step YouTube Thumbnail Automation Workflow
I Fully Automated My YouTube Thumbnails (No Canva)
sbb-itb-b59debf
Step 1: Set Up a Repeatable Thumbnail Workflow
Set the same inputs, file structure, and tracking system for every upload. The goal is simple: remove guesswork. Start with four fixed input groups: content, visuals, brand rules, and composition.
Define the Required Inputs for Every Video
Use one fixed input list so the AI gets the same direction each time.
| Input Category | What to Collect | Why It Matters |
|---|---|---|
| Content | Final title, transcript, topic, target emotion | Gives the AI a starting point |
| Visual Assets | Face photos, product shots, backgrounds, screenshots | Helps the AI use accurate, high-quality subjects |
| Brand Rules | Core colors, font pairings, signature style | Builds audience recognition over time |
| Composition | Text zone, subject position, pose | Cuts down decisions during generation |
Use an identity lock: repeat the subject's physical description at the start and end of the prompt. Sharma reported that this cut identity misses from 30% to 10%.
Once your prompt inputs are fixed, lock down the canvas and file structure too.
Standardize Canvas, Export, and File Organization
Set 1,280 x 720 pixels at a 16:9 ratio as the default canvas.
For file organization, keep separate folders for source images, drafts, and final exports. Then track each thumbnail in a sheet with these status labels:
new uploadthumbnail createdpublished
"The reframe that helps most: thumbnails are not deliverables attached to individual videos. They are installments in an ongoing visual series." - Dan Kim, Founder, Hooksnap
Steady branding can support stronger click-through rates. With that system in place, you can move into the first AI thumbnail batch.
Step 2: Generate the First Batch of AI Thumbnails
Generate 3–5 thumbnail versions at once, then polish the strongest one. Once your workflow is set, batch generation turns one brief into a handful of draft ideas fast.
Create Multiple Variations from One Title or Topic
ThumbnailCreator can generate 1 to 10 thumbnail variations from one text prompt or video title. Across the batch, the AI changes layout, color, emotion, and text so you can compare different hooks and angles side by side. You can also paste a URL to generate concepts from the video topic itself, not just from source frames.
A good starting point is 3–5 variations. From there, choose the best concept and tune it in the editor.
Let AI show you a few visual directions before you start editing.
Use Short Prompts That Control Subject, Layout, and Style
Use the same inputs from Step 1 so your prompts stay consistent. Try to keep prompts under 200 words and build each one around five main parts:
| Prompt Component | Purpose | Example |
|---|---|---|
| Subject | Sets the main focus and emotion | "Surprised creator holding a trophy" |
| Text | Adds the hook | "Bold white text '100K SUBS'" |
| Composition | Shapes the layout | "Subject right, text top-left" |
| Style/Mood | Sets the visual tone | "Neon blue, dark background" |
| Format | Fits the platform | "YouTube thumbnail, 16:9" |
Small details can change the result a lot. Always include "YouTube thumbnail" in the prompt so the AI frames the image for a 16:9 layout. Keep text overlays to 3–5 words max. And instead of vague terms, use emotion words like "surprised", "excited," or "curious." If you have a saved face photo, use it to keep the subject consistent across each version.
One more rule helps right away: keep the lower-right corner clear. That’s where YouTube puts the timestamp.
Next, narrow down the best draft for readability and focus.
Step 3: Refine the Best Draft for Readability and Focus
Choose the strongest draft, then give it one last pass before you publish. Start with a simple check: does the thumbnail still work on a phone screen?
Fix Text Placement, Contrast, and Spacing for Mobile Viewing
Shrink the thumbnail to about 120 px wide. If the hook gets hard to read, trim it down.
The goal is instant clarity. Someone should get the hook in under two seconds. Keep text to 3–5 words max, use high-contrast colors like white or yellow on dark backgrounds, and add a stroke or shadow so the text stands out against a busy scene.
Keep both the hook and the main subject inside the safe area. During your final review, leave the lower-right corner clear.
Use Face Swaps, Object Swaps, or Background Edits Only When Needed
If the thumbnail still feels hard to read, make one focused edit to fix that single issue. Before you change anything, ask: does this make the main message clearer in under two seconds? If the answer isn’t an immediate yes, leave it alone.
ThumbnailCreator includes tools built for this step. Face swap can help match the creator's likeness and expression to the video's emotional hook. Object swap can replace a generic element with a more specific hook. Background removal can isolate the subject when clutter pulls attention away from the main message.
Use one edit for one problem.
Once the draft reads clearly, make sure it still fits the channel brand and export settings.
Step 4: Check Brand Fit and Publishing Readiness
After the readability pass, do one last brand and export check before upload. If everything looks good, move right into export and comparison.
Confirm the Thumbnail Matches the Channel's Visual Identity
Put your draft next to a few recent thumbnails and check the basics: color, font weight, subject placement, and overall tone. The big idea is simple: does this look like it belongs on your channel?
ThumbnailCreator puts it this way:
"Design Rules let you define permanent constraints that your AI always follows - no matter what prompt you use or what style you pick. Think of them as your brand's creative guardrails."
On a day-to-day level, that means setting a few fixed rules and sticking to them. For example:
- Use the same brand colors
- Keep your preferred font style
- Place the main subject in a standard spot, like the right side of the frame
That kind of consistency makes your channel easier to spot from one upload to the next.
Verify Export Settings and Compare Final Draft Options
Before upload, make sure the file matches your YouTube preset and exports as JPG or PNG. Also check that no key detail sits under the timestamp area. It’s a small thing, but it is one of many thumbnail mistakes to avoid that can ruin an otherwise strong design.
If you made more than one version, compare them side by side using the same set of checks: This manual review is a great first step before you A/B test your thumbnails to see which one actually performs best with your audience.
| Criteria | What to Check |
|---|---|
| Subject focus | Subject stands out right away |
| Visual contrast | Contrast keeps the thumbnail clear |
| File format | Export settings are correct |
Pick the version with the clearest subject, the easiest-to-read text, and the strongest contrast. Then publish that version and save it so you can use the setup again later.
Step 5: Publish, Track Results, and Reuse What Works
Once the final thumbnail is live, stop tweaking and start reviewing performance.
Look at CTR first. Compare your results against current YouTube thumbnail trends to see how your niche is evolving. Then check subject consistency: how often the system keeps your face, colors, and layout in line from one output to the next. If the setup is dialed in, you should get usable results 90–95% of the time, which means you rarely have to start over from scratch.
Save Prompts, Layouts, and Styles as Reusable Templates
When one version performs well, turn it into your starting point for the next upload.
Save the prompt, layout, colors, and pose as a template. Save your best pose and identity-lock format as default prompt settings too. That way, you’re not rebuilding the same setup every time.
ThumbnailCreator’s Design Rules feature makes this easier. You can lock in brand colors vs. optimized styles, font style, and subject placement so new generations begin from a steady baseline.
That loop is what makes the process faster with each upload.
Conclusion: Build a Simple System You Can Repeat Every Upload
The system is simple: create, publish, measure, and reuse what works.
FAQs
How do I make AI thumbnails look consistent every time?
Use ThumbnailCreator’s Design Rules to set fixed instructions the AI follows on every thumbnail. That can include your brand colors, font picks, and where the subject should sit in the frame.
If you want your thumbnails to look consistent from one video to the next, upload a clear reference photo of your face. Then use Style Cloning with a thumbnail you already like, so new designs match the branding you’ve already built.
What should I track besides CTR after publishing?
Beyond CTR, track watch time and watch time share. YouTube favors thumbnails that don’t just earn clicks - they also keep people watching.
You should also watch impressions, average view duration, and view velocity. A thumbnail with a slightly lower CTR can still win if it sets clear expectations and leads to longer viewing.
When should I edit a generated thumbnail by hand?
Edit a generated thumbnail by hand when you want those last personal touches, like custom text, brightness tweaks, or a manual crop to clean up the composition.
AI handles most of the work. Your manual edits help dial in the small details, so the final thumbnail lines up with your vision and looks the way you want.