
How to Design Thumbnails Fast Without Design Skills
Creating YouTube thumbnails doesn’t have to be time-consuming or require advanced design skills. With ThumbnailCreator, an AI-powered tool, you can generate professional thumbnails in seconds. Here's the gist:
- Why Thumbnails Matter: 90% of top-performing YouTube videos use custom thumbnails. They can boost click-through rates (CTR) by up to 50%, directly impacting your video’s success.
- Challenges: Beginners spend 2–4 hours on a single thumbnail, or pay $25–$100 for professional designs.
- Solution: ThumbnailCreator simplifies the process. Input your video link or topic, and the AI generates multiple designs instantly. Creators like Chloe MacKenzie have cut design time from 3 hours to 30 seconds while increasing CTR by 80%.
Key Tips for Better Thumbnails:
- Use human faces with strong emotions - they increase CTR by 38%.
- Choose bright colors and high contrast to make your thumbnail stand out.
- Keep text short (3–5 words) and avoid placing it in the bottom-right corner.
ThumbnailCreator is free to try, offering 10 thumbnails at no cost. Pro and Agency plans unlock unlimited designs and advanced features for creators managing multiple channels. Ready to save time and improve your video’s performance? Start creating thumbnails today.
How To Make Thumbnails 10× Easier With AI in 2026
Core Design Principles for Better Thumbnails
Creating a thumbnail that grabs attention doesn’t require a degree in design. Instead, focus on three simple principles that can make your thumbnails irresistible to viewers.
Add Faces and Emotions
Human faces are like magnets for attention. We’re naturally drawn to them, especially when they display strong emotions like surprise, curiosity, or excitement. A face with an exaggerated expression - wide eyes, an open mouth, or a look of shock - can instantly connect with someone scrolling through their feed. Why? Because our brains process facial expressions 60,000 times faster than text.
"Thumbnail design is 80% marketing psychology, and only 20% design skill." – Thomas Frank, Creator
To get the best shot, record multiple expressions and pick the clearest frame. This approach avoids motion blur and ensures a natural, high-quality image. And don’t forget: the face should take up enough space to stand out on smaller screens like mobile devices. Close-ups are your best bet.
Choose Bright Colors and Strong Contrast
Thumbnails need to pop against YouTube’s white and dark backgrounds. Bright, saturated colors help your design stand out, and 88% of the most-watched YouTube videos feature vibrant thumbnails. Pairing high-contrast colors - like blue with orange or yellow with black - creates visual tension that naturally attracts the eye. In fact, high-contrast designs can perform up to 45% better than monochromatic ones.
For text, aim for a contrast ratio of at least 4.5:1 against the background. Adding a thin outline - such as white text with a black border - keeps the text readable, even over busy images.
| Color | Best Use Case | Why It Works |
|---|---|---|
| Red | Breaking news, reveals | Evokes urgency and excitement |
| Yellow | Tutorials, how-to guides | Feels optimistic and eye-catching |
| Blue | Educational, tech reviews | Builds trust and professionalism |
| Orange | Motivational content | Radiates energy and enthusiasm |
These color strategies and trends lay the foundation for a powerful, attention-grabbing design.
Keep Text Short and Clear
Once your visuals are set, make sure your text delivers the message quickly. Viewers scrolling through YouTube have less than a second to understand what your video is about. Stick to 3–5 words to keep the message concise and effective, especially for mobile viewers. Use bold, sans-serif fonts to ensure the text remains legible at any size.
Avoid placing text in the bottom-right corner - YouTube’s timestamp will cover it up. Instead, position your text along the top or left side, following a natural Z-pattern that guides the viewer’s eye. Clear, well-placed text complements your visuals and helps drive clicks.
How to Start Using ThumbnailCreator
Getting started with ThumbnailCreator is quick and easy - no design skills needed. This platform is tailored for creators who want fast results, and it’s already trusted by over 15,000 creators to design thumbnails that drive engagement.
Create Your Account
Head to ThumbnailCreator and click the "Create Your First Thumbnail Free" button to join the Free plan. As a new user, you’ll get 10 free thumbnails to test the platform and explore its features. Once you sign up, you’ll be directed to the main dashboard, where you can dive into your first project immediately.
Main Features: Templates and AI Tools
One of ThumbnailCreator's standout features is its AI-powered thumbnail generation, which can produce professional-quality designs in just 30 seconds. Simply paste a YouTube video URL or type in your video topic, and the AI will analyze your content to create multiple design options instantly.
The platform also includes face-aware technology to enhance facial expressions for better viewer engagement. Want to customize your thumbnail? The built-in editor is user-friendly, allowing you to swap objects, add text, and tweak elements - all without needing complex tools like Photoshop. When your design is ready, you can upload it directly to YouTube with a single click. These features make thumbnail creation faster and more efficient than ever.
"ThumbnailCreator has saved me so much time. I used to spend 1-3 hours per thumbnail... Now, my thumbnails are finished within a few mins and they look (and convert) better as well." – Dave S Anderson, YouTube Creator
The tool is about 10 times faster than traditional design methods, cutting the average creation time from 2 hours to just 6 minutes. This is a huge advantage for creators juggling multiple videos every week.
ThumbnailCreator Plan Comparison
Choosing the right plan depends on your needs - whether you’re just testing the waters or managing multiple channels. Here’s a breakdown of the available plans:
| Plan | Price | Best For | Key Features | Thumbnail Limit |
|---|---|---|---|---|
| Free | $0 | Testing the platform | Basic templates, AI generation, limited features | First 10 thumbnails free |
| Pro | Paid monthly | Solo creators/small channels | Full template library, advanced AI tools, face/object swapping | Unlimited |
| Agency | Paid monthly | Agencies managing multiple channels | All Pro features, team collaboration tools, priority support | Unlimited |
The Free plan is ideal for exploring the platform and testing its capabilities. The Pro plan unlocks advanced tools and unlimited thumbnails, making it a great choice for consistent, high-quality production. If you’re managing multiple channels, the Agency plan offers team collaboration features and priority support to streamline your workflow. Once you’ve picked the plan that works for you, you can start creating your first thumbnail with ease.
sbb-itb-b59debf
How to Design Thumbnails with ThumbnailCreator
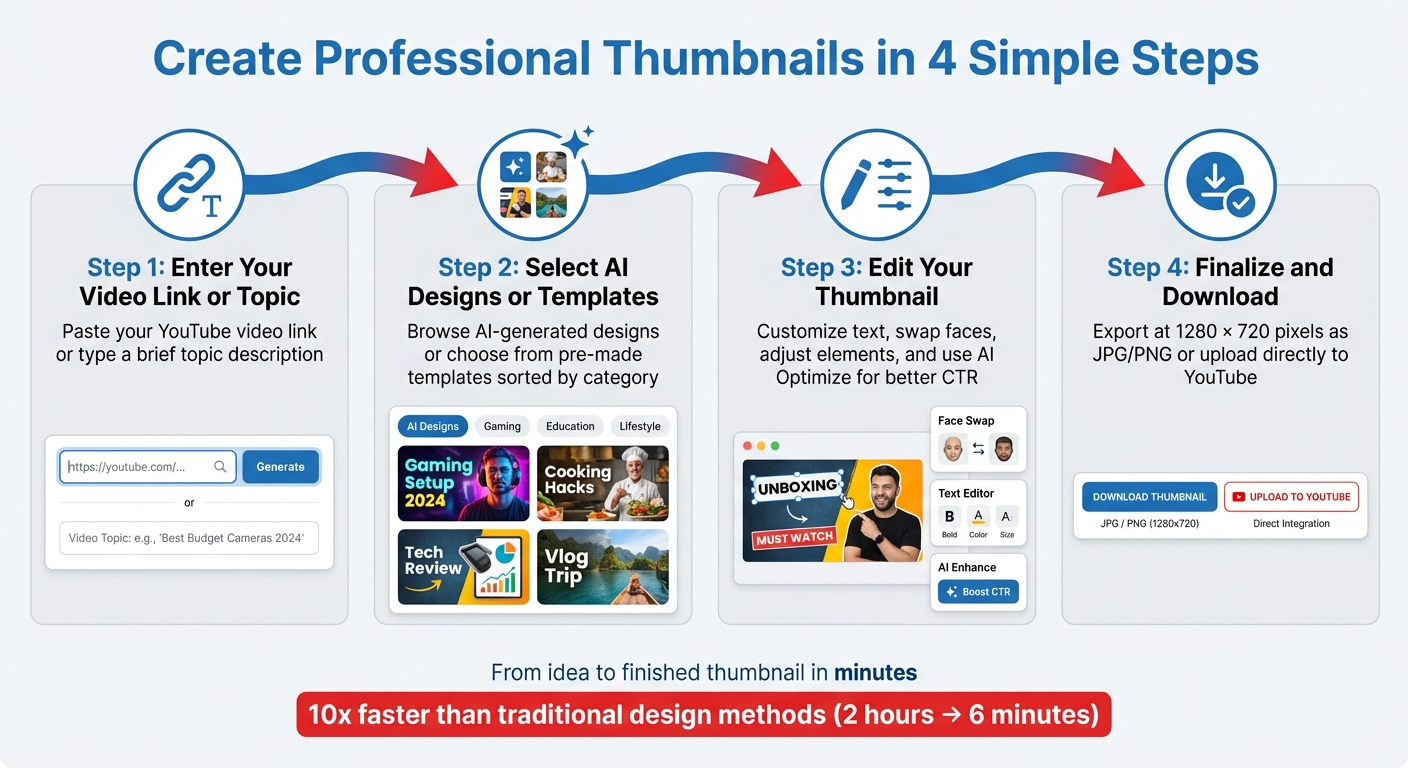
4-Step Process to Create YouTube Thumbnails with ThumbnailCreator
ThumbnailCreator makes creating eye-catching thumbnails a breeze with its simple four-step workflow. The platform takes care of the heavy lifting, allowing you to focus on your content. Here's how you can transform your idea into a polished thumbnail:
Step 1: Enter Your Video Link or Topic
Begin by pasting your YouTube video link into the input field on the dashboard. If your video isn’t live yet, you can simply type a brief, clear description of your topic. This step generates tailored design suggestions based on your input.
Step 2: Select AI Designs or Templates
Within moments, ThumbnailCreator provides several AI-generated designs tailored to your video. Browse through the options and pick the one that resonates most with your style. If none of the AI-generated designs feel like the right fit, you can explore the template library. These pre-made templates are sorted by video categories, making it easy to find a starting point that works for your content.
Step 3: Edit Your Thumbnail
Once you’ve chosen a design, customize it to align with your brand and message using the built-in editor. You can tweak text overlays to make your message pop or use the face swap tool to replace generic images with your own, ensuring the visuals feel authentic. The editor also allows you to adjust individual elements while maintaining balance in the design. For an extra touch, the AI Optimize feature fine-tunes the visuals to enhance click-through rates.
"The AI not only generates beautiful thumbnails, but it also understands what style works best for different types of videos." – Maria Reyes, YouTube Creator
Step 4: Finalize and Download
Before wrapping up, double-check that all text is legible, even in smaller thumbnail previews. When you’re satisfied, export the design at YouTube’s recommended size of 1280 x 720 pixels. You can save your thumbnail as a JPG or PNG file, or upload it directly to YouTube. With your design ready, you’re all set to grab your audience’s attention!
Tips to Improve Thumbnail Performance
After designing your thumbnail, it's crucial to test and tweak it to maximize clicks. Even minor changes can significantly influence your video's success.
Experiment with Different Templates
Create multiple thumbnail variations to see what works best. Tools like ThumbnailCreator make it simple to try out different background colors, facial expressions, and text placements. Aim to produce 2–3 distinct designs. YouTube now offers a feature in the Studio dashboard that lets creators upload multiple thumbnails for testing. This auto-test feature helps identify which version generates the highest click-through rate (CTR). Run these tests for a minimum of 72 hours, but for videos with lower traffic, extending the test to 7 days can provide more reliable insights. Testing different styles allows you to zero in on the design that resonates most with your audience.
Use AI Tools to Perfect Your Design
Once you've created several variations, refine them with AI tools. ThumbnailCreator’s AI features can help enhance details, making your designs more polished. For instance, the face-aware enhancement sharpens facial features and highlights emotions like curiosity or excitement - key elements since thumbnails featuring human faces can attract up to 921,000 additional views. Additionally, the AI Optimize feature adjusts color saturation and contrast to ensure your thumbnail pops. Always perform a "Shrink Test" (scaling the thumbnail down to 160×90 pixels) to confirm it remains clear and impactful by following a mobile thumbnail optimization guide.
Monitor Performance and Adapt
Keep an eye on your YouTube Analytics, specifically the CTR under the "Reach" tab. If your CTR falls below 2–5%, it might be time to update your thumbnail. However, high CTR alone isn’t enough - make sure it aligns with good audience retention. As the ClickyApps Team explains:
"A thumbnail that gets clicks but results in low watch time may be misleading. The winning variant should not negatively impact audience retention".
Regularly reviewing performance ensures your thumbnails align with viewer preferences. Take note of which colors, fonts, and imagery consistently perform well with your audience.
Conclusion
Making professional thumbnails doesn't require expensive software or advanced training anymore. With ThumbnailCreator's AI, you can turn a simple text description into a polished thumbnail in just minutes. It takes care of the tricky parts - like background removal, color adjustments, and layout design - so you can focus on creativity.
But even with AI handling the technical side, good design basics still matter. Stick to a few simple rules: use expressive faces, limit text to 3–5 words, and opt for bright, contrasting colors. These small choices can make a big difference in grabbing attention across screens.
Here’s how easy it is: enter your video link or topic, pick an AI-generated design or template, make any tweaks you want, and download your thumbnail. Plus, ThumbnailCreator can cut design costs by up to 90% while boosting click-through rates by an average of 50%. As Heleana Tiburca from The Brief puts it:
"Our YouTube thumbnail creator makes it so easy to make great designs without the struggle of learning graphic design".
Thumbnails are more than just visuals - they’re key to your strategy. Experiment with different designs, fine-tune them using AI tools, and keep an eye on analytics and A/B test your thumbnails to see what works best.
FAQs
How does ThumbnailCreator help boost click-through rates?
ThumbnailCreator is designed to boost click-through rates by helping you create eye-catching, professional thumbnails that draw attention and entice viewers to click. With easy-to-use design tools, it’s accessible to everyone - even if you have no prior design experience.
The platform emphasizes bold visuals, bright colors, and clear text to ensure your thumbnails pop in a crowded feed. This approach not only helps your content stand out but also increases visibility and encourages more audience engagement.
Why are human faces so effective in YouTube thumbnails?
Human faces work wonders in thumbnails because they instantly catch the eye and spark emotional reactions. We’re naturally wired to notice facial expressions - they can communicate emotions like curiosity, excitement, or surprise, which makes viewers more inclined to click.
Plus, faces create a sense of connection. They make the content feel more relatable and approachable, which often leads to better engagement and higher click-through rates.
What’s the best way to test if a thumbnail design works well?
To figure out which thumbnail design grabs the most attention, try using A/B testing in YouTube Studio. This tool allows you to test different thumbnails by comparing their click-through rates (CTR) and determining which one drives more engagement.
You can also preview your thumbnails in various sizes and formats to ensure they look eye-catching across different devices. By reviewing performance metrics and tweaking designs based on viewer behavior, you’ll get a better sense of what connects with your audience.