
How Batch Processing Speeds Up Thumbnail Design
Batch processing makes creating YouTube thumbnails faster and more efficient. Instead of designing one thumbnail at a time - which can take up to 3–4 hours - batching allows you to produce multiple thumbnails in a single session, saving up to 5 hours per week. By using templates, grouping tasks, and leveraging tools like AI, creators can maintain a consistent style, test variations easily, and focus more on content creation.
Key takeaways:
- Time Saved: 10+ thumbnails can be created in 15 minutes using batch methods, compared to hours for individual designs.
- Consistency: Templates ensure a uniform look across your channel.
- Cost Efficiency: AI tools like ThumbnailCreator reduce costs to as little as $0.10 per thumbnail.
- Mobile Optimization: Designs are tailored for YouTube’s mobile-heavy audience.
Batch processing is a game-changer for creators managing high volumes of content. It not only saves time and money but also boosts click-through rates by enabling quick A/B testing and polished designs. Tools like ThumbnailCreator streamline the process, making professional thumbnails accessible for all creators.
What is Batch Processing for Thumbnail Design?
Batch Processing Defined
Batch processing is all about tackling multiple tasks in a single, focused session, saving you time and energy in the long run. Think of it like meal prepping - spend a chunk of time upfront, and you’re set for days. When it comes to thumbnail design, this means dedicating a specific session to create several thumbnails at once.
For example, you could shoot all your headshots in one go, apply a single master template across multiple videos, or tweak text and colors for a batch of thumbnails in just minutes instead of hours.
"Dedicate a day, or even a few hours, just to thumbnails. Create multiple designs at once... It's more efficient, and lets you enter a design mindset instead of constantly shifting gears."
That’s the advice from Lydia Sweatt, Blog Manager at vidIQ.
The real game-changer here is something creators call "toggling." This involves using a master template and simply swapping out elements like text, backgrounds, or facial expressions to create variations. With toggling, you could whip up 10 different thumbnail designs in just 15 minutes - spending only 60–90 seconds per design - compared to the 3–4 hours it might take for individual designs.
This method not only saves a ton of time but also helps maintain a consistent look across your channel, which is a huge bonus for creators.
Why YouTube Creators Need Batch Processing
For YouTube creators, batch processing is a lifesaver, especially when you’re juggling a high volume of content. By grouping thumbnail tasks, you avoid the mental drain that comes with constantly switching between different activities.
Another big perk? It ensures your channel’s thumbnails have a cohesive and recognizable style. By reusing brand elements like fonts, colors, and layouts, you create a visual identity that sticks with your audience.
Batch processing is also a great tool for A/B testing. It allows you to quickly produce variations - like changing a background color or tweaking a facial expression - so you can test which designs perform best. This is especially important since YouTube’s algorithm prioritizes watch time share, not just clicks.
sbb-itb-b59debf
How to Batch Process Thumbnails: Step-by-Step
1. Gather All Your Assets First
Before diving into your design software, make sure you have everything you need for your thumbnails. Start by brainstorming 3–4 short hooks (just 1–3 words each) that add to your video titles without repeating them. Take advantage of your current filming setup to capture a series of "emotional selfies" - think shocked, confused, or excited expressions - all in one session while your lighting and camera are already set up. Build a collection of 5–10 high-quality backgrounds, such as color gradients, lifestyle images, or simple textures. Don’t forget the essentials from your brand kit: your preferred fonts, 2–3 main colors, and logos.
Pro tip: After filming your main content, keep the camera rolling to capture thumbnail poses. This lets you get natural, in-the-moment expressions without needing to recreate your setup later.
Once you’ve gathered your assets, the next step is to create templates that will save you time and ensure consistency.
2. Use Templates for Faster, Consistent Design
Templates can turn thumbnail creation into a much quicker process, allowing you to create multiple variations in just minutes. Start by setting your canvas size to 1280×720 pixels (16:9 aspect ratio) to meet YouTube’s file size requirements of under 2 MB.
Design your master file using tools like Photoshop’s "Smart Objects" or Figma’s "Components." These features let you make one change - like swapping a background or subject - and instantly apply it across all your designs. Add a safe-zone overlay to mark the lower-right corner where YouTube’s timestamp appears, so your key elements don’t get hidden.
Your template should focus on consistency. Use one bold sans-serif font, position text in the left third or bottom band (avoiding the bottom-right), and stick to 2–3 brand colors for accents and backgrounds. This approach not only saves time but also gives your thumbnails a professional, cohesive look.
3. Customize Thumbnails in Bulk
With templates in place, you can now make bulk edits to personalize your thumbnails. Adjust one element at a time - like changing text phrases, swapping background colors, or using different facial expressions - so you can pinpoint what works best. If you tweak everything at once, it’ll be harder to identify which change made a difference.
AI tools like "Magic Grab" can help you quickly remove backgrounds, making it easier to reposition your main subject consistently. Before finalizing, zoom out to 25–33% to see how your thumbnails will appear on mobile devices. Since over 70% of YouTube views come from mobile, make sure your text and visuals are clear at that smaller size.
Keep your text short - 2–4 words max - and use bold, high-contrast fonts for readability. If your designs are too large (e.g., 1920×1080), use a batch resizer to downscale them to 1280×720 and compress the file size to 90–98% JPEG quality.
4. Export and Organize Your Thumbnails
When exporting, use a consistent naming system like video-slug_A.jpg or video-slug_B.jpg to make A/B testing vs. gut feeling comparisons easier. This method is especially helpful when managing multiple thumbnail variations for the same video.
Export all your designs in one go, ensuring each file stays within the 2 MB limit and meets the 1280×720 resolution requirement. Organize your thumbnails by video title or upload date so you can quickly find the right one when needed. YouTube’s "Test & Compare" tool evaluates thumbnails based on watch time, not just click-through rate (CTR). Having well-organized variations allows you to test different designs efficiently and see what keeps viewers engaged.
How to BATCH Your THUMBNAILS For YouTube!
Watching trending YouTube thumbnails can help you identify which styles to batch for your next content sprint.
How ThumbnailCreator Speeds Up Batch Processing
ThumbnailCreator takes the hassle out of manual batch processing by automating the entire workflow in just seconds. Instead of spending hours gathering assets, building templates, and making bulk edits, this platform uses AI to handle the heavy lifting. Here's how its features can transform your workflow.
AI Generation Creates Multiple Thumbnails Quickly
With ThumbnailCreator, AI does the designing for you. By analyzing your text descriptions or YouTube video links, it generates multiple professional thumbnail options in about 30 seconds. Forget starting from scratch with traditional tools - the platform, trained on a database of over 3 million top-performing YouTube thumbnails, knows exactly what drives clicks. Simply paste a YouTube URL, and the AI will analyze the video content and create optimized variations automatically.
Take gaming creator Chloe MacKenzie, for example. With 245,000 subscribers, she saw her click-through rate (CTR) rise from 4% to 7.2% within a week of using ThumbnailCreator, cutting her design time from 3 hours to just 30 seconds.
"My CTR jumped from 4% to 7.2% in the first week. What used to take me 3 hours in Photoshop now takes 30 seconds." - Chloe MacKenzie, Gaming Creator
For creators managing multiple uploads weekly, this speed boost is game-changing. Jack Patterson, an educational content creator with 512,000 subscribers, publishes five videos a week. By switching to AI automation, he saved 15 hours of manual design work each week.
Ready-Made Templates for Quality Results
ThumbnailCreator’s ready-made templates ensure professional designs while maintaining your brand's identity. The platform provides a library of templates that instantly apply your preferred fonts, colors, and logos through the Brand Kit feature. This makes it easy to create consistent, on-brand thumbnails, whether you're making one or fifty.
The "Style Cloning" tool adds another layer of convenience by analyzing your existing thumbnails and replicating their aesthetic for new batches. Fitness coach Mitchell Davies raved about this feature:
"The brand consistency feature is incredible. All my thumbnails now have the same professional look that my subscribers recognize instantly." - Mitchell Davies
For a complete overhaul, the Channel Makeover tool can redesign all your thumbnails in one go.
Quick Customization Tools
After generating base thumbnails, ThumbnailCreator offers tools to tweak them in seconds. The face-aware generation feature automatically incorporates your facial expressions into designs, saving you the trouble of manually adjusting images.
Additional tools like face swapping, intuitive text editing, and object replacement let you replicate high-performing designs with ease. The "Copy Viral Success" feature allows you to paste a URL of a successful YouTube thumbnail, and the AI will recreate it by swapping faces and maintaining the original design’s lighting and composition. This means you can adapt proven designs across multiple videos while keeping them aligned with your brand.
One-click background removal tools and color enhancement tools further simplify edits. You can also make bulk changes across thumbnails in seconds. The AI even merges multiple images - like your face photo and a video screenshot - while balancing lighting, shadows, and effects automatically.
Direct YouTube Integration
ThumbnailCreator doesn’t just stop at creation - it integrates directly with YouTube to streamline the entire process. Paste any YouTube URL, even for unlisted videos, and the AI will analyze your content’s context before generating thumbnails.
For creators handling high volumes, the platform works with tools like Zapier, Make, and n8n, enabling workflows that auto-generate thumbnails as soon as a video is uploaded. You can also use RESTful APIs to sync designs directly to cloud storage services like Google Drive or Dropbox.
This integration eliminates the need for manual exporting, organizing, and uploading. Whether you’re processing 10, 20, or even 50 thumbnails at once, ThumbnailCreator ensures a seamless workflow from start to finish.
Batch Processing vs. Individual Creation: A Comparison
Batch Processing vs Individual Thumbnail Creation: Time and Cost Comparison
Creating thumbnails individually can be a real time sink. Each one requires starting from scratch, which means spending anywhere from 45 minutes to 3 hours per thumbnail. That’s a lot of effort for just one design.
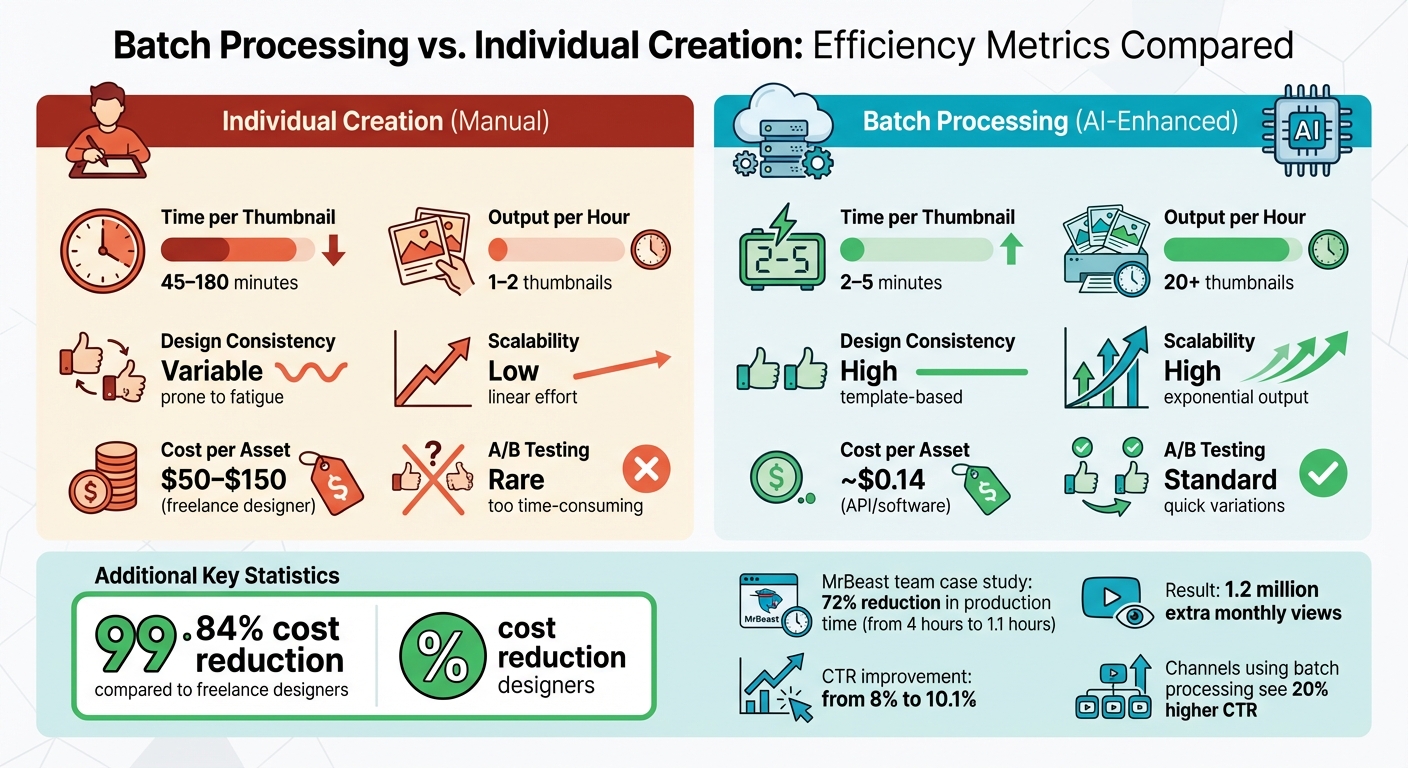
But with AI, creators have flipped the script. Instead of slogging through one thumbnail at a time, batch processing allows for a streamlined workflow. Using AI tools, you can produce 20+ thumbnails per hour. What used to take an entire day can now be done in about 30 minutes. For instance, in early 2026, the MrBeast team slashed their thumbnail production time by 72% - going from 4 hours per project to just 1.1 hours - by adopting an AI-driven batch approach. This efficiency boost didn’t just save time; it also increased their click-through rate from roughly 8% to 10.1%, adding an estimated 1.2 million extra monthly views.
Another big win with batch processing is consistency. When creating thumbnails individually, minor inconsistencies in fonts, colors, or logo placements can creep in. Batch workflows eliminate this problem by locking in brand elements through thumbnail templates and style guides. The result? Every thumbnail in a series looks cohesive, which is crucial when viewers are scrolling through your channel. This level of consistency plays a key role in building a recognizable and professional brand.
Efficiency Metrics Compared
The numbers make it clear why batch processing has become the go-to method for many creators:
| Metric | Individual Creation (Manual) | Batch Processing (AI-Enhanced) |
|---|---|---|
| Time per Thumbnail | 45–180 minutes | 2–5 minutes |
| Output per Hour | 1–2 thumbnails | 20+ thumbnails |
| Design Consistency | Variable (prone to fatigue) | High (template-based) |
| Scalability | Low (linear effort) | High (exponential output) |
| Cost per Asset | $50–$150 (freelance designer) | ~$0.14 (API/software) |
| A/B Testing | Rare (too time-consuming) | Standard (quick variations) |
Beyond just speed, batch processing makes A/B testing a practical reality. With AI, you can generate multiple variations of a thumbnail in minutes, making it easy to test which version performs better. Channels that embrace this approach often see a 20% higher CTR compared to those relying on static, single-image designs. And let’s not overlook the cost savings - automated batch processing can cut costs by a staggering 99.84% compared to hiring freelance designers.
These metrics highlight why batch processing isn’t just a time-saver - it’s a game-changer for creators looking to optimize their thumbnail strategy.
Conclusion
Batch processing has transformed how thumbnails are designed. What used to take anywhere from 15 minutes to 3 hours per thumbnail can now be streamlined to produce over 20 thumbnails per hour using AI-driven workflows. This approach shifts your focus from manual design tasks to refining and curating your content strategically.
The advantages go beyond just speed. Batch processing ensures your brand's visual identity stays intact across all uploads. Say goodbye to inconsistencies in fonts, colors, or overall style. Your channel gains a cohesive, professional look that viewers instantly recognize. And with the ability to generate multiple versions quickly, A/B testing becomes a routine part of your strategy rather than an occasional luxury. This method not only saves time but also ensures your branding remains consistent. ThumbnailCreator exemplifies these benefits perfectly.
ThumbnailCreator simplifies this process by enabling professional thumbnail creation in under 30 seconds while offering batch generation for multiple videos simultaneously. Leveraging data-driven insights, the platform allows you to create designs optimized for higher click-through rates, so you're not just working faster - you’re working smarter.
As your channel grows, batch processing scales effortlessly. What once cost between $50 and $150 per thumbnail can now be achieved for as little as $0.10 to $0.50 using AI. This drastic cost reduction comes without sacrificing quality - if anything, it enhances it.
The transition from "designing" to "toggling" means less time spent wrestling with complicated software and more time focusing on your content strategy. Batch processing not only saves time but also empowers you to grow your channel efficiently and sustainably.
FAQs
How many thumbnails should I batch at once?
When it comes to batching thumbnails, there’s no magic number to stick to - it really depends on your project and workflow. However, creating multiple thumbnails at once can make things much smoother. Tools like ThumbnailCreator and batch processing techniques can help you handle repetitive tasks, such as cropping or resizing, across several images in one go. For the best results, aim to design your thumbnails in high resolution and process them together. This approach not only saves time but also keeps your workflow organized.
What should I standardize in a thumbnail template?
Creating a strong thumbnail template involves standardizing essential elements such as resolution, text style, color contrast, and layout. Stick with a resolution of 1280 x 720 pixels (16:9 ratio) to ensure your thumbnails look sharp across platforms. Use bold, sans-serif fonts to keep text readable, and opt for high-contrast color combinations - like yellow on black - for maximum visibility. Keep your text brief (around 3-5 words) and enhance it with outlines or shadows to make it pop. By maintaining consistency across these elements, you can strengthen your brand identity and improve click-through rates.
How do I A/B test thumbnails without hurting performance?
YouTube's "Test & Compare" feature makes it easy to A/B test thumbnails without compromising your video's performance. Here's how it works:
- Upload up to three different thumbnail variations for your video.
- YouTube will automatically rotate these thumbnails among viewers over a period of 7–14 days.
For accurate results, tweak only one major element per variation - like the color scheme or the text style. This helps pinpoint what’s driving viewer behavior.
When analyzing results, don't just focus on click-through rate (CTR). Metrics like watch time and audience retention provide a deeper understanding of how the thumbnail impacts overall engagement.