
Aspect Ratios Explained: YouTube Thumbnails
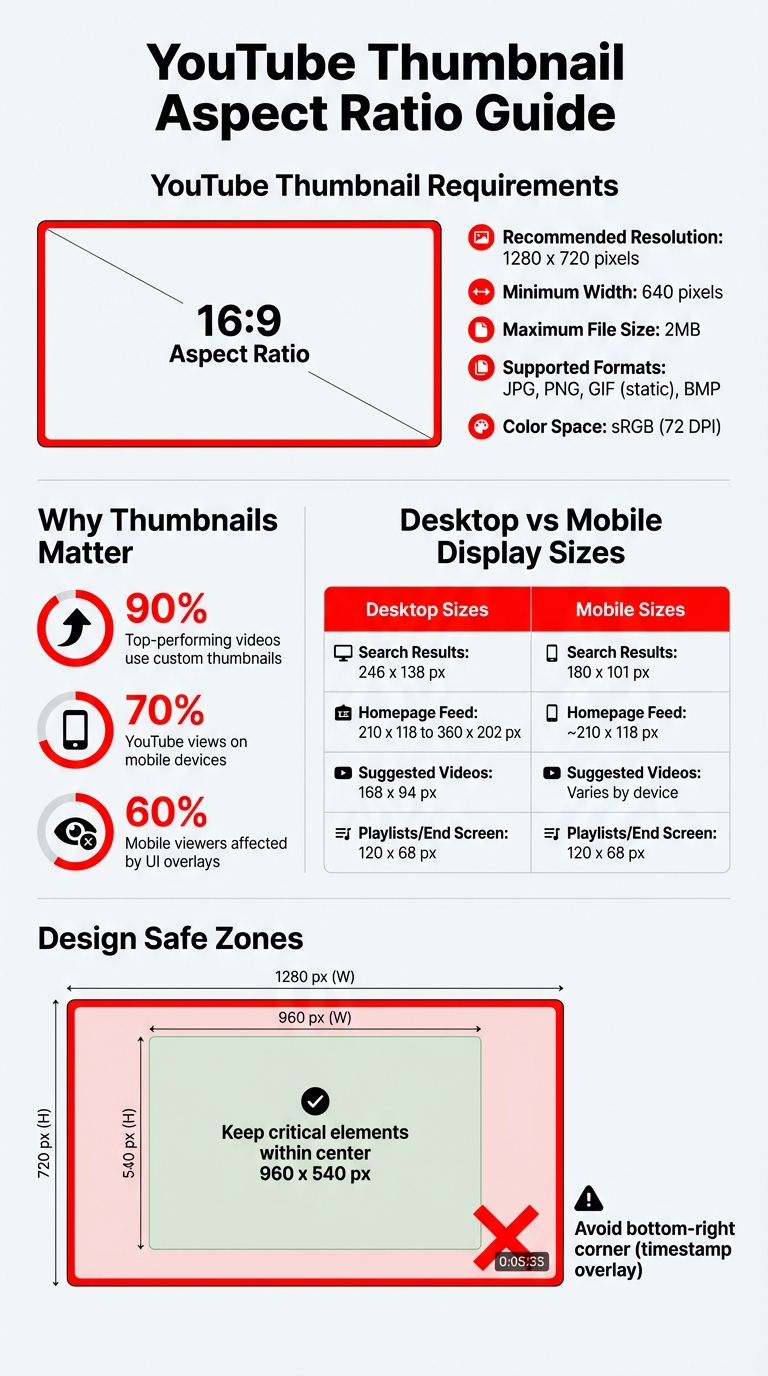
Aspect ratio defines the shape of an image by comparing its width to its height. For YouTube thumbnails, the standard aspect ratio is 16:9, ensuring compatibility with YouTube's video player across devices. Recommended thumbnail dimensions are 1280 x 720 pixels, which balance HD quality with manageable file sizes. This ratio prevents issues like cropping or black bars, helping your thumbnail look polished and professional.
Why does this matter? 90% of top-performing YouTube videos use custom thumbnails, and with 70% of YouTube views on mobile devices, designing thumbnails that display well on all screen sizes is key. Use bold fonts, high contrast, and avoid placing text or visuals in the bottom-right corner, where YouTube overlays timestamps. Tools like ThumbnailCreator simplify the process by automating proper aspect ratio setup and optimizing designs for all platforms.
YouTube Thumbnail Specifications and Display Sizes Across Devices
YouTube's Required Aspect Ratio and Dimensions
The 16:9 Aspect Ratio Explained
YouTube has specific guidelines to ensure your videos and thumbnails look their best. The platform requires thumbnails to use a 16:9 aspect ratio, matching the dimensions of its video player. This alignment prevents issues like cropping, stretching, or the appearance of black bars, keeping your thumbnail visually consistent across all placements.
Even with YouTube Shorts, which are designed for vertical viewing, thumbnails uploaded via desktop still need to follow the 16:9 format. This ensures your thumbnail displays correctly in search results and suggested video feeds. By adhering to this standard, you can design with confidence, knowing your thumbnail will look great no matter where it appears.
Recommended Thumbnail Dimensions
For the best results, YouTube suggests using specific dimensions for your thumbnails. The ideal resolution is 1280 x 720 pixels, as it meets HD standards while maintaining quick loading times. While YouTube allows a minimum width of 640 pixels, sticking to 1280 x 720 ensures your thumbnail looks crisp on screens of all sizes, from smartphones to large monitors.
| Specification | Requirement/Recommendation |
|---|---|
| Recommended Resolution | 1280 x 720 pixels |
| Aspect Ratio | 16:9 |
| Minimum Width | 640 pixels |
| Maximum File Size | 2MB |
| Supported File Formats | JPG, PNG, GIF (static), BMP |
| Color Space | sRGB (72 DPI) |
Keep the file size below 2MB to avoid upload issues or excessive compression. For faster loading, save your thumbnail as a JPG, but use PNG if you need sharper text or graphics. Always work in the sRGB color space (72 DPI), as this is optimized for digital screens rather than print. These guidelines will help ensure your thumbnails are both visually appealing and functional.
sbb-itb-b59debf
How Aspect Ratios Affect Thumbnail Display on Different Devices
Desktop vs. Mobile Thumbnail Display
Thumbnails look different depending on the device they’re viewed on, and understanding these differences can help you design more effectively. On desktop, thumbnails are displayed at larger sizes, offering more room for details and text. For example, in search results, thumbnails appear at 246 x 138 pixels, while on the homepage, they can go up to 360 x 202 pixels. These dimensions allow for more intricate designs and readable text.
On mobile, thumbnails are much smaller. In search results, they shrink to 180 x 101 pixels, and in playlists or end screens, they can be as tiny as 120 x 68 pixels. At these reduced sizes, fine details and small text often become invisible.
| Placement | Desktop Display Size | Mobile Display Size |
|---|---|---|
| Search Results | 246 x 138 px | 180 x 101 px |
| Homepage Feed | 210 x 118 to 360 x 202 px | ~210 x 118 px |
| Suggested Videos | 168 x 94 px | Varies by device |
| Playlists/End Screen | 120 x 68 px | 120 x 68 px |
Designing for Maximum Visibility
Because mobile screens display thumbnails at smaller sizes, designing with mobile in mind is essential. Focus on keeping the critical elements - like faces, key objects, or text - within the center 960 x 540 pixels of your 1280 x 720 canvas. This central area is considered the "safe zone" since scaling and YouTube’s interface can obscure elements outside of it.
One specific area to avoid is the bottom-right corner. YouTube adds a duration timestamp there, which can block any text or visuals placed in that spot. To ensure your thumbnails remain clear and effective, stick to large, bold fonts (at least 30pt) and limit text to 3–6 words. High-contrast text works best, as it remains visible across all screen sizes. You can also experiment with different YouTube thumbnail styles to see which visual approach captures the most attention. For extra assurance, always preview your thumbnail at 120 x 68 pixels before uploading to confirm its clarity and readability.
YouTube Thumbnail Size for Videos in 2025 (Resolutions & Aspect Ratio)
Common Aspect Ratio Mistakes and How to Fix Them
Getting your thumbnail dimensions and layout right is crucial, but it's just as important to avoid common mistakes that can hurt the visual appeal of your content. Let’s break down some frequent pitfalls and how to address them.
Using Non-16:9 Thumbnails
Thumbnails that aren’t in a 16:9 aspect ratio often lead to letterboxing or pillarboxing. For example, if you upload a 4:3 or square (1:1) thumbnail, YouTube will automatically add black bars to fill the 16:9 player space. These bars - whether on the sides or top and bottom - can make your thumbnail look less polished and reduce click-through rates.
The fix? Always design your thumbnails at 1280 x 720 pixels. This size perfectly matches YouTube’s 16:9 player, ensuring your thumbnail fills the frame without any black bars or distortion. It also ensures your content looks professional across all devices.
Ignoring Safe Area Guidelines
Even with the correct aspect ratio, placing important elements too close to the edges can be a problem. Overlays, like video timestamps, often appear in the bottom-right corner and can cover up to 10% of the thumbnail’s edge. This is especially problematic for mobile viewers, who account for 60% of YouTube views. On smaller screens, UI elements can obscure or crop parts of your thumbnail.
To prevent this, keep critical elements - like faces, text, or logos - away from the edges, particularly the bottom-right corner. Instead, center these elements or position them in areas free from overlays. This approach ensures your thumbnail remains clear and visually appealing, no matter the viewing device.
Comparison Table: Aspect Ratio Problems and Solutions
| Problem | Impact on Display | Recommended Fix |
|---|---|---|
| Non-16:9 Ratio (4:3, 1:1) | Black bars appear; reduced visual impact. | Use 1280 x 720 (16:9) dimensions. |
| Text in Bottom Right | Text obscured by overlay. | Move essential text to the top or left side. |
| File Size > 2MB | YouTube rejects the upload. | Export as JPG at 90% quality or compress PNG. |
| Small Font Size | Text becomes unreadable on mobile. | Set source text at a minimum height of 80–100px. |
| Low Contrast | Text blends into background; reduced CTR. | Use bold fonts with contrasting outlines or shadows. |
Using ThumbnailCreator to Get the Right Aspect Ratio
ThumbnailCreator takes the hassle out of creating thumbnails with the correct aspect ratio by automating the entire process. It ensures your thumbnails meet YouTube's standards without requiring complex software or tedious manual adjustments. Plus, its built-in safe-area overlay highlights zones that stay clear of YouTube's interface elements, helping you avoid design mishaps.
AI-Powered Thumbnail Creation
The AI feature in ThumbnailCreator streamlines thumbnail design by eliminating common issues like black bars, incorrect cropping, and guesswork. It ensures every thumbnail aligns with industry standards. The safe-area overlay is particularly useful, marking where YouTube's UI elements - like timestamps and channel names - usually appear. This keeps your key design elements away from the edges, which typically account for the outer 8–10% of the frame. The tool also simplifies the design process with pre-designed templates, so you can focus on creating thumbnails that grab attention.
Pre-Designed Templates for Consistency
ThumbnailCreator's templates are pre-set to match YouTube thumbnail dimensions, making it easy to switch between different formats like 16:9 for regular videos, 9:16 for Shorts, and 1:1 for Instagram. With just one click, you can ensure your thumbnail fits perfectly on the platform you're targeting. The templates also default to the sRGB color profile, preventing any unexpected color shifts during uploads.
Advanced Editing Features
ThumbnailCreator offers a range of editing tools - like object swapping, text editing, and even face swapping - that automatically maintain proper proportions. Its export options are optimized to keep file sizes under 2MB, with JPG and PNG formats available. JPG files are preset between 85 and 92 for a balance of quality and size. The thumbnail contrast checker further enhances clarity, sharpening edges to make text more readable, especially on mobile screens. Since up to 95% of a thumbnail's perceived sharpness on mobile comes from contrast and edge clarity, this feature is a game-changer.
Conclusion
Getting your YouTube thumbnail dimensions right is a game-changer for maintaining a polished look and building viewer trust. The recommended 16:9 aspect ratio (1280×720 pixels) ensures your thumbnails display seamlessly across all devices, avoiding awkward cropping or blurry visuals. By sticking to these dimensions, you can maximize space for text and branding while keeping file sizes under YouTube's 2 MB limit.
Well-designed thumbnails not only look professional but also boost click-through rates (CTR), which can help YouTube's algorithm favor your content. On the flip side, poorly sized thumbnails can lead to compression issues that hurt your credibility. In a competitive platform like YouTube, having this edge is essential.
Since more than 70% of YouTube views come from mobile devices, designing with mobile users in mind is critical. Use bold fonts, high contrast, and safe zones to avoid overlapping with YouTube’s interface elements.
To simplify the process, tools like ThumbnailCreator templates can be a lifesaver. They take the guesswork out of thumbnail design by automating aspect ratio adjustments, offering safe-area overlays, and optimizing file exports to stay under 2 MB. Features like contrast checkers and format selection ensure your thumbnails remain sharp and readable, especially on smaller screens where contrast plays a huge role in perceived clarity. Whether you're just starting out or refining your workflow, having the right tools and sticking to precise dimensions can make all the difference.
FAQs
How do I convert a non-16:9 image into a YouTube thumbnail without losing key content?
To turn an image that’s not in a 16:9 aspect ratio into a YouTube thumbnail, you’ll need to crop or resize it to 1280 x 720 pixels. This ensures it fits the standard 16:9 format. When doing this, make sure to center the most important parts of the image so nothing critical gets cut off. Tools like ThumbnailCreator can help you adjust the image while keeping it sharp and clear. Be careful not to resize the image in a way that stretches or distorts it, as this can ruin the look. Also, keep all key elements within the safe area to ensure nothing gets cropped when displayed.
What is the best “safe zone” layout so text and faces aren’t covered on mobile?
To make sure text and faces stay visible on mobile screens, keep all essential elements at least 30 pixels away from the edges. Also, avoid placing them within 100 pixels of the bottom-right corner. This helps prevent UI overlays - like timestamps and progress bars - from blocking important details.
Should I export thumbnails as JPG or PNG for the sharpest look under 2MB?
When it comes to keeping your thumbnails sharp and under 2MB, export them as JPGs. JPG files strike a great balance between compression and image quality, making them ideal for smaller file sizes without sacrificing clarity.
On the other hand, PNGs are a better choice if your image needs transparency or if maintaining lossless quality is critical. Just keep in mind that PNGs tend to have larger file sizes compared to JPGs.