

How AI Helps Replicate Celebrity Thumbnail Designs
I use AI to borrow thumbnail design patterns - not a celebrity’s face or branding. I start with 5–10 thumbnails, note their layout, colors, expressions, and text placement, then apply those rules to my own images.
Here’s my process:
- Build a style sheet: Separate reusable design choices from logos, wording, and artwork I shouldn’t copy.
- Generate and edit: Use ThumbnailCreator with approved photos and product images. Check faces, objects, and lettering for errors.
- Compare drafts: Aim for two to six words, test readability at small sizes, and change one major element at a time.
- Review before publishing: Check permissions, accuracy, and the upload preview. Avoid implying a celebrity appearance or endorsement.
My final test: <u>Does the thumbnail clearly match the video?</u> AI can help me make drafts, but it can’t promise more views or a higher click-through rate.
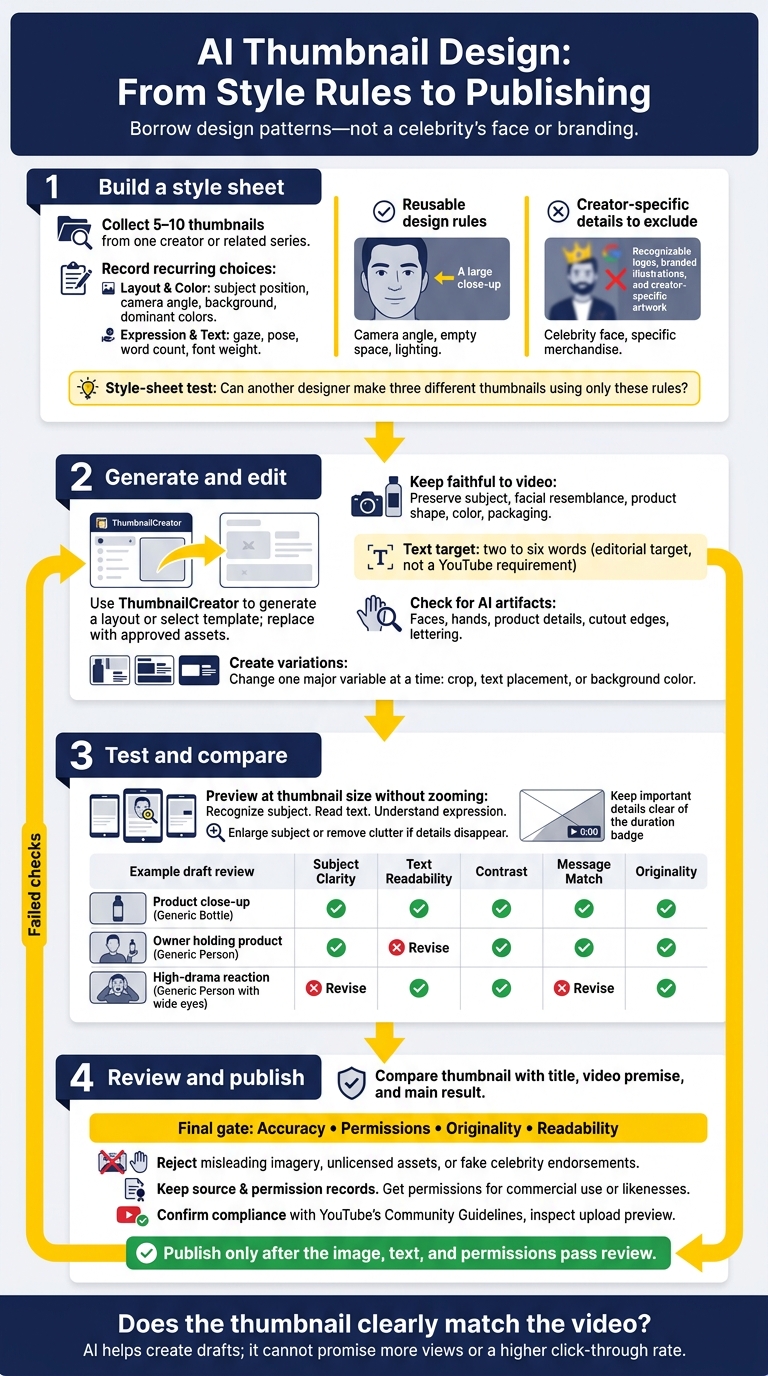
AI Thumbnail Design: From Style Rules to Publishing
How to Make MrBeast Thumbnails with AI
sbb-itb-b59debf
Step 1: Build a Thumbnail Style Sheet
Turn the patterns you found in celebrity thumbnails into rules you can reuse. Collect 5–10 thumbnails from one creator or related series and compare them side by side. Record choices that repeat, not one-off details.
Split your notes into two columns: reusable design rules and creator-specific details to exclude. A large close-up belongs in the first column. A creator’s branded illustration belongs in the second.
Note Layout, Color, Expression, and Text
- Record the subject’s position, how much of the frame they fill, the camera angle, and empty space.
- Note the background, dominant and accent colors, lighting, and how contrast works: brightness, color, outline, or shadow.
- Describe what the expression, gaze, and pose do - for example, direct attention toward a product or show concern about a problem.
- Record the text’s word count, line count, font weight, capitalization, placement, and contrast.
- Include arrows, circles, or props only when they add meaning.
- Turn your notes into rules. Exclude recognizable logos, branded illustrations, and artwork closely tied to the creator.
- Use only original or properly licensed assets.
Use the Style Rules for Your Video
Hypothetical small-business product demo: For a local bakery’s video showing how it tests a seasonal cupcake, use a close-up of the owner on the left and the actual cupcake on the right. Choose a deep navy background, natural product colors, and white text with a yellow accent. Keep the wording to “NEW FLAVOR?” and use an open-handed gesture toward the cupcake - not an exaggerated reaction that suggests a result the video never shows.
Put the sheet to the test: Can another designer make three different thumbnails using only these rules? If the instructions still refer to the celebrity or finished image, make the rules for framing, color, expression, and text more specific.
Before taking the style sheet into ThumbnailCreator, attach the owner’s approved photo, the real product image, and supporting graphics, fonts, and video frames.
Step 2: Generate and Edit With ThumbnailCreator
Generate Your First Layout
Use your style sheet as a prompt to recreate the pattern - not the celebrity’s exact look - and make it fit your subject and footage. In ThumbnailCreator, generate a layout from the style sheet or choose a template that fits your video. Replace the default images and copy with your approved assets, then remove anything that competes with the subject. Check the first draft against your style rules.
Hypothetical prompt: “Small-business owner holding the featured product, large foreground subject, high-contrast background, clear space for short bold text on the left.”
Once the base layout is set, change only what’s needed to match your video.
Edit Faces, Objects, and Text
For face swapping, upload a clear, well-lit photo of your own face. Check that the result still looks like you. For object swapping, use the actual product shown in the video, keeping its shape, color, packaging, and label intact. Neither edit should imply a celebrity appearance or endorsement that never happened.
Aim for two to six words of text. That’s an editorial target, not a YouTube requirement. Adjust the placement, size, and color so the words stand out without covering the face or product. Check that the wording stays exact after every edit, and add outlines or shadows only if they make the text easier to read.
Check Edits and Make Variations
Check faces, hands, product details, cutout edges, and lettering for AI artifacts. Fix each problem with a targeted edit. Then make a few versions from the same style sheet, changing one major variable at a time: the crop, text placement, or background color. Keep the layout logic, subject, and message consistent. Discard any edit that changes facial resemblance, misrepresents the product, or makes the text harder to read.
Once the draft is clean, test it at thumbnail size.
Step 3: Check Readability and Compare Drafts
Preview Thumbnails at Small Sizes
Test each draft at the size viewers will actually see - not just at full size. Shrink it to thumbnail size, then check whether you can recognize the subject, read the text, and understand the facial expression without zooming.
If details disappear, make the subject larger or remove background clutter. Keep text, faces, and product details away from the bottom-right corner, where the duration badge appears.
Compare Drafts Before Upload
View drafts side by side with your finalized video title. Label each design check Pass or Revise.
Draft Subject Clarity Text Readability Contrast Message Match Originality Product close-up Pass Pass Pass Pass Pass Owner holding product Pass Revise Pass Pass Pass High-drama reaction Revise Pass Pass Revise Pass
Reject any draft that misrepresents the video or uses unlicensed assets. Borrow the pattern, not the celebrity’s identity. Favor clarity over added drama to keep the celebrity-inspired structure while making the thumbnail original and accurate.
Conclusion: Publish an Original, Accurate Thumbnail
Once your drafts pass the readability test, choose the strongest version and prepare it for upload. Check the final draft against the same framing, contrast, and text clarity rules.
Use your style sheet to create a draft in ThumbnailCreator. Add images you have permission to use and your channel’s branding. Before publishing, check accuracy and permissions one last time.
Run the Final Publishing Check
Compare the thumbnail with the title, video premise, and main result. The subject should be clear, and the text should be readable on mobile. Make sure the image doesn’t suggest a fake event, product, relationship, quote, or result by balancing curiosity and authenticity.
Keep source and permission records for every image and likeness. U.S. publicity rights vary by state, and false celebrity endorsement claims can create legal risk. If the thumbnail is commercial or promotional, or a likeness is central to its message, get permission or legal review.
Revise anything that fails an accuracy, permission, originality, or readability check. Confirm that the final image follows YouTube’s Community Guidelines. Save the final file and asset records, then inspect the upload preview for cropping or compression. Publish only after the image, text, and permissions pass review.
FAQs
How can I tell if my thumbnail copies too much?
Your thumbnail can blend into the feed if it leans too heavily on familiar clichés: surprised faces, red arrows, or yellow text. Rather than copying channels in your niche, look to movie posters or other content categories for inspiration.
In ThumbnailCreator, combine your own face and custom Design Rules with clear visual instructions that rule out overused tropes. This helps your thumbnails stand apart instead of looking like everyone else’s.
How can I adapt thumbnail trends to my channel’s branding?
In ThumbnailCreator’s Styles tab, save colors, typography, and layouts from your best-performing thumbnails - or inspiration outside your niche - as custom styles. This keeps your thumbnails consistent while letting you work in new trends.
Use Design Rules to set brand requirements, like your teal color or fixed text placement. Pair those rules with your own Face Model to help viewers recognize your content in a crowded feed.
How do I measure whether my new thumbnail works?
Use Mobile preview mode in the editor to make sure your thumbnail is clear and easy to read at 168 × 94 pixels. Generate 3–5 variations, then compare them to see which approach works best.
Check your dashboard’s Winning formula section for layout, color, and text patterns in your most-viewed videos. Give generated thumbnails a thumbs-up or thumbs-down to help the system learn your preferences.