

How AI Extracts Thumbnails from Videos
AI thumbnail extraction comes down to 3 steps: split the video into shots, score a small set of frames, and edit the top frame for YouTube. Instead of checking every frame, the system cuts the search by 90%+ by pulling only 1–3 keyframes per shot and removing frames that are blurry, dark, washed out, or off-topic.
If I had to boil this guide down, it would be this:
- First, AI finds scene changes so it only reviews useful parts of the video
- Then, it scores frames for sharpness, brightness, contrast, subject focus, and topic match
- Finally, it formats the winner into a 16:9, 1,280 × 720 thumbnail and may spin up 3–5 test versions
A good thumbnail frame is usually clear, well-lit, easy to read at a small size, and closely tied to the video title. A bad one may look fine in motion but fail as a still image.
Here’s the short version of what matters most:
| Step | What AI Does | What I’d pay attention to |
|---|---|---|
| Scene finding | Splits video into shots | Ignore tiny flashes and brief motion |
| Frame scoring | Checks blur, exposure, contrast, saliency, and topic match | Put clarity ahead of style |
| Final prep | Crops and edits the top frame | Keep subjects away from the bottom-right timestamp area |
If you want the plain answer: AI does not “guess” the thumbnail. It filters, scores, and ranks frames using simple visual and topic signals, then turns the best still into something fit for upload.
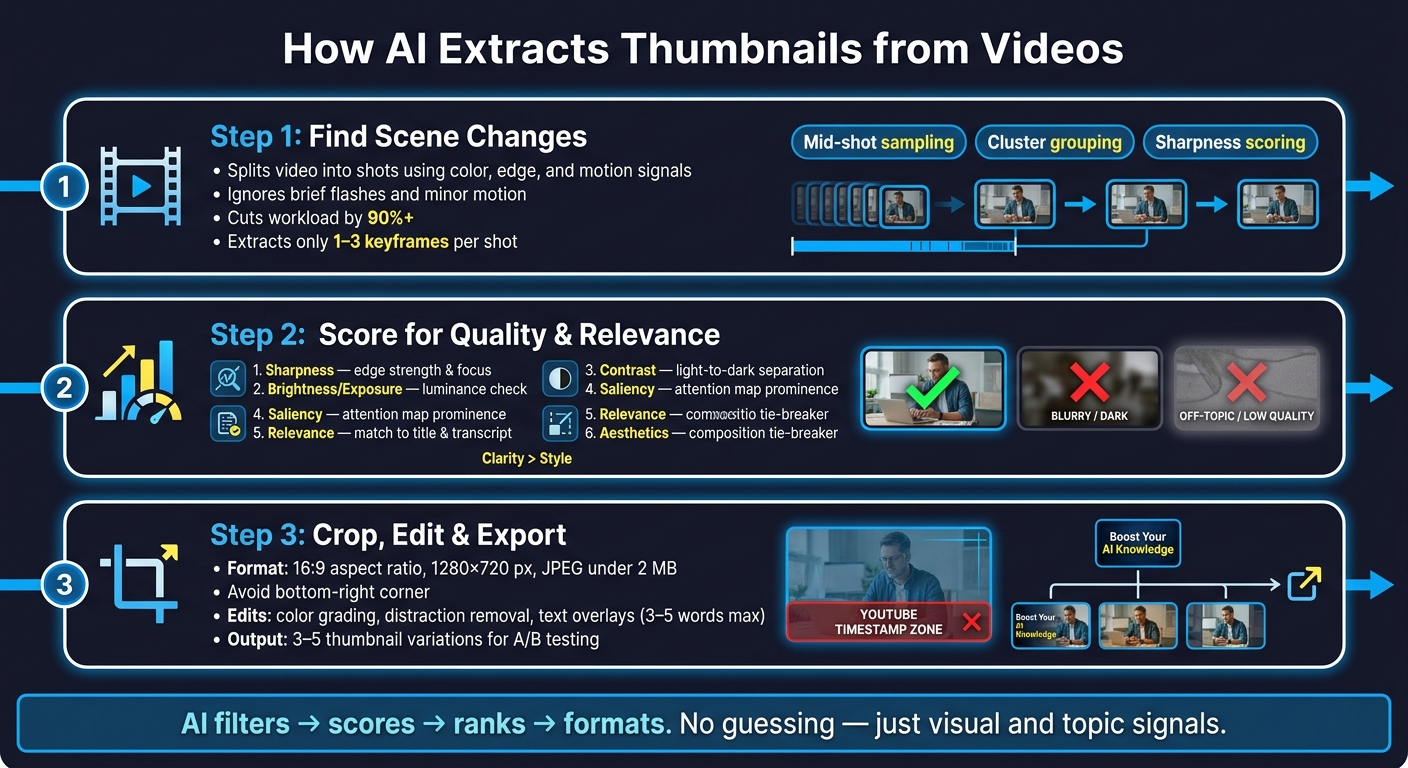
How AI Extracts & Scores Video Thumbnails: 3-Step Workflow
This AI Creates VIRAL Thumbnails From Just a URL
sbb-itb-b59debf
Step 1: Detect Useful Frames from Scenes and Shots
Instead of reviewing a video frame by frame, AI first breaks it into shots and pulls sample candidates from each one. That can cut the workload by over 90%. Then it trims each shot down to a small set of frames that best represent what’s on screen.
Use Shot Segmentation to Find Meaningful Visual Changes
Shot segmentation compares consecutive frames and looks for clear visual shifts. The system checks signals like color, edges, motion, and visible subjects. When those signals pass a set threshold and stay there across several frames, AI marks a new shot boundary.
A brief flash or someone walking through the frame usually won’t trigger a new shot. To avoid false cuts, AI looks across a broader frame window to make sure the change is actual and not just a momentary blip.
Extract Keyframes Instead of Checking Every Frame
After the video is split into shots, the AI picks 1–3 representative frames per shot instead of checking every single frame inside that shot. It usually does this with a few common methods:
- Mid-shot sampling - taking a frame from the middle of the shot, where blur tends to be lower
- Grouping similar frames - picking the frame closest to the cluster center inside the shot
- Sharpness and saliency scoring - ranking frames by focus and visual prominence, then keeping the top result
The best candidates usually have a stable subject, clear composition, and little or no motion blur. Those frames are the ones most likely to work as thumbnails, so they move on to the scoring stage.
Step 2: Score Each Frame for Quality, Clarity, and Relevance
After scene detection and keyframe extraction, AI scores the candidate frames. Once it has a shortlist, it looks at each frame for quality, clarity, and topic match. Frames that pass these basic checks move up. Blurry, dark, low-contrast, or off-topic frames get removed early.
Filter Out Blurry, Dark, or Weak Frames
AI starts by removing frames that are blurry, dark, overexposed, or low-contrast. It then scores the remaining options for sharpness, exposure, contrast, and relevance. If a face or key object is present but still looks dim or washed out, that frame gets marked down even if the rest of the image looks fine.
The table below shows what each scoring signal checks and how it affects whether a frame stays or gets cut:
| Criterion | What AI Measures | Why It Matters | Typical AI Decision |
|---|---|---|---|
| Sharpness | Edge strength, focus metrics, blur detection | keeps small thumbnails readable on mobile devices | Discard frames below focus threshold |
| Brightness / Exposure | Average luminance, highlight clipping | Poor exposure hides the subject on mobile screens | Penalize underexposed or overexposed frames |
| Contrast | Global and local light-to-dark separation | High-contrast frames stand out in crowded feeds | Flag and remove flat, low-contrast frames |
| Saliency | Predicted attention maps, prominent regions | Makes the subject instantly noticeable | Prioritize frames where the subject is most salient |
| Relevance | Match to title, keywords, transcript, objects | Aligns viewer expectations with actual content | Boost frames that visually explain the topic |
| Aesthetics | Composition, color harmony, learned quality scores | Used when two frames score similarly on clarity and relevance | Used as a tie-breaker between similarly strong frames |
Aesthetics usually works as a second-pass ranking signal. If two frames are about equally sharp and relevant, the one with better composition and color balance gets the nod. But clarity still matters more than style.
Once weak frames are gone, the remaining candidates move to subject and topic ranking.
Rank Frames by Subject Focus and Topic Match
AI then ranks the remaining frames by how clearly they show the video’s main subject. Face detection and object recognition matter a lot here. If a face or key object sits near the center and matches the part of the frame most likely to draw attention, that frame scores higher.
This matters for a simple reason: thumbnails are small. A frame that shows the main subject right away is easier to understand at a glance. AI compares the frame with the title, description, and transcript to check topic match, then boosts frames that clearly reflect the main topic. A frame that visually matches the video’s topic will outrank a clean but unrelated shot. Clear close-ups usually beat cluttered wide shots.
The highest-ranked frame becomes the base for cropping, formatting, and final thumbnail edits.
Step 3: Pick the Best Frame and Turn it into a Thumbnail
Once you've picked the winning frame, the job isn't done yet. Think of that frame as the raw material. It's the base for your thumbnail, but it still needs a few edits before it's ready for YouTube.
Crop and Format the Selected Frame for YouTube
YouTube thumbnails should use a 16:9 aspect ratio at 1280×720 pixels and be exported as a JPEG under 2 MB.
At this stage, AI tools can help crop the frame to the right size while keeping the main subject front and center. That matters because a good frame can fall flat if the crop feels off or the subject gets pushed too far to the edge.
One more thing: avoid putting text or faces in the bottom-right corner. That's where YouTube's time stamp can cover part of the image. Some AI tools account for thumbnail safe zones, which helps, but it's still smart to check that corner yourself before exporting.
Once the size and layout look right, you can move on to edits that make the image sharper and easier to notice.
Refine the Frame with AI-Assisted Edits in ThumbnailCreator
After cropping, the next step is making the frame more clickable. This is where targeted edits come in.
ThumbnailCreator works well here because it lets creators use a YouTube URL or video ID to generate thumbnail concepts based on the video's actual content. That cuts down on manual prompting.
A few edits tend to make the biggest difference:
- Color grading to make the image pop
- Distraction and background removal to clean up the frame
- Face swapping to strengthen the subject
- Text overlays limited to 3–5 words max so they're easy to read on mobile
The goal isn't to pile on effects. It's to make the main idea of the video obvious at a glance.
Choose Between One Final Frame or Multiple Thumbnail Variations
Sometimes one strong thumbnail is enough. Other times, it makes sense to test a few versions from the same frame.
If the channel is set up for testing, create multiple thumbnail options. A/B testing can help improve CTR by comparing things like tighter crops, shorter text, and stronger contrast. In most cases, 3–5 variations is plenty. That's enough to test different visual angles without turning the process into a mess.
| Feature | Single Extracted Frame | Multiple AI Variations |
|---|---|---|
| Source | One high-quality video still | AI-generated concepts from a video URL or transcript |
| AI Selection | Best frame based on quality and clarity | Multiple concepts optimized for CTR |
| Creator Control | High - manual cropping and text placement | Moderate - choosing from AI-generated options |
| Best Use Case | Vlogs or content where a specific moment matters | High-competition niches that benefit from testing |
| Refinement | Background removal, color grading, and text overlays | Face swapping, object swapping, and background replacement |
Conclusion: The Core Workflow Creators Should Remember
The workflow is straightforward: AI finds strong frames, scores them, and then fine-tunes the best option. Consistency matters. A weak thumbnail can drag down clicks, even if the video itself is great.
Key Points to Apply to Your Next Upload
Use this on your next upload:
- Finalize the title first so AI can score frames against the exact promise of the video.
- Extract keyframes from meaningful scene changes.
- Filter out anything blurry or poorly lit. This helps you avoid common thumbnail mistakes that can hurt your performance.
- Put the highest priority on frames where the subject is clear and closely tied to the topic.
- Crop, clean, and sharpen the frame before export.
For channels that test thumbnails, making 3–5 variations gives you enough range to compare visual hooks without making the process messy.
FAQs
How does AI know which frames are relevant?
AI uses computer vision to scan a video for visual signals like faces, key objects, facial emotions, and dramatic lighting. Then it picks the frames most likely to grab attention and earn clicks.
It also looks at context, including the video title, description, and metadata, so the chosen frames line up with the video’s topic and promise.
Why can’t AI just scan every frame?
Because the goal isn’t to index all footage. It’s to find the high-impact moments most likely to drive clicks.
So instead of treating every frame the same, AI looks at the video, metadata, title, and transcript to spot clickable moments, expressive faces, and key objects. That narrower focus helps it pick frames with strong visual hierarchy, emotion, and contrast.
What makes a video frame good for YouTube?
A good YouTube thumbnail frame should be striking, simple, and easy to read on mobile. That matters because over 70% of views happen on mobile devices.
Stick to 2 to 3 main visual elements so the image doesn't feel cluttered. Use the rule of thirds to place the most important part of the frame where people are most likely to look first. If you add text, keep a 4.5:1 contrast ratio between the text and the background so it's easy to read at a glance.
One more thing: avoid putting key details in the bottom-right corner. That's where YouTube places the video length, and it can cover part of your thumbnail.