
How To Design Thumbnails for YouTube Series
Your thumbnail is the first thing viewers notice, and for a YouTube series, it plays a critical role in building recognition and attracting clicks. Here’s how to create effective thumbnails:
- Consistency is Key: Use a branding template with fixed colors, fonts, and logo placement to make your series instantly recognizable.
- Visuals That Pop: Choose images with expressive faces and strong emotions. Human faces can boost views significantly.
- Text Matters: Keep text short (1–3 words), bold, and readable even on small screens. Avoid clutter.
- Mobile Optimization: Over 70% of views come from mobile devices. Follow a mobile thumbnail optimization guide to ensure clarity on small screens.
- Use Tools Wisely: AI tools like ThumbnailCreator can speed up the process, ensuring consistency and quality.
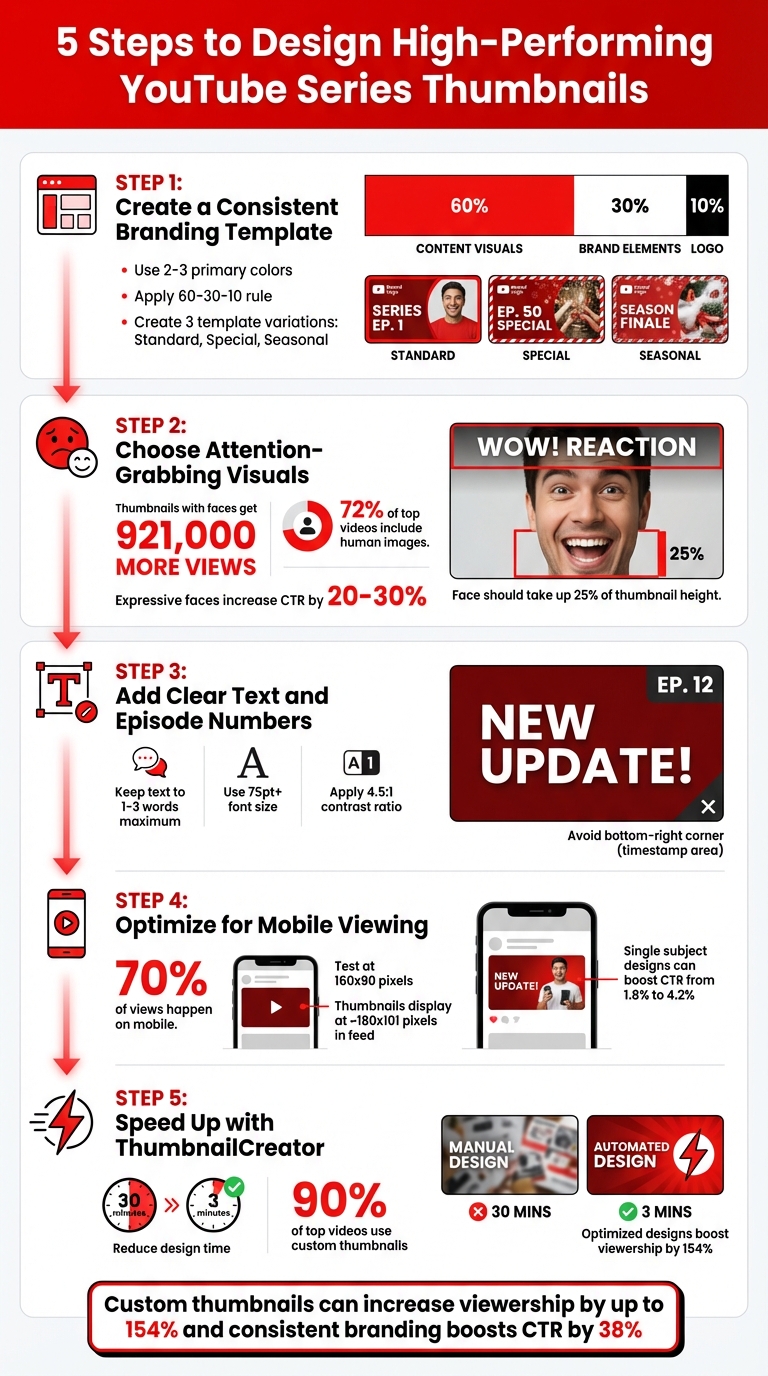
5-Step Process for Designing Effective YouTube Series Thumbnails
11 Thumbnail Design Hacks Top Creators Use on YouTube
sbb-itb-b59debf
Step 1: Create a Consistent Branding Template
Your thumbnail template is like a visual signature for your series. It should make your content instantly recognizable as viewers scroll through their feed. Achieving this means sticking to consistent design choices, such as your color scheme, fonts, and logo placement.
Design a Template for Your Series
Start by defining your series' personality in three words (e.g., bold, sleek, adventurous). These words will serve as your creative compass. Next, select 2-3 primary colors that pop against YouTube’s white and gray background - think bright red, vibrant orange, or electric blue - and apply them across all episodes.
Typography is equally important. Pick two fonts: a bold, sans-serif font for headlines (like Montserrat or Impact) and a secondary font for smaller text. To ensure readability, maintain a 4.5:1 contrast ratio between the text and its background, especially for mobile devices. Also, place your logo in the same spot on every thumbnail, avoiding the bottom-right corner where YouTube’s timestamp appears.
Here’s how to allocate space using thumbnail composition principles like the 60-30-10 rule:
| Space Allocation | Purpose | Example Use |
|---|---|---|
| 60% | Content visuals | Episode-specific images, faces, or action shots |
| 30% | Brand elements | Borders, shapes, or background patterns |
| 10% | Logo/branding | Channel logo in a consistent corner |
Create three variations of your template:
- A Standard layout for regular episodes.
- A Special layout for milestones or collaborations.
- A Seasonal layout for trending topics or events.
These variations ensure your thumbnails stay fresh while maintaining a cohesive look. You can also use visual cues like colored tabs (e.g., blue for tutorials, red for reviews) to help viewers quickly identify the type of content you’re offering. Once you’ve nailed down your design rules, applying them becomes second nature.
Use ThumbnailCreator to Build Templates
If you’re not a design pro, tools like ThumbnailCreator can simplify the process. With AI-assisted features and pre-made designs, you can skip the complexities of professional design software. ThumbnailCreator’s Brand Kit allows you to save your color hex codes, fonts, and logo placement, making it easy to apply your branding across all episodes with just a click.
The platform’s AI customization tools let you tweak each thumbnail to match the episode’s theme while keeping your overall branding intact. To ensure your design works, shrink your thumbnail to 160x90 pixels and check if the text and branding are still clear. If everything looks sharp, you’re good to go!
Step 2: Choose Attention-Grabbing Visuals
Your thumbnail needs to stand out immediately, especially on mobile screens, where more than 70% of YouTube watch time happens. The right image can mean the difference between someone clicking or scrolling past.
Pick Images with Strong Faces and Emotions
Visual consistency is as important as sticking to your branding. Human faces are naturally captivating. Thumbnails featuring faces average 921,000 more views than those without, and 72% of top-performing YouTube videos include a human image. Why? Because our brains process visuals 60,000 times faster than text. A well-chosen face can set the tone for your video before viewers even glance at the title.
Emotion plays a big role in performance. Videos featuring sadness average 2.3 million views, while joy or humor bring in about 1.5 million, and anger or fear hover around 818,000 views. Expressive faces can increase your click-through rate (CTR) by 20% to 30%. So don’t hold back - exaggerate expressions to balance curiosity and authenticity while ensuring they’re clear, even on smaller mobile screens.
"If you trusted Jimmy on the last video that he uploaded... then the next video you see his face, and you'd be like, 'Oh, that's the guy that delivered on the last video I enjoyed so I'm going to click on this video as well.'" - Chucky Appleby, Creative Team, MrBeast
For maximum impact, make sure your face takes up at least 25% of the thumbnail's height and is well-lit. Position the eyes along the top third of the image to guide attention naturally, and maintain direct eye contact with the camera. This creates a psychological connection that can boost CTR by up to 25%. To keep things consistent, use the same person, hairstyle, and clothing from your video content to avoid a staged look. If you can’t get the perfect shot, AI tools can help you tweak or replace elements while staying true to your visual style.
Improve Visuals with AI Tools
When the ideal shot isn’t available, advanced AI tools can step in. For example, ThumbnailCreator offers face-swapping and object-editing features to refine your visuals. You can pre-shoot a variety of expressions - like shock, excitement, or curiosity - and build a library of high-quality assets. AI can then place your face into different backgrounds or scenes while keeping your appearance consistent and recognizable.
AI tools also let you swap out distracting elements or add visual interest without starting from scratch. This is especially helpful for series thumbnails, where maintaining a cohesive look while keeping things fresh is essential. Always double-check that your design stays clear and effective on smaller screens.
Step 3: Add Clear Text and Episode Numbers
The text on your thumbnail can make or break its effectiveness. Its main role? To spark curiosity - creating a burning question in the viewer's mind that makes them want to click. Your thumbnail text should work with your video title, not duplicate it. For instance, if your title says, "How to Edit Videos Faster", your thumbnail might say something like "3X SPEED" or "10 MIN SETUP." These phrases add intrigue without wasting valuable space.
Write Short, Value-Focused Text
Keep it short and punchy. Ideally, stick to 1–3 words, and never go beyond 5–6 words. Why? Because over 70% of YouTube views happen on mobile devices. Long text means smaller fonts, and if your thumbnail takes too long to read, viewers will just scroll past.
Use visual hierarchy to make your message pop. The most important part of your text - your hook or value - should be the largest on the screen. For example, if your video is about "Top 5 Camera Settings", make "TOP 5" the focal point, with "Camera Settings" smaller. To grab attention, highlight key words with a different color.
Here's a great example: In December 2025, ClickyApps Team tested two thumbnail designs for a software tutorial. The version with a frustrated face and the single word "FINALLY" outperformed the other by 2.1% in click-through rate (CTR) within the first 48 hours.
If you're creating a series, include episode numbers, but keep them secondary. Place "EP 3" in a corner or along the top edge, while your main hook takes center stage. Never put text in the bottom-right corner - that's where YouTube's video length timestamp appears. Alicja Suska, a Senior Product Designer at Outdraw Design, shifted from simple, dark designs to vibrant, colorful thumbnails with varied backgrounds. Her new approach led to 10 times more views compared to her older designs.
Once your text is concise and eye-catching, make sure it’s readable on all devices.
Make Text Easy to Read
Readability is key. Use bold, heavy sans-serif fonts like Montserrat Extra Bold, Impact, Bebas Neue, or Arial. Keep the font size at least 75pt to ensure it’s clear even on smartphone screens. Always test your thumbnail at 160x90 pixels to confirm the text is still legible.
Choose high-contrast color combinations to make your text stand out. White or yellow text with a dark 8–12 pixel outline works well. Alternatively, you can use a black-to-transparent gradient under the text to ensure it pops against a busy background. For example, WIRED uses a consistent color-coding system for its series thumbnails - green for "Autocomplete Interview" and blue for "Tech Support." This consistency helps viewers instantly recognize their content in a crowded feed.
| Element | Best Practice | Recommended Fonts/Colors |
|---|---|---|
| Episode Number | Large, bold, and high-contrast | Impact, Montserrat, Bebas Neue |
| Safe Area | Top-left or center-left; avoid bottom-right | White or Yellow with Black Outline |
| Text Limit | 1–4 words total | 4.5:1 minimum contrast ratio |
Step 4: Optimize for Mobile Viewing
Once your visuals and text are polished, the next step is to ensure your thumbnails look just as good on mobile devices. With over 70% of YouTube watch time happening on mobile screens, chances are your thumbnail will be viewed on a screen as small as 5 inches. At this size, thumbnails typically appear at around 180x101 pixels in the feed. A design that looks blurry or cluttered at this scale could cost you valuable clicks.
Design for Small Screens
Simplicity is key when designing for mobile. Thumbnails overloaded with multiple subjects, busy backgrounds, or excessive visual elements are difficult to interpret on smaller screens. Instead, focus on a single, clear subject - like a close-up of an expressive face that takes up at least 25% of the thumbnail's height. To make your subject pop, aim for a contrast where the main element is at least 30% brighter or darker than the background. For better accessibility, especially in bright outdoor conditions, ensure a minimum contrast ratio of 4.5:1 between text and background.
Here’s an example: A gaming creator tested two thumbnail designs. One featured a full squad of four characters, while the other focused on a single character with a shocked expression. The cluttered design had a 1.8% click-through rate (CTR), but the simplified version with one character jumped to 4.2% CTR over seven days. Similarly, the cooking channel "Tasty Creations" swapped their wide-angle shots with busy backgrounds for extreme close-ups and bold, three-word text. This change boosted their CTR from 2.8% to 7.1%.
Test Your Thumbnails on Mobile
Make sure your thumbnail remains clear even when scaled down to 160x90 pixels. A simple way to test this is the squint test - if the main subject or hook isn’t immediately obvious when you squint, it’s time to simplify your design. As Ventress.app advises:
If your thumbnail isn't legible when it's the size of an app icon, it isn't ready.
Also, check how your thumbnail performs against both light and dark backgrounds to ensure sharp edges and strong contrast. Finally, take advantage of YouTube Studio’s "Test & Compare" feature. This tool allows you to compare A/B testing vs gut feeling by testing up to three thumbnail variations with real mobile users. The winner is determined by watch time share, not just CTR, ensuring your thumbnail attracts viewers who engage with your content.
Once your thumbnail passes these mobile tests, you're ready to streamline your workflow with ThumbnailCreator.
Step 5: Speed Up Your Workflow with ThumbnailCreator
Once you've optimized your design and mobile readability, it's time to take your production process to the next level. Thumbnails are a crucial part of any YouTube series, but creating them can easily consume hours of your week - especially if you're aiming for consistency across dozens of episodes. That's where automation tools like ThumbnailCreator come in. This AI-powered tool can cut your thumbnail design time from 30 minutes to just 3 minutes. By automating repetitive tasks, you free up time to focus on the creative touches that make each episode stand out.
ThumbnailCreator Features Overview
ThumbnailCreator is packed with tools designed to simplify the thumbnail creation process, even if you have zero design experience. Its AI generation tool creates high-quality backgrounds and visual elements from simple text prompts, so you can skip the hassle of stock photo searches or manual photography. The face swapping feature is another standout - it allows you to place your face onto various poses or pre-designed templates, ensuring your personal brand stays consistent across all episodes. And with one-click background removal, isolating subjects for clean, professional layouts has never been easier.
Another helpful feature is the brand kit, which automatically applies your saved colors, fonts, and logos to every thumbnail. This not only reinforces your channel's identity but also saves time. Consistent branding, after all, can increase click-through rates by up to 38%. To top it off, predictive performance analytics reviews your design and offers suggestions to enhance contrast and text placement before publishing.
Create Series Thumbnails Faster with AI
ThumbnailCreator goes beyond individual designs to make series production a breeze. With its templating strategy, you can build a master template that includes fixed elements like backgrounds, logos, and brand details. From there, it's a quick process to swap in episode-specific details like titles or numbers. Some advanced features even allow you to generate custom thumbnails directly from your YouTube video link by pulling metadata such as the title and description and applying them to your preset template.
For creators managing multiple episodes, batch processing is a massive time-saver. Record a few minutes of varied facial expressions in one green screen session, export the best frames, and use ThumbnailCreator's face-swapping tool to integrate them into your templates. Combine this with AI-generated backgrounds, and you can crank out thumbnails for an entire season in record time. With 90% of top-performing YouTube videos featuring custom thumbnails, a faster workflow not only saves you time but also keeps your content competitive.
Conclusion
Review of the 5 Steps
Creating effective thumbnails boils down to five key principles that can significantly impact your channel's performance. First, establish a consistent branding template that makes your series instantly recognizable. This visual consistency helps loyal viewers spot your content in a crowded feed and reinforces your overall brand. Second, use attention-grabbing visuals - especially human faces with strong expressions. Thumbnails featuring faces tend to perform better, averaging 921,000 more views than those without. Third, include clear text and episode numbers in your design. Stick to 3–4 bold words that quickly communicate your video's value, as viewers take only about 0.3 seconds to decide whether to click. Fourth, ensure your design works well on mobile devices by testing it at a small size (around 160×90 pixels) to guarantee clarity, following YouTube thumbnail size best practices. Finally, take advantage of tools like ThumbnailCreator to streamline your workflow and maintain a consistent posting schedule that episodic content requires.
These steps aren't just about making your thumbnails look good - they directly influence viewer behavior and channel growth. Thumbnails that accurately reflect your content and maintain visual consistency reduce bounce rates from clickbait and signal quality to YouTube's algorithm. It's worth noting that 90% of top-performing videos use custom thumbnails instead of auto-generated ones, and optimized designs can boost viewership by as much as 154% for the same video content.
By following these strategies, you're setting your channel up for long-term success.
Start Designing Your Series Thumbnails
Now it’s time to put these strategies into action. Begin by creating your first template using ThumbnailCreator. Its AI tools can help you design compelling backgrounds while keeping your colors, fonts, and logos consistent through the brand kit feature. Before publishing, test your thumbnail on your phone to ensure the text and visuals are clear at a small size. If anything feels cluttered or unclear, simplify the design.
A well-thought-out thumbnail does more than just attract clicks - it builds trust with your audience and encourages them to keep coming back for more. As Chucky Appleby, part of MrBeast's creative team, explains:
Make your thumbnail easy to understand so that when people look at it the first time, they're saying, 'I know what's going on in this video, so I'm going to click on it'.
With the right tools and approach, you can create thumbnails that not only drive clicks but also strengthen your brand and grow your series. Start designing today and watch your content thrive.
FAQs
How can I tell if my thumbnail template is consistent enough?
A consistent thumbnail template strengthens your brand by incorporating similar colors, fonts, layouts, and imagery across your videos. This makes it easier for viewers to immediately identify your content. Take a look at your recent thumbnails - do they share core visual elements and reflect your brand identity? If so, your template is likely on the right track. Keep refining your design based on viewer engagement and feedback to ensure consistency and boost recognition.
Should every series thumbnail include my face?
Including your face in thumbnails can help create a personal connection with viewers and make them more appealing. However, this isn't a one-size-fits-all rule. It really depends on your branding and the style of your content. Think about what resonates most with your audience and aligns with the overall tone of your channel.
When should I change a thumbnail in my series?
If your thumbnail isn't grabbing attention, it might be time for a change. For new videos, consider updating the thumbnail if the click-through rate (CTR) falls below 5% within the first 24 hours. For older videos, refreshing the thumbnail can help if views have dropped significantly or if the thumbnail no longer represents the content accurately.
Make sure to wait at least 24 hours after publishing before deciding, as this gives enough time to gather meaningful data.