
How to Replace Thumbnail Backgrounds with AI
Replacing thumbnail backgrounds with AI can help your videos stand out and attract more viewers. Tools like ThumbnailCreator simplify the process, offering features like one-click background removal, AI-generated backgrounds, and pre-designed templates. Here’s a quick overview:
- Why Thumbnails Matter: Thumbnails influence click-through rates (CTR) and YouTube recommendations. Custom thumbnails can boost CTR by 60–70%.
- Steps to Replace Backgrounds:
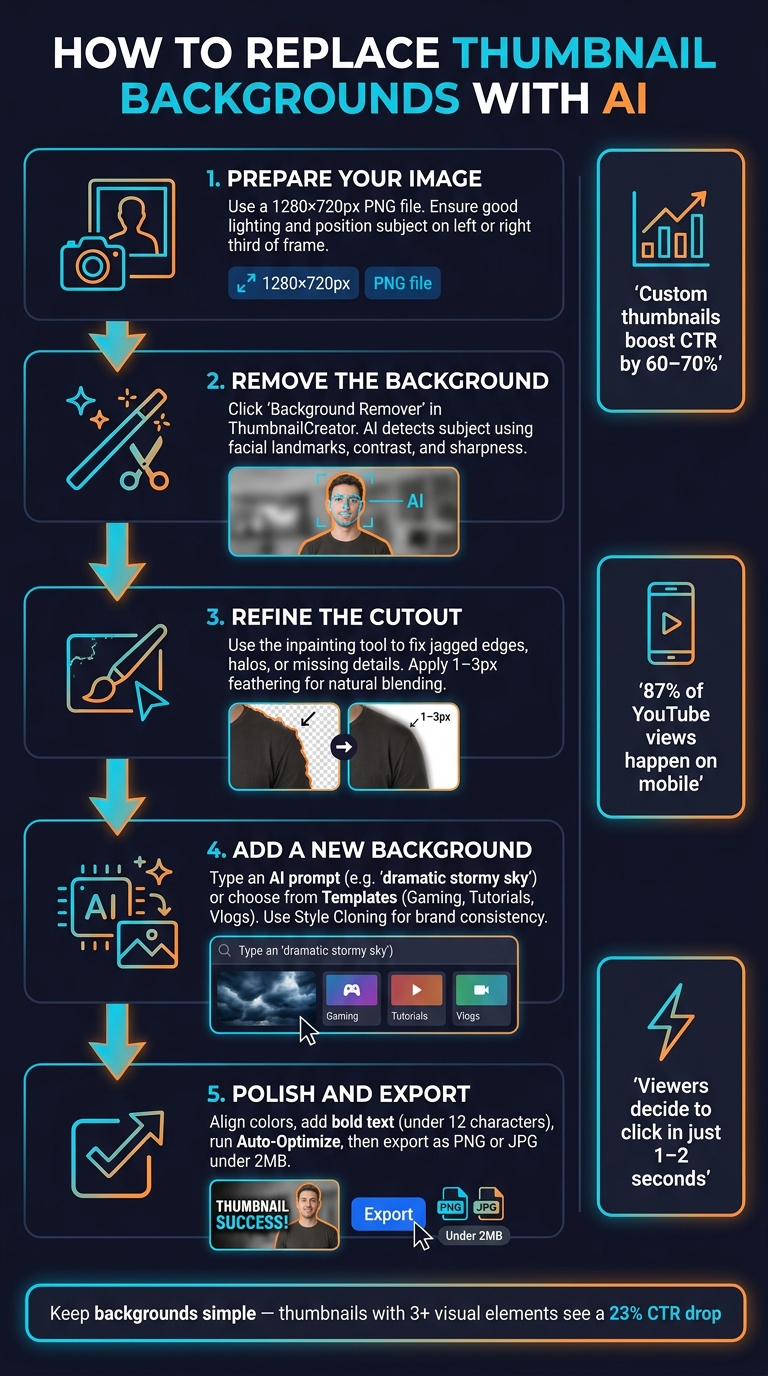
- Choose a high-quality image (1280 × 720 pixels recommended).
- Use AI tools like ThumbnailCreator to remove the background.
- Refine edges and imperfections with inpainting tools.
- Add a new background using AI-generated designs or templates.
- Adjust colors, text, and layout for a polished look.
- Pro Tips:
- Use bold, readable fonts for text.
- Test thumbnails at smaller sizes for mobile visibility.
- Stick to a consistent style for brand recognition.
With tools like ThumbnailCreator, you can create professional thumbnails in minutes, helping you increase engagement and grow your channel.
How to Replace Thumbnail Backgrounds with AI: Step-by-Step
How To Replace A Background Using AI in CapCut!
sbb-itb-b59debf
Preparing Your Thumbnail Image for AI Background Replacement
The quality of your thumbnail starts with a solid foundation. A well-prepared source image makes it much easier for AI tools to deliver polished results.
Choosing the Right Source Image
Start with an image that’s at least 1280 x 720 pixels (16:9 aspect ratio), which aligns with YouTube's recommended standard. Smaller images can lead to blurry thumbnails. Keep the file size under 2MB and, when possible, use PNG files instead of JPGs. PNG files retain better edge detail during edits.
Good lighting is key. Opt for natural light and wear clothing that contrasts with the background. This reduces harsh shadows and ensures the subject stands out.
"Thumbnails featuring close-up faces with exaggerated expressions consistently outperform faceless thumbnails." - Backgroundless
For mobile viewers - who account for over 70% of YouTube's audience - thumbnails can shrink to as small as 120 pixels wide. To keep your thumbnail effective, focus on close-up shots and use dedicated photos instead of video screenshots. This approach ensures better lighting, angles, and facial expressions, which are crucial for AI tools to process accurately. Position your subject on either the left or right third of the frame. This leaves space for a new background and any text overlays you might add.
Once your source image is ready, you’re set to move on to ThumbnailCreator for editing.
Setting Up in ThumbnailCreator
With your image prepared, head to ThumbnailCreator to start your project. You can upload your image directly by dragging a file into the tool or importing it from a YouTube URL to pull an existing thumbnail or video frame.
After uploading, the AI will automatically break your image into layers - such as foreground, background, text, and objects - so you can edit each element independently. If your image isn’t high enough quality, use the built-in AI Image Upscaler to enhance it by 2x or 4x before making edits.
Before diving into background removal, use the YouTube Preview Tool within ThumbnailCreator. This feature lets you see how your thumbnail will look in search results, on home feeds, and on mobile screens. It’s a great way to spot any composition or readability issues early on.
Removing the Existing Background Using AI
Once your image is uploaded and the layers are set, it's time to let the AI handle the background removal.
Using AI Background Detection
Start by clicking the Background Remover button. ThumbnailCreator's AI will analyze the image to separate the subject from the background. It uses factors like facial landmarks, sharpness, contrast, and positioning to identify the foreground. This method works best with well-lit portraits and clear, distinct backgrounds. However, if the subject's colors are too similar to the background or the image is low-resolution or dimly lit, the AI might struggle with certain edges.
When the process is complete, your subject will be placed on a transparent (checkerboard) background. Carefully review the result to ensure the subject's outline is clean and free of leftover background pieces. Zoom in to 150–200% to check the edges and finer details. If you notice any imperfections, move on to the refinement step.
Refining the AI Cutout
After the AI has removed the background, you may need to clean up any small errors using the inpainting tool. Common issues include jagged edges, missing parts like fingers, halo effects, or patches of leftover background.
To fix these, paint over the problem areas to guide the AI for a smoother cutout. Use a larger brush for broader corrections and a smaller brush for detailed areas. Zoom in for precision and adjust the brush size as needed. You can also apply edge smoothing or feathering in small increments (1–3 pixels) to ensure the subject blends naturally without looking blurry.
Finally, test the cutout by placing it against a solid contrasting color, such as black or white. This will help you spot and correct any remaining halos or imperfections before moving forward.
Replacing and Customizing the Thumbnail Background
With your subject neatly cut out, it's time to dive into the most impactful part of thumbnail creation: crafting a background that complements your video's theme and grabs attention.
Generating a New Background with AI
Once your subject is isolated, you can create a background that aligns perfectly with your video's message. ThumbnailCreator makes this easy - just type a description of what you want into the AI prompt field. For example, you could input "dramatic stormy sky with dark clouds" or "bright kitchen with warm lighting for a cooking channel." The tool will generate a background tailored to your description.
For a cohesive look across your channel, the Style Cloning feature captures color schemes and layouts that have worked well before. This helps maintain visual consistency without imitating others’ designs. You can also save commonly used descriptions as prompt snippets, making it simple to reuse them for a series of videos without retyping.
Using Templates and Object Swapping
If starting from scratch feels daunting, the Templates library is your go-to. It’s organized by categories like Gaming, Tutorials, and Vlogs, offering ready-made layouts complete with pre-set backgrounds, text, and objects. Once you select a template, you can use the drag-and-drop canvas to move elements around or swap out background objects to better suit your needs.
For precise adjustments, toggle layer visibility to focus on individual elements. This makes customizing your background far easier and less overwhelming.
Both AI-generated backgrounds and templates simplify the process, helping you create thumbnails that grab attention and boost click-through rates (CTRs).
Positioning and Layer Management
After finalizing your background, fine-tune the layout to ensure everything works harmoniously. Use z-index controls to position the background behind your subject. If you're using the popular text-behind-subject style, place the text layer between the background and the foreground. This layering adds depth and gives your thumbnail a polished, professional look.
For optimal composition, position your subject along the left or right third of the frame instead of dead center. Research shows that thumbnails with more than three visual elements can experience a 23% drop in CTR, so keep the background simple and uncluttered. Slightly blurring or desaturating the background can also help your subject stand out.
Finally, shrink your design to 120 pixels wide to check how it looks on mobile devices - where 87% of YouTube views occur. This ensures your thumbnail remains clear and engaging, even on smaller screens.
Polishing and Exporting Your Thumbnail
After customizing your background, it’s time to refine your design for a polished, professional look.
Aligning Colors and Styles
Make sure your subject and background blend naturally. One common issue is a mismatch in color temperature - like a subject appearing warm-toned (shot under indoor lighting) against a cooler-toned background. To fix this, adjust the subject’s color temperature to align with the background, creating a seamless look.
For added depth and focus, consider using contrasting color temperatures. For instance, a warm subject (orange or yellow tones) against a cool background (teal or black) can make the subject pop. If the background feels overwhelming, try desaturating it to keep the focus on the subject. ThumbnailCreator's Auto-Optimize feature can simplify this process by adjusting contrast, vibrancy, and mobile visibility in just one click. This feature costs 1 credit per use and can save you time.
To maintain a consistent look across your channel, stick to a limited palette of 2–3 main colors and 1–2 fonts for all your thumbnails. This consistency helps build brand recognition, making your content easily identifiable.
Adding Text and Visual Elements
When it comes to thumbnail text, simplicity is key. Thumbnails with fewer than 12 characters tend to perform better. Aim for 3–4 words to ensure readability on mobile devices - using more than 7 words can lower click-through rates by 20–30%.
Choose bold or extra-bold sans-serif fonts like Bebas Neue, Montserrat Bold, or Impact for maximum legibility. These fonts are compact, high-contrast, and remain clear even at small sizes (like 168×94 pixels on mobile). Using ALL CAPS for short phrases creates a clean, scannable design. To make your text pop, apply a three-layer effect: white fill, a 10–15px black stroke, and an 80% opaque drop shadow.
Position your text in "safe zones" - typically on the left side or upper-middle part of the thumbnail. Avoid placing important elements in the bottom-right corner, as YouTube’s timestamp overlay can obscure them.
Final Checks and Exporting
Before exporting, ensure your thumbnail meets YouTube’s technical requirements:
| Requirement | Specification |
|---|---|
| Ideal Resolution | 1280 × 720 pixels |
| Aspect Ratio | 16:9 |
| Max File Size | 2 MB (mobile) / 50 MB (desktop) |
| Accepted Formats | JPG, PNG, GIF |
| Minimum Width | 640 pixels |
For sharp text or graphic-heavy designs, PNG is the best choice as it preserves clean edges. For photo-based designs, opt for a JPG at 80–85% quality to keep the file size under 2 MB.
Finally, test your thumbnail by reducing its size to 120–160 pixels wide, or use thumbnail A/B testing to see which version performs best. This "stamp test" ensures your design remains clear and visually effective even at smaller sizes.
Conclusion
Switching out a thumbnail background using AI is a quick and straightforward process. As outlined above, it involves uploading your image, removing the background, and making any necessary adjustments. The whole process can be done in just a few minutes.
Did you know that viewers usually decide whether to click on a video within 1–2 seconds, largely based on the thumbnail? That’s why having a standout thumbnail is so important for growing your channel. You can even learn from top YouTube creators to see how they structure their visuals. It’s not just an image - it’s your first opportunity to grab attention.
"A well-designed thumbnail isn't just a tiny image; it's your content's first impression, a visual hook that can determine whether a potential viewer scrolls past or clicks through." - primefinancetips
Tools like ThumbnailCreator make this process easy and accessible. Over 15,000 YouTube creators are already using it to create eye-catching thumbnails that make an impact. If you haven’t tried it yet, the platform offers a 7-day free trial with 10 credits. That’s enough to explore features like background removal, real photos vs AI-generated thumbnails, and automatic optimization for your thumbnails.
Why not give it a shot? Take one of your current thumbnails, run it through ThumbnailCreator, and see the difference for yourself. A polished thumbnail could be the key to increasing your viewer engagement.
FAQs
What kind of photo works best for clean AI background removal?
For effective AI background removal, start with photos that showcase clear facial expressions and have good lighting. Strong contrast between the subject and the background is key. Expressions like surprise or curiosity tend to stand out better, especially for smaller image sizes. Use high-resolution images (minimum 1280x720) and avoid backgrounds that match the subject's colors. Proper lighting, like natural light or a ring light, helps minimize shadows for a cleaner result. Instead of pulling stills from videos, opt for dedicated thumbnail shots framed from the upper body for a sharper, more professional look.
How do I fix messy edges or “halo” outlines after removing a background?
When you’re dealing with messy edges or those pesky “halo” outlines after removing a background in ThumbnailCreator, the AI-powered inpainting and precision editing tools are your go-to fix. Simply use the brush tool to paint over the rough areas, and the AI will automatically smooth and refine the edges for you.
For trickier details, like flyaway hair, the Magic Click tool is a lifesaver. It’s designed to clean up edges and give your thumbnail that polished, professional finish.
How can I make sure my thumbnail still looks clear on mobile?
To make your thumbnail pop on mobile devices, focus on bold visuals, strong contrast, and clean, simple designs. These elements help ensure your key features grab attention, even on smaller screens.
Here are a few essential pointers:
- Use large, readable text that’s easy to spot at a glance.
- Create a clear focal point to draw viewers' eyes instantly.
- Try tools like ThumbnailCreator’s Auto-Optimize feature, which tweaks contrast, readability, and element placement for mobile displays.
Lastly, perform a quick "Shrink Test" by resizing your thumbnail to 160×90 pixels. This ensures it remains sharp and effective, even when scaled down.