
How to Upload Thumbnails in YouTube Studio
Uploading custom thumbnails in YouTube Studio is simple, but there are a few steps you need to follow. Here's a quick summary:
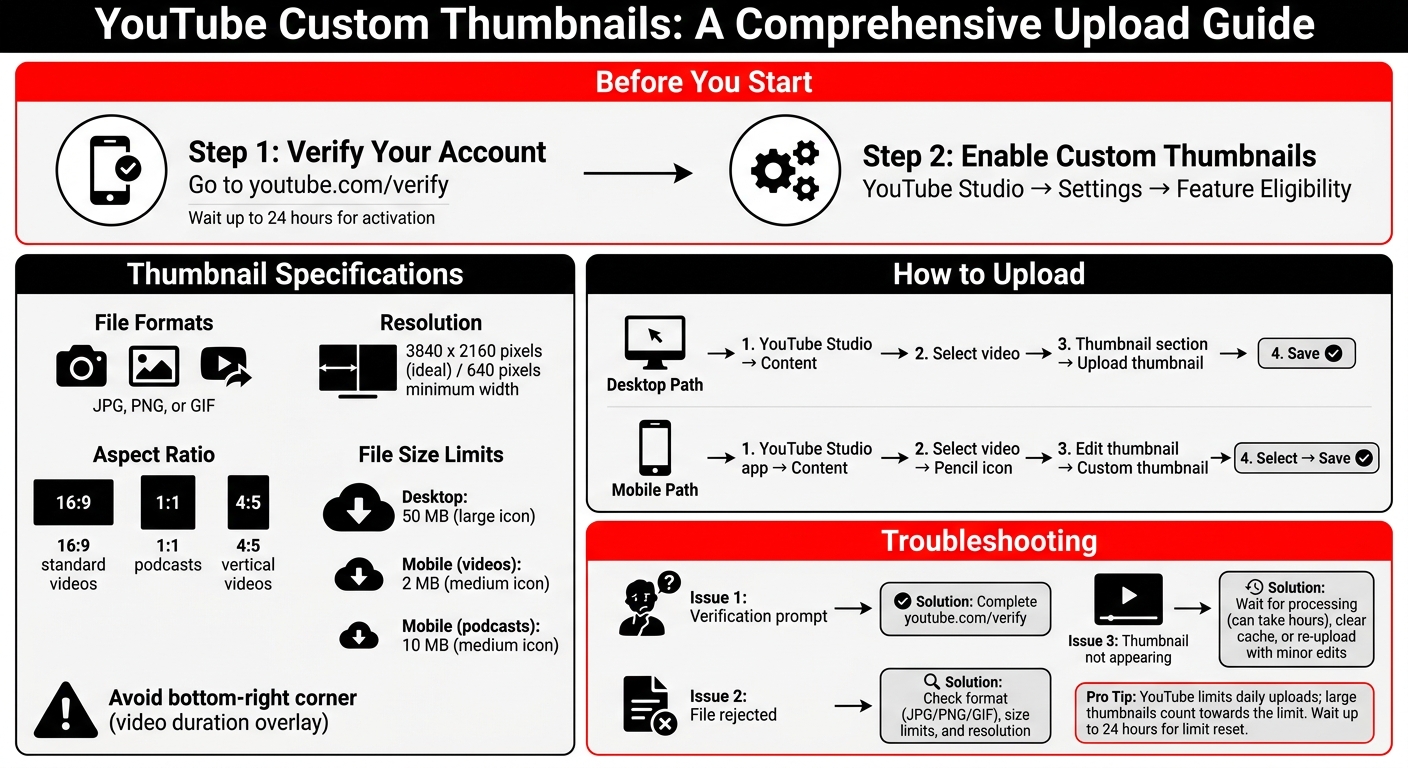
- Verify Your Account: Go to youtube.com/verify and link your phone number. This unlocks custom thumbnail uploads and other features.
- Thumbnail Requirements: Use JPG, PNG, or GIF formats. Aim for a resolution of 3840x2160 pixels (16:9 aspect ratio). File size limits are 50 MB for desktop uploads and 2 MB for mobile.
- Uploading on Desktop: Open YouTube Studio, go to Content, select a video, and upload your custom thumbnail in the Thumbnail section.
- Uploading on Mobile: Use the YouTube Studio app, select a video, tap the pencil icon, and upload your thumbnail.
Pro Tip: Use high-quality thumbnails or explore AI thumbnail generation for professional results and avoid placing critical elements in the bottom-right corner (covered by the video duration).
Follow these steps to make your videos stand out and improve your click-through rate!
YouTube Custom Thumbnail Upload Process and Requirements Guide
Prerequisites for Uploading Custom Thumbnails
How to Verify Your YouTube Account
To use custom thumbnails, you need to verify your YouTube account by linking it to a phone number. This also unlocks features like live streaming and longer video uploads.
Here’s how to do it:
- Go to youtube.com/verify.
- Choose to receive a 6-digit code via SMS or voice call.
- Enter the code to complete verification.
Keep in mind, it can take up to 24 hours for these features to activate. Additionally, be cautious about adhering to YouTube’s Community Guidelines. Violations can result in losing access to custom thumbnails and may lead to a 30-day ban for repeated offenses.
After verifying your account, you can enable custom thumbnails through your account settings.
How to Enable Custom Thumbnails
Once verification is done, head to YouTube Studio to activate custom thumbnails. Follow these steps:
- Visit studio.youtube.com and click the gear icon in the bottom-left corner to open Settings.
- Select Channel from the sidebar, then navigate to the Feature Eligibility tab.
Under the Feature Eligibility section, look for "Intermediate Features." If "Custom thumbnails" is marked as "Eligible" and not "Enabled", click Verify Phone Number to finalize the setup.
Keep in mind there are daily limits for custom thumbnail uploads. If you see the "Daily custom thumbnail limit reached" error, you’ll need to wait 24 hours before uploading more thumbnails.
sbb-itb-b59debf
How to Add Custom Thumbnails to Your YouTube Videos
Thumbnail Specifications and Requirements
Before uploading your thumbnail to YouTube, make sure it aligns with the platform's format and resolution standards.
Supported File Formats and Size Limits
YouTube supports custom thumbnails in JPG, GIF, or PNG formats. If you're working with photographs or need smaller file sizes, go with JPG. For graphics featuring sharp edges, PNG is a better choice.
The file size limit depends on your upload method: 50 MB for desktop uploads and 2 MB for mobile video thumbnails. For podcasts uploaded via mobile, the limit increases to 10 MB.
Keep in mind that GIF thumbnails only display the first frame, as YouTube doesn't support animated thumbnails.
Required Resolution and Aspect Ratio
To ensure your thumbnails look great across all devices, YouTube recommends a resolution of 3840 x 2160 pixels, especially for 4K displays and TV apps. The minimum width requirement is 640 pixels.
Stick to the standard 16:9 aspect ratio for most videos, as it ensures consistent display across various devices. However, if you're creating thumbnails for podcast playlists, use a 1:1 square ratio instead. For vertical videos, YouTube automatically replaces 16:9 thumbnails with 4:5 auto-generated thumbnails on mobile home, explore, and subscription pages.
Lastly, avoid placing critical design elements in the bottom-right corner of your thumbnail. This area is often covered by the video duration overlay, which could obscure important details.
How to Upload Thumbnails in YouTube Studio
Once you've verified your account and enabled custom thumbnails, you're ready to add your personalized images to your videos using YouTube Studio. Here's how to do it:
Uploading Thumbnails on Desktop
Start by signing in to YouTube Studio and navigating to Content from the sidebar. Click on the video you want to update and scroll to the Thumbnail section. You’ll notice three auto-generated thumbnail options based on different points in your video (around 25%, 50%, and 75% of the total length). To upload your custom thumbnail, click Upload thumbnail, select your image file, and then hit SAVE in the top right corner to finalize the update.
Desktop uploads allow images up to 50 MB in size.
Uploading Thumbnails on Mobile
If you're using a mobile device, the process is just as straightforward:
Open the YouTube Studio app on your Android or iOS device. Tap Content from the bottom menu and choose the video you want to edit. Tap the pencil icon, then tap Edit thumbnail on the current image. From here, you can either pick one of YouTube’s auto-generated options or tap Custom thumbnail to upload an image from your device’s gallery. Once you’ve selected your image, tap SELECT to confirm, and then SAVE in the top right corner.
Keep in mind that mobile uploads have size limits: 2 MB for standard videos and 10 MB for podcasts. If your file exceeds these limits, you’ll need to compress it or switch to a desktop for uploading. If you need to resize your image, you can use various free thumbnail tools to meet these requirements.
Troubleshooting Common Thumbnail Upload Issues
Sometimes, even when you follow all the right steps, uploading a custom thumbnail can still hit a snag. Here’s a breakdown of common problems and how to fix them.
Fixing Verification Prompts
If YouTube asks you to verify your account when uploading a thumbnail, it means your account isn’t fully verified yet. This step ensures that you're a real user. To fix this:
- Go to youtube.com/verify.
- Select your country.
- Choose to receive a 6-digit code via SMS or an automated voice call.
- Enter the code to complete the process.
Once verified, you may need to wait up to 24 hours before the custom thumbnail feature is enabled. If you're still being prompted after that time, double-check that you’re logged into the right channel, as verification applies to each channel individually.
If verification isn’t the issue, you might be dealing with file compatibility problems.
Resolving File Rejection Errors
File rejections are usually due to format, size, or resolution issues. Here’s what you need to know:
- Supported Formats: YouTube accepts JPG, GIF, or PNG files. If your file is in a different format like HEIC, TIFF, or WebP, use an image editor, tech thumbnail templates, or an online converter to change it to an accepted format.
- File Size: Make sure your thumbnail file doesn’t exceed YouTube’s size limit.
- Resolution: Your image should ideally be 3840 x 2160 pixels, with a minimum width of 640 pixels, and maintain a 16:9 aspect ratio to avoid cropping.
If you're uploading from a mobile device and encountering issues, try switching to a desktop browser for better results. If the file specifications are correct and you're still having trouble, the issue might be related to processing delays.
Understanding Delayed Thumbnail Appearance
Sometimes, your new thumbnail doesn’t show up right away - this is usually due to processing delays.
"In 95% of the cases, YouTube won't change your thumbnail because it takes long to process it" - David Ch, Chief Editor at ThumbnailTest
YouTube’s servers need time to process and distribute the thumbnail across regions and devices, which can take a few hours. If the new thumbnail appears in YouTube Studio but not publicly, it could be a caching issue. To check the updated version, try these steps:
- Open your video in an incognito or private browser window.
- On mobile, clear the YouTube app cache or restart the app if the thumbnail updates on desktop but not on your device.
If the thumbnail still doesn’t update after several hours, making a small adjustment - like cropping or tweaking brightness - and re-uploading it can often prompt YouTube to re-process the file.
Creating Thumbnails with ThumbnailCreator
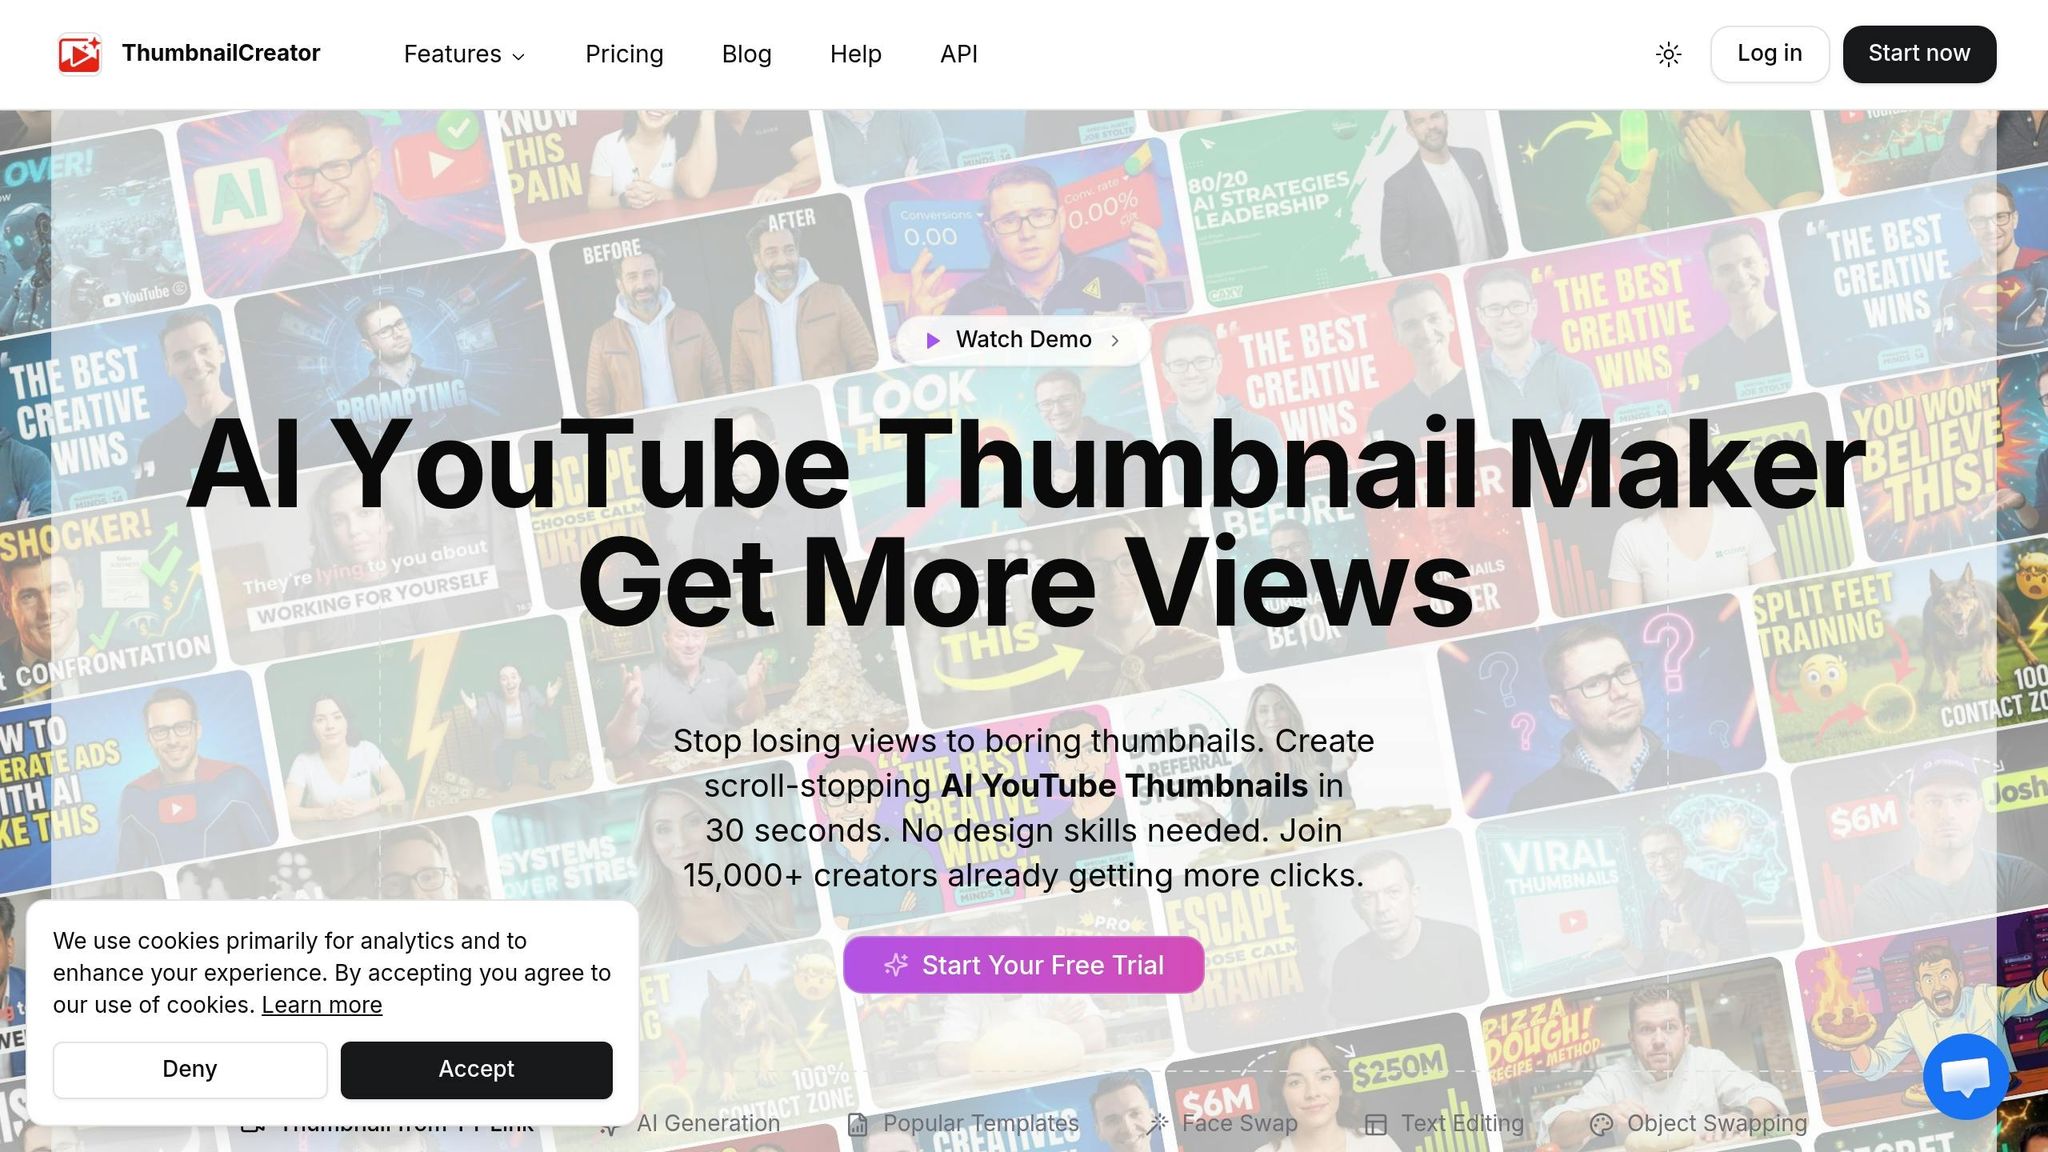
Now that you’ve learned how to upload thumbnails in YouTube Studio, it’s time to focus on creating designs that grab attention. Enter ThumbnailCreator - a tool designed to help YouTube creators craft professional-looking thumbnails without needing advanced design expertise. Let’s dive into how this tool simplifies the process.
What is ThumbnailCreator?
ThumbnailCreator is an AI-driven platform that generates and customizes YouTube thumbnails based on simple text prompts.
It offers a range of features tailored for YouTube creators, such as:
- AI Thumbnail Generator: Creates visuals from scratch using your descriptions.
- Face Swap: Lets you insert your face for consistent branding across videos.
- Style Cloning: Mimics the aesthetics of popular thumbnails to help your content stand out.
- Design Rules: Allows you to set brand guidelines so the AI adheres to your specific style preferences consistently.
How ThumbnailCreator Saves Time and Boosts Click-Through Rates
The "Edit with AI" feature interprets commands like "add bold white text" to quickly enhance your designs. It can also generate multiple design variations for A/B testing, letting you determine which elements resonate most with viewers and help you reach optimal CTR benchmarks. For the best results, use detailed prompts - think "excited person pointing at a rising graph" instead of vague descriptions.
New users receive free credits and can extract thumbnails directly from URLs, making updates quick and easy.
Using ThumbnailCreator with YouTube Studio
ThumbnailCreator ensures its thumbnails meet YouTube’s technical requirements. Once your design is ready, download it at 1280x720 resolution with a 16:9 aspect ratio to align with YouTube’s specifications. Then, log in to YouTube Studio, go to Content, select your video, and click Upload thumbnail to update your video.
Conclusion
Key Takeaways
Uploading custom thumbnails in YouTube Studio is a simple process, but it starts with account verification. Without verifying your account, you'll be stuck with auto-generated thumbnail options. Keep in mind that desktop and mobile uploads have different size requirements. For the best results, use a 16:9 aspect ratio and high-resolution images - 3840 x 2160 pixels is ideal. Always make sure your thumbnails follow YouTube's Community Guidelines. Violations can lead to strikes or even a suspension of your ability to upload custom thumbnails for at least 30 days. Also, remember that YouTube Shorts don’t support custom thumbnails after publishing, so you’ll need to select a frame during the initial upload process.
If designing thumbnails feels overwhelming, tools like ThumbnailCreator can make life easier. This AI-driven platform helps you create professional-looking thumbnails without needing advanced design skills. It also takes care of YouTube's technical requirements automatically, so you can focus on creating visuals that grab attention.
Next Steps for Your Channel
Now that you know the basics, here’s how to get started: First, verify your YouTube account to unlock custom thumbnail uploads. Then, check out ThumbnailCreator at https://thumbnailcreator.com to design your first thumbnail. Once your design is ready, download it at the proper resolution and upload it through YouTube Studio’s Content section.
Don’t be afraid to experiment with different styles to see what resonates with your audience. By combining ThumbnailCreator’s AI tools with YouTube Studio’s features, you’ll be well-equipped to boost your video’s click-through rates and grow your channel’s reach.
FAQs
Why can’t I upload a custom thumbnail yet?
If you're unable to upload a custom thumbnail to your YouTube videos, it might be because your channel doesn't meet the necessary conditions. Here's what you need to check:
- Channel Verification: Your channel must be verified through a phone number.
- Account Standing: Your channel should have no active community guideline strikes.
- Account Age: The channel must be at least 24 hours old.
- Feature Enablement: The custom thumbnail feature must be enabled on your account.
Make sure all these requirements are fulfilled before attempting to upload custom thumbnails.
Why doesn’t my new thumbnail show up right away?
When you update your YouTube thumbnail, it might not show up right away. This delay is often due to YouTube’s processing time. If your account is newly verified or still unverified, it could take up to 24 hours for the changes to go live. Additionally, caching issues in your browser or app might cause the old thumbnail to stick around temporarily. Give it some time for YouTube to fully update your thumbnail.
What should I do if YouTube rejects my thumbnail file?
If YouTube isn't accepting your thumbnail, it might be due to problems with size, format, or account settings. Make sure your thumbnail meets these requirements: 1280×720 pixels, less than 2MB, and in one of these formats: JPG, GIF, BMP, or PNG.
Additionally, you'll need to verify your account to upload custom thumbnails. If you're still having trouble, look for error messages about file permissions or other issues. Also, double-check that your account has the proper permissions to upload custom thumbnails.