

How Instagram Carousels Boost YouTube Video Views
Yes - Instagram carousels can send more people to your YouTube videos than a single promo image. The reason is simple: a carousel gives you more room to show the video’s value, build interest, and point people to one next step.
If I wanted the short version, it would be this:
- Pick one YouTube video with one clear outcome
- Turn that outcome into 4–6 short slides
- Use Slide 1 as the hook
- Share 2–3 useful points
- Stop before the full answer
- End with one clear CTA to watch the full video
- Link to the direct video, not my channel home page
- Track External traffic, watch time, and average view duration using YouTube thumbnail guides to optimize your click-through rate
A few details matter more than most:
- Use 1,080 x 1,350 px slides for mobile viewing
- Keep slide text short, often 4 to 6 words
- Match the carousel cover to the YouTube thumbnail
- Publish the YouTube video first, then the Instagram carousel
- Judge results by clicks and watch time, not likes alone
This is not about reposting the whole video in slide form. It’s about giving people just enough to think, “I want the rest.” If the carousel gets swipes but not clicks, the CTA or link path is weak. If it gets clicks but low watch time, the video opening likely does not match the promise.
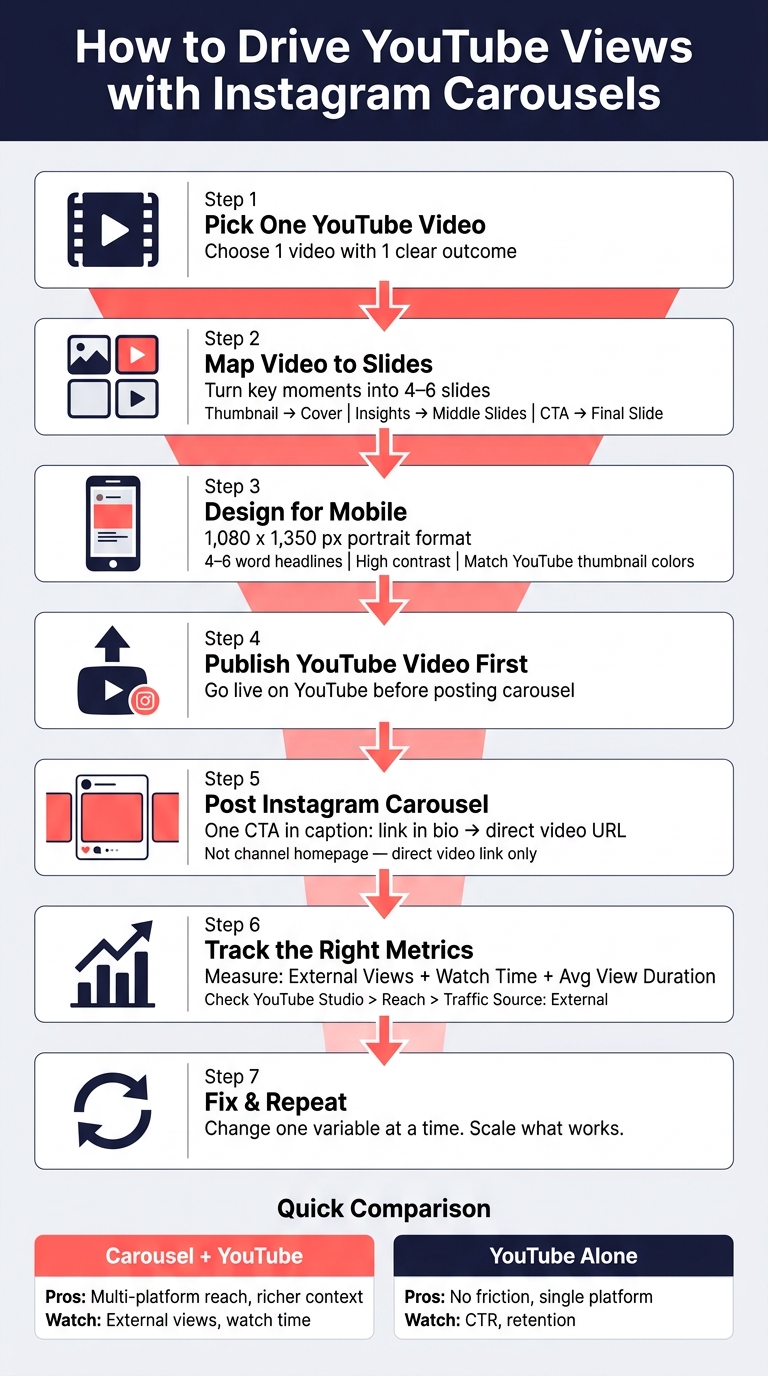
Instagram Carousel to YouTube Views: Step-by-Step Funnel
How to Repurpose YouTube Videos into Instagram Carousels Using Adobe Express
sbb-itb-b59debf
Quick Comparison
| Approach | What it does well | Main downside | Best metric to watch |
|---|---|---|---|
| Instagram carousel + YouTube video | Brings in traffic from Instagram and adds more context before the click | Adds one extra step before the video | External views, watch time |
| YouTube upload alone | Keeps viewers on one platform with less friction | Depends on YouTube discovery only | CTR, retention, watch time |
So my takeaway is simple: use carousels to sell the click, not to replace the video. When the hook, slide flow, link path, and video opening line up, Instagram can become a solid traffic source for YouTube.
Plan One Carousel Around One YouTube Video
Not every video should become a carousel. The best ones make a clear, specific promise that fits the swipe format.
Tutorials and how-to videos are an easy fit because they teach one defined skill. Reaction or challenge videos can work too, but only when they have a strong hook or an angle people don’t see coming.
Pick one video with one clear payoff, then build the carousel around that single idea. The aim isn’t to recap the whole video. The aim is to get the click to YouTube. Once you’ve got the right video, turn its main moments into a slide-by-slide outline.
Start with one hook and up to three key points. Don’t try to squeeze in everything. Save the full walkthrough, the finished result, or the longer demo for YouTube.
Map Video Elements to Carousel Slides
Use this simple mapping to turn the video into a swipeable story.
| YouTube Video Element | Carousel Slide Version |
|---|---|
| Main Hook (Thumbnail/Title) | Slide 1: Carousel Cover |
| Key Insight / Supporting Point | Middle Slides: Insight Slides |
| Video Proof / Data Point | Evidence Slide |
| Final Slide / CTA | Send viewers to the full video on YouTube. |
Each slide should carry one idea only. That’s what keeps the carousel easy to follow.
Use a Slide Flow That Leaves a Reason to Click
Once you have the pieces, line them up so each swipe pushes the viewer toward the full video. A solid flow looks like this: Slide 1 makes the promise, the middle slides give two or three key points, and the last slide sends people to the full video.
Why does this work? Because it matches how people read on Instagram. They want to know what’s in it for them before they spend more time swiping.
The middle slides are where many creators slip by making common thumbnail mistakes. Some give away too much. Others stay so broad that the content feels empty. The sweet spot is simple: give people something useful now - a specific tip, a surprising stat, or a concrete step - but stop just before the full payoff. And make sure the tone fits Instagram, not just the video.
Design Carousel Slides That Get Swipes and Support the Video
Once you’ve mapped the slide flow, the next job is simple: make each slide easy to read on a phone.
Use a 1,080 x 1,350 pixel portrait layout for every slide. That taller shape fills more of the screen than a square post, which gives you a bit more space before someone scrolls away. Since people read carousels on mobile, design for mobile first.
The cover has to do the heavy lifting. It needs to earn the swipe. Put the headline front and center as the biggest element on the slide, and stick to one headline plus one supporting visual. That keeps the message clean and easy to process. High-contrast colors also help the text stand out fast.
Write Short, Specific Slide Copy That Shows the Video Benefit
Keep slide headlines short: four to six words is a good target. That’s usually enough to read in a split second, but still clear enough to feel useful.
The best copy focuses on the outcome. Don’t just name the topic. Show the payoff.
Instead of "Tips for better editing", write "Cut your edit time in half." Instead of "Gaming setup advice", write "3 settings pros change first."
Tone matters too. Tutorials usually work better with direct language. Entertainment content can lean a bit more playful. In both cases, the copy should point to what the viewer gets from watching the full video, not just what the video is about. That makes the slides easier to scan and gives the video a stronger hook.
Keep the Carousel Cover and YouTube Thumbnail Visually Matched
Once the wording is done, line up the carousel cover with the YouTube thumbnail.
If someone sees your carousel on Instagram and later finds your video on YouTube, both should feel connected. Use the same color palette, key wording, and subject framing across both assets. So if the thumbnail puts the subject on the left, keep that same setup on the carousel cover too.
This is where a tool like ThumbnailCreator can help. ThumbnailCreator can speed up this step by helping you match the thumbnail’s colors, framing, and text hierarchy to the carousel cover.
Publish With a Clear Path From Instagram to YouTube
Publish the YouTube video first. Then post the carousel. If the video isn't public yet, your CTA sends people nowhere. That's a wasted click.
Once the video is live, copy the direct URL and test it in a logged-out mobile browser. Make sure it loads without any hiccups. That way, the carousel can send traffic to a live destination instead of a dead end.
Before you upload the carousel, export every slide at the exact same pixel dimensions. Also keep key text and faces away from the edges. Instagram uses the first uploaded image as the sizing reference and may crop later slides to match it. That matters for two reasons: it helps the full carousel look clean, and it keeps the carousel aligned with the thumbnail setup from the earlier step.
Check the full sequence on your phone before you publish. If the files look right, move to the caption.
The caption is your last conversion point, so keep it simple. State the payoff, sum up the video in one line, and finish with ONE CTA:
"Watch the full tutorial on YouTube - tap the link in our profile."
Don't pile on extra asks like commenting, saving, sharing, and clicking the link. Too many directions split attention. One main action works better.
Send people to the promoted video itself, not your channel homepage. YouTube logs visits from outside platforms under External sources in Reach analytics, so a direct video link keeps that traffic easier to track. If you use a link-in-bio tool, put the promoted video first and label it with action-focused text such as Watch the carousel tutorial on YouTube.
After publishing, tap the profile link from a logged-out mobile browser and confirm that the correct video opens.
Make the Link Path Easy to Follow
Instagram Carousel Promotion vs. Publishing on YouTube Alone
Using a carousel with a YouTube upload gives you another place to get seen. But it also adds one more step before someone reaches the video. Neither option wins every time. They just do different jobs in the funnel.
| Factor | Instagram carousel + YouTube upload | YouTube upload alone |
|---|---|---|
| Discovery | Reaches Instagram followers and feed users; YouTube records resulting visits as external traffic | Relies on YouTube Search, Home, Suggested videos, and subscribers |
| Link friction | Requires a working link path and at least one extra tap | No cross-platform jump; viewers are already on YouTube |
| Measurement | Requires matching Instagram engagement with YouTube External sources data | YouTube-native analytics covers the full discovery-to-retention picture |
| Main limitation | People may engage with the carousel without ever clicking through | Strong videos can still get missed without outside promotion |
Use these differences to judge whether Instagram is adding reach or just adding friction. Look at qualified clicks and watch time, not raw engagement. The next step is checking whether those clicks turn into watch time.
Measure Results, Fix Weak Points, and Repeat What Works
Once the carousel is live, check whether Instagram attention turns into YouTube watch time.
Read YouTube and Instagram Metrics Together
Before you publish, log 7 days of baseline data. Then compare it with the next 7 days in YouTube Studio > Analytics > Advanced Mode. The target isn't more engagement by itself. The target is qualified YouTube views.
To check whether Instagram drove traffic, open the video's Reach tab and look at Traffic source: External. YouTube's external-source report can show which sites and apps sent viewers, so watch for Instagram traffic there. Some mobile or in-app visits may still land under Direct or unknown, so treat the Instagram figure as a minimum tracked number, not the full total.
| Metric | Where to check | What it tells you |
|---|---|---|
| Reach, swipes, saves | Instagram post insights | Whether the carousel kept people interested |
| Profile visits, link clicks | Instagram post insights | Whether viewers tried to continue to the video |
| External views | YouTube Studio, Reach tab | Whether Instagram sent measurable traffic |
| Watch time | YouTube Analytics | The total viewing value of that traffic |
| Average view duration | YouTube Analytics | Whether referred viewers stayed to watch |
| Audience retention | YouTube Analytics | Where referred viewers dropped off |
Start with the lowest-performing metric. That's usually where the funnel is breaking.
If engagement is high but clicks are low, the carousel likely didn't earn the click. If clicks are high but watch time is weak, the video opening likely didn't deliver on the promise.
Fix Common Problems in the Carousel-to-YouTube Funnel
Use the weakest metric to find the break point: the cover, the click path, or the video itself.
If reach is high but profile visits or link clicks are low, the cover slide probably isn't giving people a reason to move. A vague opener like "New video out now" doesn't do much. A line like "Fix harsh indoor lighting in 3 steps" gives people a clear reason to care.
If swipes and saves look good but YouTube visits stay weak, the issue is likely the path to the link. Make the destination easier to spot in the caption and on the final slide. People shouldn't have to hunt for the next step.
If external views are high but average view duration is low, the carousel probably promised one thing and the video opened with another. Go back to the first 30 seconds of the video and compare them with the exact wording used in the carousel. Tighten that match so the viewer gets what they expected right away.
Change one variable at a time - the cover, CTA, slide order, or promise - so the result is easy to read. When a carousel brings in solid external views and meaningful watch time, keep that format. Use the same topic angle and slide flow, then apply it to the next video.
Conclusion: Build a Simple Carousel-to-YouTube System
Use one repeatable loop: pick one video, turn its main payoff into a short carousel, and send people to the direct video link. That keeps the funnel simple and easy to measure.
Your design and copy should feel like one piece, not two separate assets stitched together. Use ThumbnailCreator to match the thumbnail’s colors, framing, and headline style to the carousel. When the visuals line up, judge performance by traffic and watch time.
Watch clicks, watch time, and average view duration - not likes alone. Instagram should bring in qualified YouTube views, not just social activity. When a format drives both clicks and watch time, use it again for the next video.
Repeat what works, then run the same test on the next video.
FAQs
How many slides should my carousel have?
The available information doesn’t state a required number of slides for an Instagram carousel.
What it does cover is thumbnail best practices, aspect ratios, and social media post generation. So if you’re looking for a clear rule on carousel slide count, that detail isn’t included here.
If your goal is to speed up content production, ThumbnailCreator can help you put together polished thumbnails and social media assets for your promo campaigns.
Where should I send Instagram users to watch the video?
Send Instagram users to your YouTube watch page URL so they land on the video itself, not some extra step along the way.
Want more clicks? Use ThumbnailCreator to make polished thumbnails that help stop the scroll. And if you're posting Instagram Reels, weekdays between 11:00 AM and 1:00 PM can help with engagement.
What if my carousel gets clicks but low watch time?
If your carousel gets clicks but watch time stays low, your thumbnail and video often aren’t lining up. People click because the image sets one expectation, then leave when the video gives them something else.
That mismatch can cost you. YouTube cares more about watch time than raw click-through rate, so short drop-offs can limit reach over time.
The fix is pretty simple: update the thumbnail so it matches what the video actually delivers.