
Noise Reduction Techniques for AI-Generated Thumbnails
AI-generated thumbnails often suffer from visual imperfections like grainy textures, garbled text, or blurred faces. These flaws can hurt click-through rates (CTR) and reduce viewer engagement or stem from common thumbnail mistakes. Clean thumbnails, on the other hand, improve clarity, boost CTR by up to 38%, and build trust with your audience.
Key Takeaways:
- Types of Noise: Includes luminance noise (grainy brightness), color noise (random RGB speckles), and AI artifacts (distorted faces or unreadable text).
- Noise Reduction Methods:
- AI Tools: Use upscaling (2× or 4×), inpainting for targeted fixes, and AI color grading for vibrant results.
- Manual Adjustments: Tackle color and luminance noise with sliders, balance noise removal with sharpness, and avoid over-smoothing.
- Workflow Tips:
- Reduce noise before upscaling to avoid magnifying imperfections.
- Overlay sharp text after upscaling for better readability.
- Test thumbnails at smaller sizes (e.g., 120×67 pixels) to ensure clarity for mobile viewers.
A polished thumbnail can make the difference between a viewer clicking or scrolling past. Tools like ThumbnailCreator simplify the process with features like auto-optimization, face swapping, and targeted edits, helping you create sharp, professional thumbnails that grab attention.
How to Fix Noisy and Grainy Photos AI Image Denoising
sbb-itb-b59debf
Types of Noise in AI-Generated Images
AI-generated thumbnails often suffer from specific types of noise that can significantly affect their quality. Recognizing these issues is the first step toward addressing them effectively. Below are the main types of noise you might encounter and how they impact your images.
Luminance Noise
Luminance noise appears as random light and dark specks, giving the image a grainy texture. It impacts brightness without changing the color. This issue arises when AI models fail to fully denoise an image, leaving behind statistical irregularities.
The result? Fine details are lost, and the overall clarity takes a hit. This is especially noticeable in areas that should be sharp, like text or facial features. Since human vision is particularly sensitive to brightness changes, even minor luminance noise can make a thumbnail look unpolished or unprofessional. For more help, check out our YouTube thumbnail guides for design best practices.
Color Noise
Color noise, on the other hand, shows up as random red, green, and blue speckles scattered across the image. These patches are most visible in dark areas or smooth gradients, disrupting the image's color accuracy. For example, a gradient sky or a clean background might appear blotchy instead of seamless, making the thumbnail look less refined.
AI Artifacts
AI artifacts are unique visual defects introduced by generative models. These include distorted anatomy (like extra fingers or "ghost" limbs), warped faces, unreadable text, and unnatural edges that make objects look poorly integrated.
"AI image artifacts... are the telltale signs that separate amateur AI output from professional-quality images." - Cemhan Biricik, Author, zsky.ai
Such flaws can harm your brand’s credibility and lower conversion rates. Other common issues include color banding, edge halos, and inconsistent textures - for instance, one side of a face might show detailed skin pores while the other appears unnaturally smooth or plastic-like. These imperfections can make even a well-designed thumbnail look untrustworthy.
Noise Reduction Methods for AI Thumbnails
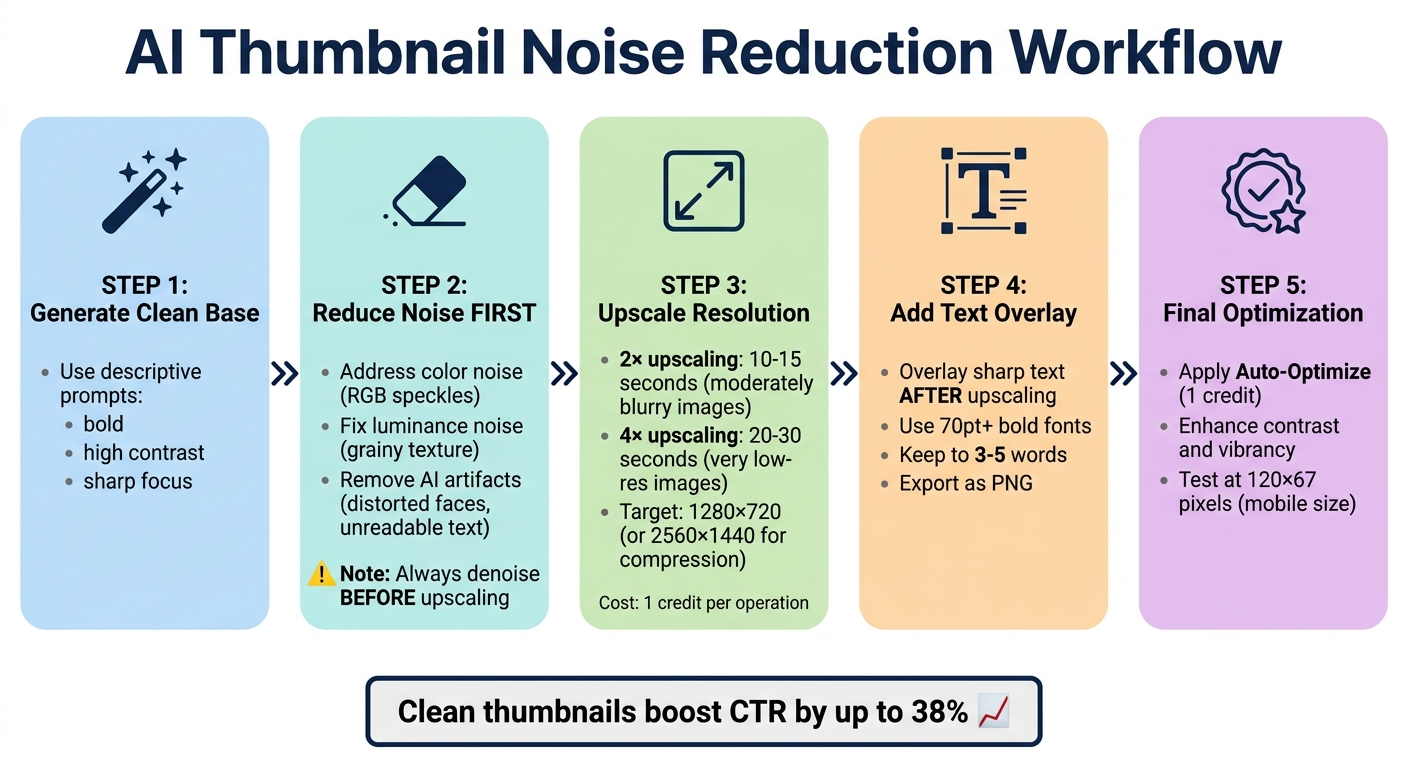
AI Thumbnail Noise Reduction Workflow: 5-Step Process
Choosing the right noise reduction method depends on your workflow preferences - whether you lean toward automated AI tools or prefer manual adjustments. Both approaches can deliver polished, professional results.
AI-Powered Denoising Tools
AI-driven tools go beyond simple blurring by reconstructing missing details using models trained on vast datasets of clean images. For instance, ThumbnailCreator's Image Upscaler doesn’t just enlarge pixels - it rebuilds fine details, textures, and edges. A 320×180 image can be transformed into a sharp 1280×720 YouTube thumbnail, making it visually appealing and ready for publishing. Processing times are quick: 2× upscaling takes 10–15 seconds, while 4× upscaling takes 20–30 seconds, each costing 1 credit per operation.
For specific fixes, AI inpainting allows targeted adjustments. You can use natural language prompts like “brighten the face area” or “make lighting warmer” to address localized issues without reprocessing the entire thumbnail.
After noise reduction, AI color grading tools can restore vibrancy, ensuring thumbnails remain striking even at small sizes like 160×90 pixels. Many tools offer presets such as "Vibrant Pop", "High Contrast", or "Cinematic", which are optimized for visibility. However, it’s important to adjust intensity levels carefully to avoid an artificial or overly polished look.
| Tool Feature | Primary Function | Best For |
|---|---|---|
| 2× Upscaler | Doubles resolution | Slightly blurry images; takes ~10 seconds |
| 4× Upscaler | Quadruples resolution | Low-res images; takes ~30 seconds |
| Color Enhancer | Professional color grading | Reviving flat or dull images |
| AI Inpainting | Targeted regeneration | Fixing specific artifacts or localized noise |
| Auto-Optimize | Contrast and readability fix | Final polish before publishing |
For optimal results, begin by upscaling to create a sharp base image, then enhance colors to add vibrancy. Use 2× upscaling for moderately blurry images and 4× for very low-resolution ones. When AI tools don’t fully meet your needs, manual adjustments can provide the precision required.
Manual Noise Adjustment Settings
Manual adjustments offer a higher degree of control, particularly when automated tools fall short. These settings allow you to address both luminance noise (monochromatic grain) and color noise (colored splotches).
Start by tackling color noise. Using the "Color" slider can help eliminate rainbow-like artifacts that draw attention away from your subject while preserving sharpness. This alone can make a noticeable difference.
Next, address luminance noise. Begin with the slider set to zero and increase it incrementally. If the image starts to look overly smooth or "waxy", adjust the "Luminance Detail" slider to reintroduce fine textures, such as skin pores or fabric details. Striking the right balance is key to achieving a natural look.
"The best result is almost never the one with the highest technical score. It's the one that looks the most natural and preserves the essential details and textures of the original subject while minimizing distracting noise."
– MyImageUpscaler
Avoid sharpening the image before reducing noise, as this can amplify the noise further. Always clean the image first, then apply sharpening. To maintain sharpness without adding noise, use a Masking slider during sharpening. This confines sharpening to high-contrast edges, such as text or facial outlines, while leaving smoother areas untouched. For example, in Adobe Camera Raw, holding Alt (Windows) or Option (Mac) while moving the masking slider lets you preview which areas will be sharpened.
Perform these adjustments while zoomed in at 100% or more to accurately judge the balance between noise removal and detail retention. Finally, check your thumbnail at around 120 pixels wide to ensure key elements remain clear, especially for mobile viewers.
Pre- and Post-Denoising Optimization
The quality of your thumbnail starts with how it’s generated. Use descriptive terms like "bold", "high contrast", or "sharp focus" in your initial prompts to reduce noise from the outset and minimize the need for heavy post-editing.
The order of your editing steps is crucial. Always reduce noise before upscaling, as upscaling a noisy image will magnify imperfections. Early noise reduction also ensures a cleaner base for subsequent edits, like sharpening or color adjustments.
"AI-driven noise reduction isn't just filtering; it's reconstruction. The model uses its learned knowledge of clean images to rebuild the details that were obscured by noise."
– MyImageUpscaler
For thumbnails with text, upscale the background image first and overlay the text afterward. Upscaling pre-existing text can lead to softening, reducing its clarity. YouTube recommends a 1280×720 resolution for thumbnails, but upscaling to 2560×1440 can help preserve details through YouTube’s compression process. When saving, opt for PNG format to maintain quality at smaller file sizes.
Finally, use Auto-Optimize tools to fine-tune contrast and vibrancy, ensuring your thumbnail looks great on mobile devices. In ThumbnailCreator, this feature costs 1 credit per use and can even analyze element placement to prevent key features from being obscured by YouTube’s UI elements, like the timestamp.
For ongoing improvement, provide feedback to the AI by marking problematic thumbnails with comments like "distorted face." Modern tools also offer layer-based editing and undo/redo history, allowing you to experiment without risking the original image.
Using ThumbnailCreator for Noise Reduction
ThumbnailCreator offers built-in tools that help you tackle noise issues right from the start. These features are designed to fit neatly into your noise reduction workflow, ensuring every thumbnail looks sharp, clean, and ready to grab attention. With AI templates, face swapping, and precision editing tools, the platform helps you create professional thumbnails without common AI-generated flaws.
Using AI Templates for Clean Designs
AI templates provide a strong starting point by using pre-processed elements derived from over 3 million successful thumbnails. This reduces the chances of noise during the initial creation process. When crafting custom designs, keep your text prompts concise - under 200 words - and include clear visual instructions like "bold yellow text" or "dark moody background" to guide the AI toward cleaner results.
To maintain consistency and minimize unpredictable artifacts, you can set Design Rules or Style References. For instance, if certain color schemes or layouts consistently produce better results, save them as default parameters. The Style Cloning feature further elevates your designs by mimicking the look of established, high-quality thumbnails, ensuring a polished and noise-free appearance.
For fine-tuning, the Edit with AI tool allows you to make targeted changes - like boosting vibrancy or tweaking text - without regenerating the entire image. This approach keeps the clean parts intact while addressing specific problem areas. Finally, use the Auto-Optimize tool (1 credit per use) to enhance contrast and improve the separation between elements. This step clarifies any lingering noisy areas and ensures your thumbnail remains readable, even at smaller sizes.
If certain elements still need improvement, object and face swapping can take your thumbnail quality to the next level.
Object and Face Swapping for Better Quality
AI-generated faces can sometimes appear distorted, distracting from the overall design. The Face Swap feature solves this by replacing flawed faces with high-quality, trained models. You can create a custom AI face model using just 3–5 high-resolution photos, ensuring lifelike, noise-free facial features.
For other noisy elements, the Paint to Edit tool provides precise control. For example, if an AI-generated hand looks distorted, you can mask that specific area and instruct the AI to "clean up details" or "replace with a solid color." This method is faster than regenerating the entire image and preserves the rest of your design.
After swapping, fine-tune the expression control settings to align lighting and emotions, avoiding the artificial look that can sometimes introduce visual noise. These adjustments ensure your thumbnails look professional and polished, ready to make an impact.
Common Mistakes and How to Preserve Details
Cleaning up your thumbnail with advanced tools can produce impressive results, but it’s easy to undo all that work with a few missteps. One common error is overusing noise reduction, which can leave your thumbnail looking flat and unnatural. The trick is to remove distracting noise while keeping the sharp edges and fine details that make your image stand out.
Avoiding Over-Smoothing
Over-smoothing often happens when traditional scaling methods blur the edges of an image, leading to a loss of clarity. This is especially noticeable on faces and skin tones, where details can become muddy. AI-based reconstruction, on the other hand, identifies key patterns - like the curve of a face or the outline of text - and works to protect those details.
Here’s a tip: avoid upscaling rasterized text directly. Instead, upscale the background first, then overlay sharp, clean text to ensure it stays readable.
Another issue arises when working with very small images, typically under 640×360 pixels. These can introduce unwanted artifacts, especially in low-resolution screenshots (often around 72 DPI). In such cases, a 4× upscale gives the AI more room to reconstruct details effectively. For standard 720p sources, a 2× upscale is usually sufficient.
Finally, focus on striking a balance between noise reduction and sharpness to avoid compromising the image's quality. Using free thumbnail tools can help you achieve this balance without additional costs.
Balancing Noise Reduction and Sharpness
Once you’ve reduced noise, maintaining sharpness is key to ensuring your thumbnail looks clear, even at smaller sizes. YouTube suggests a thumbnail resolution of 1,280×720 pixels with a file size limit of 2MB. To preserve details during YouTube’s compression, consider upscaling to 2,560×1,440 (2×).
After processing, test your thumbnail at 120×67 pixels - YouTube’s smallest display size. This ensures the image remains legible and visually appealing, even when downscaled. Use bold fonts at 70pt or larger, and keep text short - 3 to 5 words is ideal for clarity. For the sharpest text, export your thumbnail as a PNG file.
It’s also important to note the limitations of upscaling. While it can enhance sharp, small sources, it won’t recover details lost to heavy motion blur or extreme JPEG artifacts. In such cases, recapturing the original image is usually the better route.
Conclusion
Minimizing noise in AI-generated thumbnails is essential for protecting your channel's reputation and making every click count. With mobile viewers expecting sharp, attention-grabbing visuals, a cluttered or blurry thumbnail can cost you clicks. In fact, the difference between a poorly optimized thumbnail and a polished one often directly impacts click-through rates. Top creators regularly achieve CTRs of 10% or more with well-designed thumbnails.
The challenge lies in striking the perfect balance - eliminating distracting elements while keeping the sharp details that make your thumbnail pop.
"Remove AI weirdness. Extra fingers, inconsistent shadows, fake-looking text, and cluttered backgrounds kill trust fast."
– Caleb Leigh, Founder of CreatorSkills
With viewers making decisions in under two seconds, every pixel truly matters.
To streamline this process, consider tools like ThumbnailCreator's Auto-Optimize feature. It enhances contrast and readability without over-processing, ensuring your thumbnails look clean and natural. The platform also includes a mobile optimization check, guaranteeing legibility even at 120 pixels wide. And at just 1 credit per use, it’s a quick, cost-effective way to refine your designs. Whether you’re starting fresh with AI-generated images or tweaking existing ones, this tool takes care of the technical details, leaving you free to focus on your content.
Before wrapping up your design, try the "Postage Stamp Test." Shrink your thumbnail down to confirm that all key elements remain clear and impactful at a smaller size. If they don't, it’s a sign to address visual clutter. As mentioned earlier, reducing noise is only half the battle - preserving detail is equally important. Clean, professional thumbnails not only build trust but also convey your video’s value instantly, driving more clicks in the process.
FAQs
How can I tell if my thumbnail has luminance noise, color noise, or AI artifacts?
Luminance noise looks like uneven brightness or a grainy texture, especially noticeable in areas that should appear smooth. Color noise, on the other hand, appears as random specks of color scattered across the image. AI artifacts are distortions or unnatural patterns, often showing up as pixelation or odd textures. To spot these problems, pay close attention to smooth surfaces or areas with fine details.
What’s the best order for denoising, upscaling, sharpening, and adding text?
When working with AI-generated thumbnails, following the right sequence can make all the difference in achieving a polished, high-quality result. Here's the recommended process:
- Start with denoising: This step removes unwanted artifacts and ensures the image looks clean.
- Upscale next: Increasing the resolution at this stage guarantees the image maintains proper detail and size.
- Sharpen the details: Enhancing edges and fine details brings clarity and makes the image pop.
- Add text last: Applying text as the final step ensures it remains crisp and legible without affecting the overall image quality.
By sticking to this order, you can create thumbnails that are both visually appealing and professional. Each step builds on the last, ensuring the best possible outcome.
When should I use AI inpainting instead of global noise reduction?
When you need to make precise edits to specific parts of a thumbnail, AI inpainting is your go-to tool. It lets you focus on targeted areas and regenerate them with detailed precision, giving you full control over the modifications.
On the flip side, global noise reduction works across the entire image, smoothing out noise for broader, overall adjustments.
Use inpainting when you want to refine particular elements without altering the rest of the thumbnail. For general improvements, stick with global noise reduction.