

How to plan YouTube thumbnails before filming
Plan the title, thumbnail layout, and photo shot list before filming. Start with one promise the video can prove, then sketch three layouts using YouTube thumbnail ideas to decide which poses, props, and backgrounds the shoot needs.
- Match the title and image: Let the title name the topic and the thumbnail show the result.
- Check the layout: Preview it at phone size, leave room for text, and save one backup concept.
- Plan the photos: List face shots, prop photos, and clean backgrounds. Take dedicated 16:9 stills while the set is ready.
- Review and test: Build 2–3 versions, change one main element at a time, and check every visual claim against the video. Use thumbnail A/B testing in YouTube Studio where available.
Keep the approved brief and shot list with the call sheet so the planned thumbnail photos are taken before the shoot ends.
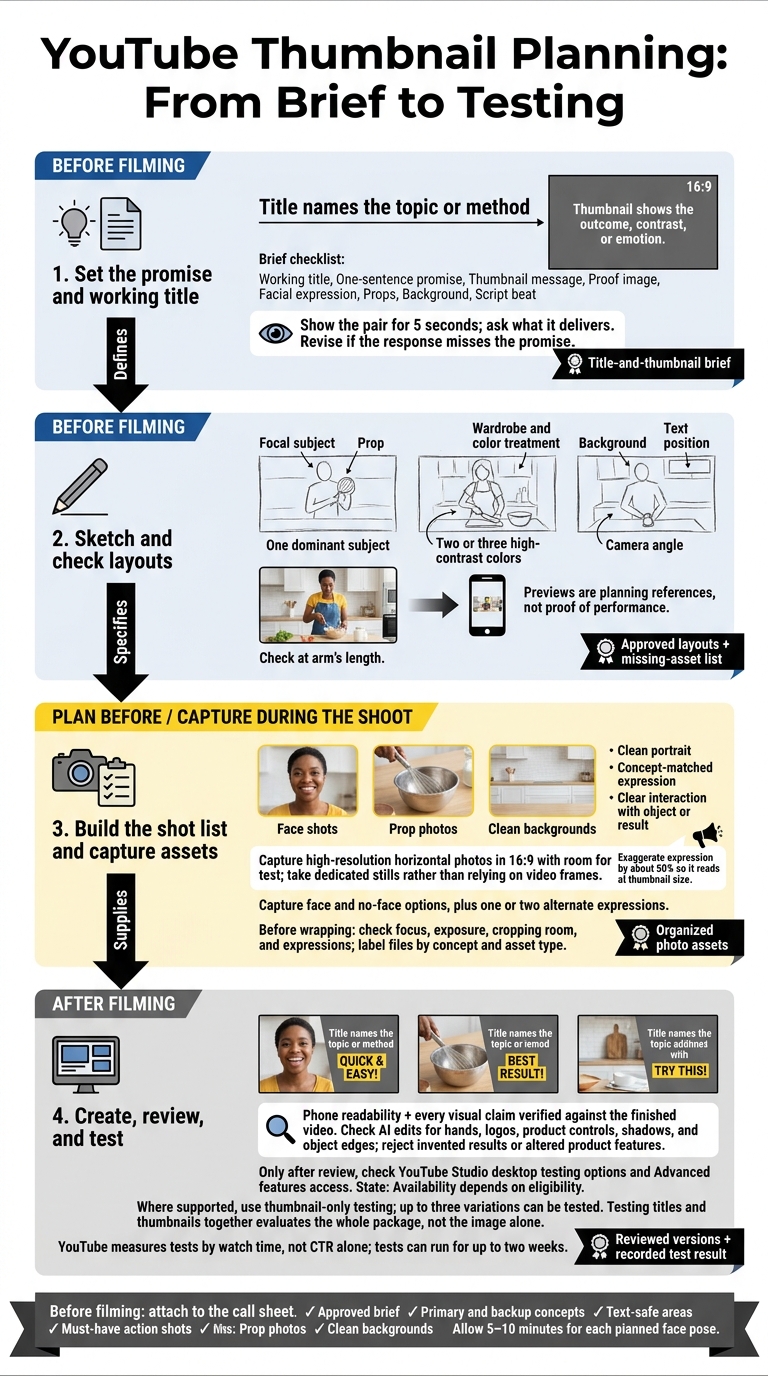
YouTube Thumbnail Planning: From Brief to Testing
1. Set the video promise and working title
Choose one result, problem, or transformation
Choose one promise you can prove on camera. Then name the single proof image that shows you've delivered it. This promise guides what you need to film. If you can't get that image, narrow the promise or change the planned demonstration.
Write titles that work with the image
Give the title and thumbnail different jobs. The title names the topic or method. The thumbnail shows the outcome, contrast, or emotion.
Check every claim before choosing a title. This ensures you avoid misleading clickbait and maintain viewer trust. Any timeframe, number, or comparison must appear in the video.
Create a title-and-thumbnail brief
Write one labeled brief for each concept. Include the working title, one-sentence promise, thumbnail message, proof image, facial expression, props, background, and script beat.
Mock up the title and thumbnail together in ThumbnailCreator before you lock the shoot plan. Show the pair to someone unfamiliar with the video for 5 seconds, then ask what they think it delivers. If their answer misses your promise, revise the pair. Use the brief to build your thumbnail shot list before filming.
sbb-itb-b59debf
Packaging first: how I pick a title and thumbnail before I film
2. Sketch thumbnail layouts before the shoot
Use the brief to sketch three rough thumbnail layouts before choosing wardrobe or setting the camera position. Label each sketch with the focal subject, required prop, wardrobe and color treatment, background, text position, and camera angle.
Stick to boxes and placeholders, not finished art. The goal is to see what you still need to shoot. These sketches become your thumbnail shot list.
Choose the main subject, props, and colors
Choose a face to show emotion, an object to show the product, or a result to show the outcome. Use a before-and-after layout only when viewers can compare both images on the same terms. Make one subject dominant. Props should support it, not compete for attention.
Pick recognizable props, wardrobe that stands out from the background, and two or three high-contrast colors. Leave room for text instead of squeezing it around the subject. Skip patterned clothing, cluttered shelves, and tiny product labels that disappear at smaller sizes. YouTube recommends simple designs, readable fonts, and deliberate composition.
Preview layouts with ThumbnailCreator
Use ThumbnailCreator to generate rough concepts or modify templates. For each preview, specify the working title, premise, subject, prop, expression, camera angle, colors, and text position. Test spacing and balance with text editing, face swapping, and object swapping.
Treat the output as a planning reference, not proof of performance. Check that the face, product, props, and suggested result match what you can actually film. Use the strongest preview to decide which poses, props, and angles you need to shoot.
Check layouts at mobile size
Shrink each preview to phone size and view it at arm’s length. If the subject is hard to recognize or the text blurs together, remove details, enlarge the focal point, or make the foreground stand out more clearly from the background.
Save one primary layout and one backup, each with its matching title, framing, poses, props, wardrobe, and text space. Add any missing assets - such as an isolated product photo, reaction close-up, or clean background - to the production plan before filming.
3. Build a thumbnail shot list
Use the brief and sketch from the first two steps to turn each thumbnail idea into a photo plan. Add time for thumbnail photos to each setup so you get the shots while the set is ready.
Plan framing and video stills
Turn each chosen layout into a shoot checklist. For every concept, note the subject, camera angle, framing, expression, hand position, background, lighting, and which concept the shot matches. Plan high-resolution horizontal photos in 16:9 (unless you are optimizing for YouTube Shorts), leaving room for headline text. Position the subject on one side, use clean light from a ring light or window, and shoot from just above eye level.
Mark the must-have action moment and take a dedicated still rather than relying on a video frame. A separate photo gives you more control over the pose, expression, and angle.
Plan face shots and prop poses
Get a clean portrait, an expression that fits the concept, and a clear interaction with the main object or result. Exaggerate the expression by about 50% so it reads clearly at thumbnail size. Keep the face unobstructed and the prop visible, with fingers away from important details.
If the face sits on one side of the frame, direct its gaze toward the center or text area. For product videos, photograph the real item when details such as connectors, finish, or the display prove the result.
Photograph props and backup assets
Photograph props on their own and backgrounds without the subject so you can composite text or accent graphics later. Get backup versions: face and no-face options, plus one or two alternate expressions.
Before wrapping, check focus, exposure, cropping room, and expressions to reduce reshoots. Label files by concept and asset type so portraits, prop shots, and backgrounds are easy to match during editing. Use these assets to test versions in the next step.
4. Create and test thumbnail versions
Change one element at a time
Use your shot-list assets to make 2–3 thumbnail versions, keeping the title and promise fixed. Build each version with the planned poses, props, and backgrounds.
Change just one main feature per version: the expression, prop placement, background treatment, or text emphasis. Label each file with its concept and target promise to keep the thumbnail tied to the title. Use ThumbnailCreator to generate variations, then check that nothing else changed by accident.
Check readability and accuracy before upload
View each version on a phone at default brightness. The subject should stand out immediately, and viewers should be able to read the text without zooming. Use 1–4 words that add to the title rather than repeat it. Cut details that compete with the subject.
Check every visual claim against the finished video. Review AI edits at full resolution, paying close attention to hands, logos, product controls, shadows, and object edges. Reject edits that invent results, alter product features, or show events the video never proves. YouTube’s thumbnail policy prohibits images that lead viewers to expect content that isn’t in the video. Complete this review before moving into Studio testing.
Check testing options in YouTube Studio
Once the thumbnail passes review, check the video’s test options in YouTube Studio on desktop and confirm access to Advanced features. Eligibility depends on the video’s format, status, and audience restrictions. Where supported, you can test up to three title or thumbnail variations.
Choose thumbnail-only testing to isolate visual changes. Testing titles and thumbnails together measures the whole package, not the image alone.
Keep pre-upload checks separate from audience testing. Clarity and accuracy are requirements - not proof that a thumbnail will perform well. Record the result, but don’t turn a small win into a rule for your next video. YouTube measures tests by watch time, not CTR alone, and tests can run for up to two weeks.
Conclusion: Review your pre-filming checklist
Before the shoot, lock the approved concept into the call sheet. Save the approved title-thumbnail brief with your call sheet, including the promise, title, main subject, text, colors, and one backup concept. Consult our YouTube thumbnail guides for niche-specific best practices. Mark text-safe areas before setting the camera position.
Pack the main props and replacements, and plan backup compositions. Allow 5–10 minutes for each planned face pose. Note the must-have action shots, prop photos, and clean backgrounds so you know what to get before rolling.
Check ThumbnailCreator previews for missing props, expressions, or text-safe areas. Add any missing shots to the call sheet, then use those preview gaps to finalize the shot list.
FAQs
How do I plan a thumbnail before knowing the outcome?
When outlining, pinpoint the curiosity gap or emotional trigger that will draw viewers in. Sum up your video’s promise in one sentence. Then sketch thumbnail layouts with props, facial expressions, or key visuals. Use ThumbnailCreator’s AI video ideation tools to generate concepts based on your planned title and topic.
While filming, record 10–20 seconds of varied poses in 4K. This gives you high-quality source material that fits your planned composition.
Which thumbnail shots should I prioritize on a tight schedule?
Get high-quality shots of your main subject - your face, product, or primary result - while filming. Record 10–20 seconds of different expressions or poses in 4K at 60 FPS so you can skip a separate photoshoot. Exaggerate facial expressions by 50% to make them easier to see on mobile, and keep your eyes along the top third of the frame.
In post-production, use ThumbnailCreator to swap faces or objects into ready-made templates for a polished, consistent look.
How can I keep AI thumbnail concepts realistic?
Build your AI thumbnail concepts around your final title, target viewer, and key video frames. In ThumbnailCreator, use references like your face or brand guidelines to keep the visuals consistent with your channel.
Keep expressions, settings, and results true to the video. Avoid misleading claims or outcomes, check that AI-edited faces and objects look natural, and compare the finished thumbnail with your footage.