
Ultimate Guide to Scheduling YouTube Promotions
Want your YouTube videos to perform better? Timing is key. This guide breaks down how to schedule and promote your videos effectively to grow your audience, boost engagement, and make the most of YouTube’s algorithm.
Key Takeaways:
- Consistency matters: Posting 12+ videos per month can grow views 8x faster and subscribers 3x faster.
- Timing is critical: Schedule uploads 1–2 hours before your audience’s peak activity.
- First 48 hours are crucial: YouTube evaluates metrics like click-through rates and watch time to decide if your video should be promoted more widely.
- Thumbnails drive clicks: 70% of YouTube clicks come from thumbnails - design them to stand out.
- Use tools for efficiency: Platforms like YouTube Studio and ThumbnailCreator can streamline scheduling and thumbnail creation.
Quick Tips:
- Pre-launch (1–2 days before): Finalize your thumbnail, prepare social media posts, and conduct keyword research.
- Launch (first 48 hours): Promote across platforms, reply to comments, and share clips to boost engagement.
- Post-launch (days 2–7): Reshare on platforms like LinkedIn or Pinterest and embed videos in blog posts.
- Use Analytics: Check your audience’s peak activity times and adjust your schedule for better performance.
- Batch content: Save time by creating multiple videos and thumbnails in advance.
Get the timing, tools, and visuals right, and you’ll see better results from your YouTube promotions.
How To Create YouTube Promotions
To maximize the impact of your promotions, ensure your visuals are high-quality by following an AI thumbnail generation guide to create professional designs quickly.
sbb-itb-b59debf
Building a Promotion Schedule
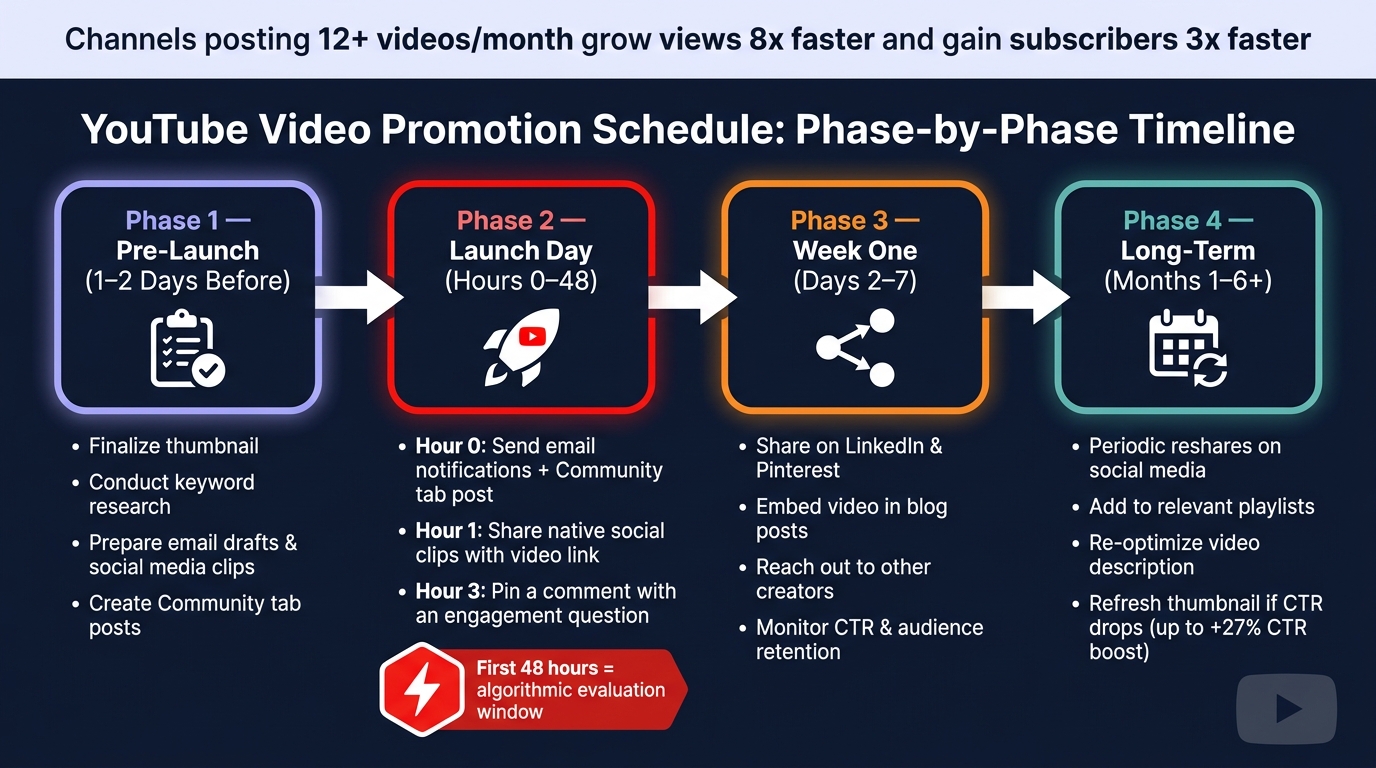
YouTube Video Promotion Schedule: Phase-by-Phase Timeline
Key Phases of a Promotion Timeline
Creating a promotion schedule involves three main stages: pre-launch, launch, and post-launch. Each phase has a distinct purpose in ensuring your video gets the attention it deserves.
Pre-launch (1–2 days before): Treat this as your prep period. Use this time to finalize your thumbnail style, conduct keyword research, and prepare assets like email drafts, social media clips, and Community tab posts. Think of this phase as setting the stage for your video's success.
Launch (first 48 hours): The moment your video goes live, the clock starts ticking. At hour 0, send out email notifications and post updates on the Community tab. By hour 1, share short native clips on social platforms with links to the full video. Around hour 3, pin a comment on your video with a question to encourage engagement. Why is this timeline so crucial? YouTube evaluates key metrics like click-through rates and watch time during the first 48 hours to decide if your video should be promoted to a wider audience.
Post-launch (days 2–7 and beyond): Don’t let your efforts stop after the first day. Share your video on platforms like LinkedIn and Pinterest, and embed it in blog posts to capture ongoing search traffic. Resharing the video periodically and adding it to playlists can help keep it relevant for months.
| Phase | Timing | Key Actions |
|---|---|---|
| Pre-Publish | 1–2 Days Before | Keyword research, thumbnail prep, asset creation |
| Launch Day | Hours 0–24 | Email list, Community tab, social clips, reply to comments |
| Week One | Days 2–7 | LinkedIn/Pinterest sharing, blog embeds, creator outreach |
| Long-Term | Months 1–6+ | Periodic reshares, playlist updates, description re-optimization |
To maximize your video's reach, use YouTube Analytics to identify when your audience is most active.
Using YouTube Analytics to Plan Your Schedule
YouTube Analytics is your go-to tool for figuring out the best time to publish. Navigate to the "When your viewers are on YouTube" heatmap in the Audience section of YouTube Studio. The darkest purple bands indicate when your audience is most active.
Here’s the trick: publish your video 1–2 hours before peak activity. This gives YouTube time to index your video, process HD versions, and send out notifications. By the time your audience logs on, your video will already have momentum. For example, a finance creator adjusted their Shorts release time to 4 p.m., ahead of a 6–8 p.m. peak, and saw a 29% increase in views per impression and a 22% boost in subscriber growth over eight weeks.
"The 48-hour window is what matters. The majority of a video's algorithmic push happens in the first two days. What your initial test pool does in that window determines whether YouTube amplifies or ignores your content." - SocialPilot
Keep in mind that timing varies by content type. Long-form videos tend to perform best between 8 a.m. and 11 a.m. on Sundays, Tuesdays, and Mondays. On the other hand, YouTube Shorts often peak in the evenings, especially on Fridays at 4 p.m., 6 p.m., and 7 p.m.. If your audience spans multiple time zones, check the "Top Geographies" report to prioritize the region that contributes the most watch time.
With these insights, you can create a structured content calendar to keep everything on track.
How to Build a Content Calendar
A content calendar is a straightforward tool - something as simple as a spreadsheet - that helps you organize every aspect of your video release process. Use it to track details like video titles, publish schedules, thumbnail progress, and cross-promotion plans.
Make sure to include deadlines for scripting, filming, and editing to avoid last-minute stress. Also, tag videos that can be repurposed into 30–60 second vertical clips for Shorts or social media. When repurposing, ensure you use optimized YouTube Shorts thumbnails to maintain high click-through rates on mobile. Batch-producing these assets can save you 8–12 hours per week.
Here’s a practical tip: upload your video as "Unlisted" 2–3 hours before its scheduled release. This ensures it’s fully processed - keep in mind that a 10-minute 1080p video can take 30–60 minutes to process, while 4K videos may take 2–4 hours. Channels that stick to a consistent posting schedule often see 20–30% higher notification click rates, so establishing a routine can pay off.
Optimizing Thumbnails for Scheduled Promotions
When planning a promotion schedule, every detail matters - especially thumbnails. These small but mighty visuals can significantly influence viewer engagement and drive action.
Why Thumbnails Matter for Promotion Success
Thumbnails are often the first thing viewers notice. In fact, 90% of top-performing YouTube videos use custom thumbnails. A strong thumbnail not only boosts click-through rates (CTR) but also signals YouTube's algorithm to increase your video's visibility.
Consistency in thumbnail design can make a big difference. Using a unified color scheme, fonts, and layout has been shown to improve viewer retention by 22% on average. On mobile devices, where thumbnails can shrink to just 150–168 pixels wide, clarity is crucial. High-contrast color combinations with a contrast ratio above 4.5:1 can improve CTR by 12%. Including a human face with a clear, expressive emotion can further increase CTR by 15%. Stick to 3–5 bold words for text and avoid simply repeating the video title.
Designing Thumbnails with ThumbnailCreator
Not everyone has the time or design expertise to create eye-catching thumbnails. That’s where ThumbnailCreator comes in. This tool uses AI to generate layered backgrounds and custom text overlays from a simple prompt in just 15 seconds.
ThumbnailCreator also offers features like pre-made templates, face swapping, object swapping, and text editing. These tools are ideal for YouTube creators looking to maintain consistent branding across multiple thumbnails. The Pro plan provides unlimited thumbnail generation and access to all advanced features, making it a valuable resource for scaling your efforts.
Once your thumbnail is ready, tailoring it to fit different platforms ensures consistency and maximizes its impact.
Resizing Thumbnails for Various Platforms
Different platforms require different thumbnail dimensions. For YouTube, the standard size is 1,280 x 720 pixels with a 16:9 aspect ratio. For YouTube Shorts and vertical platforms, use 1,080 x 1,920 pixels with a 9:16 format.
To ensure key elements like faces, text, and focal points remain prominent, keep them within the center 960 x 540 pixels of your standard thumbnail. Avoid placing critical imagery in the bottom-right corner, as YouTube’s video duration timestamp may obscure it.
Want to test your design? Use the "Stamp Test": shrink your thumbnail to about 120 pixels wide. If the text and focal point are still clear, your thumbnail is likely to perform well on mobile feeds. Creating 2–3 reusable templates with consistent fonts and colors can simplify the process and maintain a cohesive look across platforms.
Step-by-Step Guide to Scheduling Promotions
How to Schedule Standard YouTube Uploads
YouTube Studio guides you through four key steps when uploading videos: Details (where you add the title, description, and tags), Video Elements (like cards and end screens), Checks (a copyright scan), and Visibility (where you set the publish date and time). Pay special attention to your title and thumbnail design strategies during the Details step - they’re the first things viewers notice.
Timing matters. Use the "When your viewers are on YouTube" report in Analytics to identify when your audience is most active. Then, schedule your video to go live 1–2 hours before their peak activity. Channels that align their uploads with audience activity data often see 30% higher watch time.
Here are a few tips to keep in mind:
- Rename your video file to include target keywords (e.g.,
youtube-promotion-schedule.mp4) before uploading. - Allow enough time for HD processing and copyright checks to finish before your scheduled publish time.
- Remember, the "Published on" date shown on YouTube is based on Pacific Standard Time (PST), so adjust accordingly if you're in a different time zone.
These steps work best when tied to your content calendar and overall promotion strategy. Each upload should contribute to your broader goals.
For a more interactive approach, consider using YouTube Premieres.
How to Schedule YouTube Premieres
A Premiere transforms your video debut into a live event, complete with a countdown, live chat, and subscriber notifications. To set one up, upload your video in YouTube Studio, go to Visibility, select Schedule, and check the "Set as Premiere" box. You can also customize the countdown theme and add a trailer (15 seconds to 3 minutes long) to play on the watch page before the Premiere starts. Keep in mind, the trailer feature requires at least 1,000 subscribers and no active Community Guideline strikes.
Schedule your Premiere at least 24 hours in advance. This gives your thumbnail time to appear in subscribers’ feeds and allows you to promote the event. Share the public watch page URL and encourage viewers to click "Notify Me" - they’ll receive alerts 30 minutes before and again when the Premiere begins. During the event, stay active in the live chat by pinning questions, responding to comments, and acknowledging Super Chats or new members to keep the energy high.
| Feature | Standard Upload | YouTube Premiere |
|---|---|---|
| Live Chat | No | Yes (during debut) |
| Countdown | No | Yes (customizable) |
| Trailer | No | Yes (if >1,000 subs) |
| Notification Timing | At publish time | 30 mins before & at start |
| Recommended Lead Time | Immediate or scheduled | 24+ hours in advance |
As with standard uploads, align your Premiere schedule with your content calendar and promote it across the platforms in your cross-promotion plan.
Now, let’s talk about Shorts, which require a different scheduling approach.
How to Promote YouTube Shorts
Shorts work on a faster timeline compared to long-form videos. The first 60 minutes after posting are critical - early engagement (views, likes, and comments) can significantly boost its chances of appearing in the Shorts feed or homepage. Schedule Shorts for times when you can actively reply to comments right after posting.
If you’re using Shorts to build buzz for a longer video, post the Short 2–3 days before the main upload. This creates momentum without overlapping impressions. If you’re cross-posting the same clip to TikTok or Instagram Reels, stagger those posts by 2–4 hours to reach different engagement peaks on each platform.
| Platform | Best Posting Window | Notes |
|---|---|---|
| YouTube Shorts | Weekends 9 AM–12 PM; Weekdays 5–7 PM | Algorithm may surface videos days later |
| TikTok | Weekdays 7–9 PM; Weekend mornings | Rewards frequent posting |
| Instagram Reels | Weekdays 11 AM–1 PM | Peaks at lunchtime; lower late-night activity |
Make sure your Short has a 9:16 vertical aspect ratio and include #Shorts in the title or description so it’s categorized correctly. YouTube Studio allows you to schedule up to 100 videos in advance, making it easier to batch-create and maintain a consistent posting schedule. As always, tie your Shorts schedule back to your content calendar to ensure every post supports your larger promotional goals.
Tracking and Improving Your Scheduled Promotions
Metrics to Track After Each Promotion
Once your video goes live, it’s time to dive into the numbers to see how well your schedule is working. Two key stats to focus on are click-through rate (CTR) and audience retention. CTR tells you how well your thumbnail and title are grabbing attention - thumbnails alone drive about 70% of clicks. Following thumbnail design guides can help you hit these benchmarks. Audience retention, on the other hand, shows how much of your video people are sticking around to watch. On average, YouTube videos only keep 23.7% of viewers engaged, but even a small 10% boost in retention can translate into a 25%+ increase in impressions.
You should also keep an eye on traffic sources in YouTube Studio Analytics. This helps you figure out if viewers are finding your video through Search, Suggested Videos, or the Shorts Feed. For Shorts, pay close attention during the first 48 hours, as that’s when the algorithm gives new content the most visibility.
By analyzing these metrics, you can fine-tune your posting schedule to maximize results.
Refining Your Posting Schedule
If your video’s early performance isn’t meeting expectations, it might be time to tweak your posting schedule. Use the "When your viewers are on YouTube" heatmap in YouTube Studio Analytics to find peak activity times. To give your video a head start, aim to upload 1–2 hours before those peak periods so it has time to get indexed.
Posting frequency is another factor to consider - but not in the way you might think. According to Todd Beaupré, Senior Director of Growth and Discovery at YouTube:
"Upload frequency is not a factor that the YouTube algorithm focuses on. The algorithm is designed to focus on current video performance, not past performance or upload frequency."
Instead of flooding your channel with content, focus on consistency. Channels that post 12 or more videos a month tend to grow views 8x faster and subscribers 3x faster compared to less active channels. To maintain a steady schedule, consider batch-filming several videos at once so you always have content ready to go.
Updating and Re-promoting Older Content
Don’t let your evergreen videos gather dust. Updating proven content can breathe new life into it. For example, if an older video’s views are dropping, a refreshed thumbnail could increase its CTR by up to 27%. When sharing the video on social media again, tweak the title or description to keep it fresh for your audience.
To identify good candidates for updates, sort your videos in YouTube Studio Analytics by their performance over the last 90 days. Focus on those that performed well historically but have seen recent dips. When re-promoting, time your posts 2–3 hours before your audience’s peak activity to give the algorithm time to work. If your viewers are spread across different time zones, stagger your re-promotions to reach them effectively.
Conclusion: Getting the Most from Scheduled Promotions
Promoting your YouTube content successfully comes down to timing, consistency, and visuals that grab attention. Use your analytics to pinpoint the best times to post and build momentum early. Sticking to a regular posting schedule is a game-changer - consistency plays a huge role in channel growth. And don’t underestimate the power of visuals: if your scheduled video isn’t attracting clicks, your thumbnail is likely the culprit.
"The creators who sustain long-term growth treat promotion as a system, not an occasional activity." - VidOrange
Every detail matters when it comes to promotion, and visuals are no exception. Tools like ThumbnailCreator simplify the process of creating bold, click-worthy thumbnails, even if you have zero design skills. Designing thumbnails in batches alongside your content calendar can save time and help you avoid those last-minute scrambles before publishing.
One of the most impactful changes you can make is shifting from reactive to proactive publishing. Earlier sections highlighted the importance of regular audits and maintaining a content buffer. Review audience heatmaps often, keep a 1–2 week buffer of content ready, and make thumbnail creation a seamless part of your production process. These steps will help you stay on track with the scheduling system outlined in this guide.
FAQs
How do I find my best upload time?
To figure out the best time to upload on YouTube, dive into YouTube Studio and check when your audience is most active. This data gives you a clear idea of when your viewers are online, helping you schedule uploads at the right moment.
For long-form videos, weekdays between 2–4 PM tend to perform well. On the other hand, Shorts see better engagement when posted from midday to evening. By blending these platform insights with general timing trends, you can boost both engagement and visibility.
What should I do in the first 48 hours?
When you publish a new YouTube video, the first 48 hours are crucial. During this time, YouTube’s algorithm pays close attention to early metrics like views, watch time, likes, and comments to gauge the video’s potential for wider promotion.
Make the most of this window by actively promoting your video. Share it across your social media platforms, interact with viewers in the comments, and encourage them to engage - whether through likes, shares, or even starting conversations. These actions can help amplify your video’s reach during this critical period.
When should I use a Premiere vs a normal upload?
Use a Premiere when you want to create buzz and interact with your audience during a video’s debut. Premieres allow you to schedule a video and include a live chat feature, making the release feel like a shared, interactive event. This is especially great for things like special announcements or product launches.
For your regular uploads, a standard video works better. It’s simple, skips the build-up, and doesn’t include live chat - perfect for maintaining a steady flow of content without the extra fanfare.